Let's get your machine working
Dyson DC17 Full Kit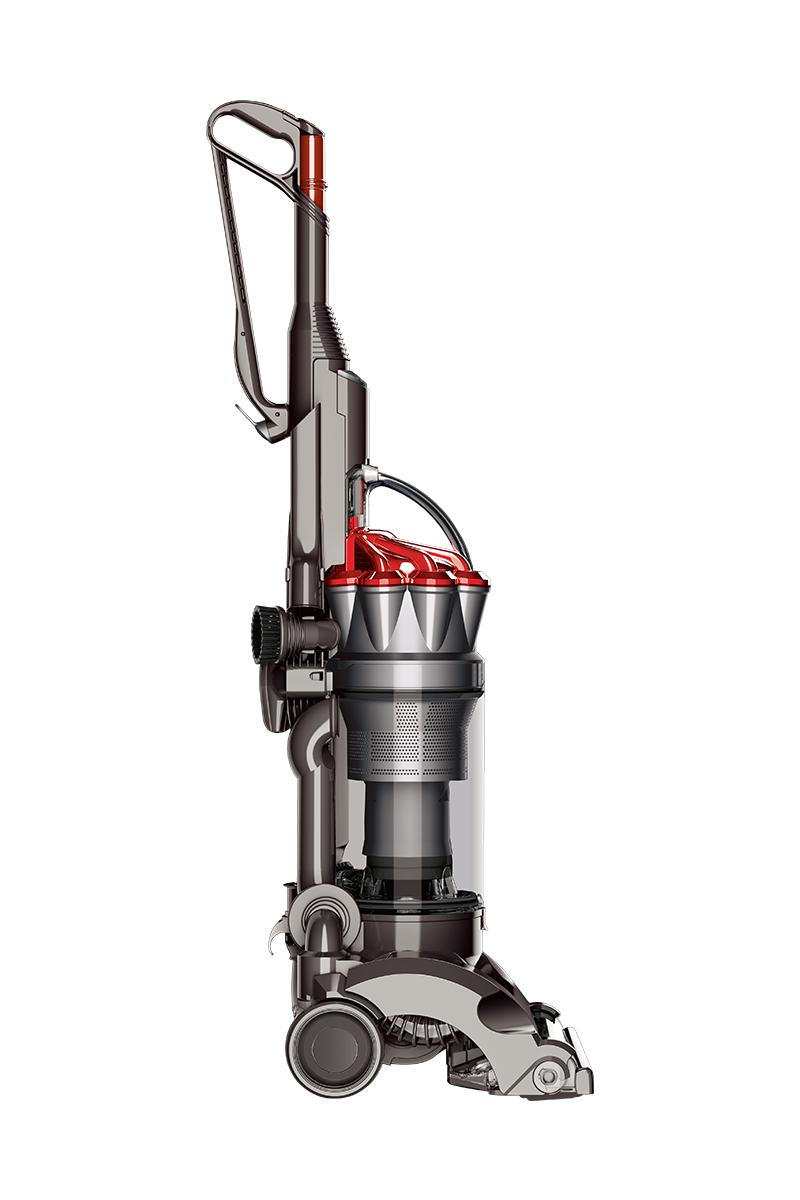
Let's get your machine working
Dyson DC17 Full Kit
Most common topics
Please select the appropriate option
How to clean the bin and cyclone
Remove the bin by pressing the catch on top of the carry handle.

Push the button to release dust directly into a dustbin or bag.

Release the bin from the cyclone by pressing the release catch.

Clean the cyclone with a dry cloth and shake or tap firmly to remove all dust from inside the fine dust collector. Do not get any part of the cyclone damp or wet.
You can use cold water to clean the clear bin.
WARNING: Do not use detergents or other chemicals.
Ensure the bin is completely dry before attaching back to the cyclone, and press firmly on the center of the clear bin base to close before placing back on the machine.
Please select the appropriate option
Please select the appropriate option


What sort of noise?
Test the suction
A whistle suggests that air is escaping due to a missing seal or blockage.
Make sure the machine is standing in the upright position.
Pull back the Wand cap.
Turn the machine on and place your hand on the end of the Wand.
Is the suction strong or weaker than usual?
Check the Brush bar
Tilt the machine back into the vacuuming position.

Turn the machine on and look through the clear Brush bar housing to see if the Brush bar is spinning.
The Brush bar will not rotate when the vacuum cleaner is in the upright position.
U-bend inspection checks
Remove the U-bend, near to the base of the machine.

Check for blockages:
Check the U-bend for blockages and remove as necessary.
Check the seal on the machine for any damage.

Plug the machine in and switch ON. Place your hand under the valve carriage and test the suction.

Is the suction strong or weaker than usual?
Switch off and unplug the machine before proceeding.
Check the Cleaner head
Turn off the power, lay the machine flat on the floor and turn over so that the base can be viewed.
Using a coin turn each fastener a quarter of a turn to the left. Remove the soleplate.

Check for blockages
Carefully remove any blockages from the Brush bar using a pair of scissors to cut away any hair and fibers if necessary.

Inspect the internal hose for blockages or and damage. Both ends of the internal hose pull away. If the internal hose is split choose 'part broken'.
When refitting, push firmly and turn side to side to connect and ensure both ends of the hose are fitted securely.
Reassemble and test machine.
Check duct, bin and cyclone
Turn the machine off and remove the cyclone and bin.

Check the duct:
Check the entry seal located on the left side of the duct is not missing or damaged.
Check the entry pipe and exhaust pipe on the main duct for any blockages, and remove as necessary.
Check the bleed valve near the base of the machine for blockages or damage.
Check the bin and cyclone:
Check the cyclone entry seal is not missing or damaged.
Check both entry inlets on the clear bin and cyclone for blockages, and remove as necessary.
Open the bin lid being careful to ensure dust is captured and check the cyclone seal is not missing or damaged.
Reassemble and test the machine.
Washing the filter
Follow the steps in the video to wash the filter.
For a step by step guide, please select step by step.
Has washing the filter resolved the problem?
Washing the filter
Remove the cyclone and bin from the machine.

Lift filter release catch and remove the filter.

Wash the filter under cold running water and squeeze gently, repeating until the water runs clear.
WARNING: Do not use detergent. Do not wash in a dishwasher or washing machine.

Leave filter to dry in a warm place until completely dry.
WARNING: Do not dry the filter in a tumble dryer, microwave, oven, or near an open flame.

Ensure the filter is completely dry before refitting into machine.

The pre-filter should be washed every 3 months and may require more frequent washing if vacuuming fine dust.
The post-motor filter located to the side of the Motor should last the lifetime of the machine and does not need to be washed.
Check duct, bin and cyclone
Turn the machine off and remove the cyclone and bin assembly.
Check the duct:
Check the entry seal located on the left side of the duct is not missing or damaged.
Check the entry pipe and exhaust pipe on the main duct for any blockages, and remove as necessary.
Check the bleed valve near the base of the machine for blockages or damage.
Check the bin and cyclone:
Check the cyclone entry seal is not missing or damaged.
Check both entry inlets on the clear bin and cyclone for blockages, and remove as necessary.
Open the bin lid being careful to ensure dust is captured and check the cyclone seal is not missing or damaged.
If any parts are missing or damaged, select 'part broken'.
Re-assemble and turn on machine.
Check the Cleaner head
Turn off the power, lay the machine flat on the floor and turn over so that the base can be viewed.
Using a coin, turn each fastener by a quarter. Remove the soleplate.
Check for blockages:
Carefully remove any blockages from the Brush bar using a pair of scissors to cut away any hair and fibers as necessary.
Inspect the internal hose for blockages or and damage. Both ends of the internal hose pull away. If the internal hose is split choose 'part broken'.
When refitting, push firmly and turn side to side to connect and ensure both ends of the hose are fitted securely.
Re-assemble and turn on machine.
U-bend inspection checks
Remove the U-bend, near to the base of the machine.
Check for blockages:
Check the U-bend for blockages and remove as necessary.
Check the seal on the machine for any damage.
Plug the machine in and switch ON. Place your hand under the valve carriage and test the suction.
Is the suction strong or weaker than usual?
Checking the hose
Please refit the U-bend before continuing.
Disconnect the Wand from the hose. Stretch out the hose and check for any splits. If the hose is damaged, select 'part broken'.

Plug the machine in and switch ON. Place your hand under the valve carriage and test the suction.

Is the suction from the hose strong or weaker than usual?
Checking the Wand
Look through the Wand. You should see light shining through. If not, remove the blockage.

Connect the Wand to the hose and test the machine.
Check duct, bin and cyclone
Turn the machine off and remove the cyclone and bin assembly.
Check the duct:
Check the entry seal located on the left side of the duct is not missing or damaged.
Check the entry pipe and exhaust pipe on the main duct for any blockages, and remove as necessary.
Check the bleed valve near the base of the machine for blockages or damage.
Check the bin and cyclone:
Check the cyclone entry seal is not missing or damaged.
Check both entry inlets on the clear bin and cyclone for blockages, and remove as necessary.
Open the bin lid by pressing the red button on top of the cyclone, be careful to do this somewhere to capture any dust securely.
If any parts are missing or damaged, select 'part broken'.
Re-assemble and turn on machine.
Checking the hose
Remove the U-bend from the machine.
Remove the hose by pulling down through the housing.
When trying to release the hose cuff, push it downwards instead of pulling the hose. Check the hose at both ends for blockages and remove as necessary.
Reconnect the hose by pushing the hose cuff through the underside of the machine.
Feed the hose through until the hose is seated correctly at the base of the machine.
Reconnect the U-bend, locking the fastener into place.
Retest the machine.
Check the duct, bin and cyclone
Turn the machine off and remove the cyclone and bin assembly.
Check the duct:
Check the entry seal located on the left side of the duct is not missing or damaged.
Check the entry pipe and exhaust pipe on the main duct for any blockages, and remove as necessary.
Check the bleed valve near the base of the machine for blockages or damage.
Check the bin and cyclone:
Check the cyclone entry seal is not missing or damaged.
Check both entry inlets on the clear bin and cyclone for blockages, and remove as necessary.
Open the bin, being careful to ensure dust is captured, and check the cyclone seal is not missing or damaged.
If any parts are missing or damaged, select 'part broken'.
Re-assemble and turn on machine.
Check duct, bin and cyclone
Turn the machine off and remove the cyclone and bin assembly.
Check the duct:
Check the entry seal located on the left side of the duct is not missing or damaged.
Check the entry pipe and exhaust pipe on the main duct for any blockages, and remove as necessary.
Check the bleed valve near the base of the machine for blockages or damage.
Check the bin and cyclone:
Check the cyclone entry seal is not missing or damaged.
Check both entry inlets on the clear bin and cyclone for blockages, and remove as necessary.
Open the bin lid carefully to ensure dust is captured and check the cyclone seal is not missing or damaged.
If any parts are missing or damaged, select 'part broken'.
Reassemble and test machine.
Test without the bin and cyclone
Plug the machine in at the wall.
Remove the bin and cyclone.
Turn the machine on.
U-bend inspection checks
Remove the U-bend, near to the base of the machine.
Check for blockages:
Check the U-bend for blockages and remove as necessary.
Check the seal on the machine for any damage.
Plug the machine in and switch ON. Place your hand under the valve carriage and test the suction.
Is the suction strong or weaker than usual?
Check duct, bin and cyclone
Turn the machine off and remove the cyclone and bin assembly.
Check the duct:
Check the entry seal located on the left side of the duct is not missing or damaged.
Check the entry pipe and exhaust pipe on the main duct for any blockages, and remove as necessary.
Check the bleed valve near the base of the machine for blockages or damage.
Check the bin and cyclone:
Check the cyclone entry seal is not missing or damaged.
Check both entry inlets on the clear bin and cyclone for blockages, and remove as necessary.
Open the bin lid being careful to ensure dust is captured and check the cyclone seal is not missing or damaged.
If any parts are missing or damaged, select 'part broken'.
Re-assemble and turn on machine.
Has checking the duct, bin and cyclone resolved the problem?
Test the Wand
Make sure the machine is standing in the upright position.
Pull back the Wand cap.
Turn the machine on and place your hand on the end of the Wand.
Is the suction from the hose strong or weaker than usual?
Please select the appropriate option
Check the Brush bar
The Brush bar will not rotate when the vacuum cleaner is in the upright position. Recline the machine back into the vacuuming position and turn the machine on.
Look through the clear Brush bar housing to see if the Brush bar is spinning.
Check the plunger
The Brush bar in the Mini turbine head is powered by the airflow, so a blockage in the machine or turbine head may cause the Brush bar to stop spinning.
Pull the plunger into the out position for vacuuming carpets.
Turn the machine on.
If the Mini turbine head is damaged, choose 'part broken'.
Check the Mini turbine head for blockages
Ensure the machine is turned off before carrying out tests.
Undo the two soleplate fasteners and remove the soleplate from the Mini turbine head.
Check for blockages:
Remove each side of the Brush bar by sliding each half out from the sides of the Mini turbine head.
Clear any thread or debris.
Check both of the metal shafts for blockages and ensure that they rotate freely by hand.
Inspect the duct on the underside of the Turbine head for blockages and remove as necessary.
Check the outside surface of the plunger for fluff and debris and remove as necessary.
Reinsert both brush parts.
When replacing the Brush bars please ensure that both of the arrows on the Brush bars are pointing in the same direction, towards the rear of the tool.
Replace soleplate and lock both fasteners:
Ensure a flush connection of the top of the soleplate before lowering downwards.
Reattach the turbine head and turn the machine on.
Carry out checks
The Mini turbine head will work if the suction is strong. This issue can be resolved by carrying out performance checks or washing the filter.
Please select the appropriate option
Washing the filter
Please follow the steps in the video to wash the filter.
For a step by step guide, please select step by step.
Has washing the filter resolved the problem?
Test the Wand
Make sure the machine is standing in the upright position.
Pull back the Wand cap.
Turn the machine on and place your hand on the end of the Wand.
Is the suction strong or weaker than usual?
Check electrical supply
Is the power cord or plug damaged?
Are the other household appliances working?
Does the vacuum work when plugged into another socket?
When did the machine last have power?
Thermal cut out
Most Dyson vacuums have a built in safety system that stops the machine if it begins to overheat. This usually happens because the filters need washing or your machine is blocked.
Carry out the performance checks and if your machine cuts out unplug and leave for at least 2 hours to cool down.
Please select the appropriate option
Washing the filter
Please follow the steps in the video to wash the filter.
For a step by step guide, please select step by step.
Is there anything else we can help you with?
Washing the filter
Remove the cyclone and bin from the machine.
Lift the filter release catch and remove the filter from the machine.
Wash the filter under cold running water and squeeze gently, repeating until the water runs clear. Do not use detergent. Do not wash in a dishwasher or washing machine.
Leave filter to dry in a warm place until completely dry. Do not dry the filter in a tumble dryer, microwave, oven, or near an open flame.
Ensure the filter is completely dry before replacing in the machine.
The pre-filter should be washed every 3 months and may require more frequent washing if vacuuming fine dust.
The post-motor filter located to the side of the Motor should last the lifetime of the machine and does not need to be washed.
What sort of smell?
Do not plug in or attempt to use the machine until it has been inspected by one of our engineers.
Cleaning the machine
This issue can be resolved by washing the filter and cleaning the bin and cyclone.
How to clean the bin and cyclone
Remove the bin by pressing the catch on top of the carry handle.
Push the button to release dust directly into a dustbin or bag.
Release the bin from the cyclone by pressing the release catch.
Clean the cyclone with a dry cloth and shake or tap firmly to remove all dust from inside the fine dust collector.
WARNING: Do not get any part of the cyclone assembly damp or wet. Do not use detergents or other chemicals.
You can use cold water to clean the clear bin.
Ensure the bin is completely dry before attaching back to the cyclone, and press firmly on the center of the clear bin base to close before placing back on the machine.
Please select the appropriate option
Reset the Brush bar
To reset the Brush bar press the Brush bar control button twice or switch the machine OFF and back ON.
Please note: In normal use, the Brush bar automatically turns OFF when the machine is upright and automatically turns ON when the machine is in the vacuuming position.
Check soleplate
Check the soleplate to ensure there is no debris caught in the wheels or any damage/wheels missing.
Do not plug in or attempt to use the machine until it has been repaired by one of our engineers.
Test the suction
If the machine is spitting out dust, there may be a blockage.
Make sure the machine is standing in the upright position.
Pull the Wand cap.
Turn the machine on and place your hand on the end of the Wand.
Is the suction strong or weaker than usual?
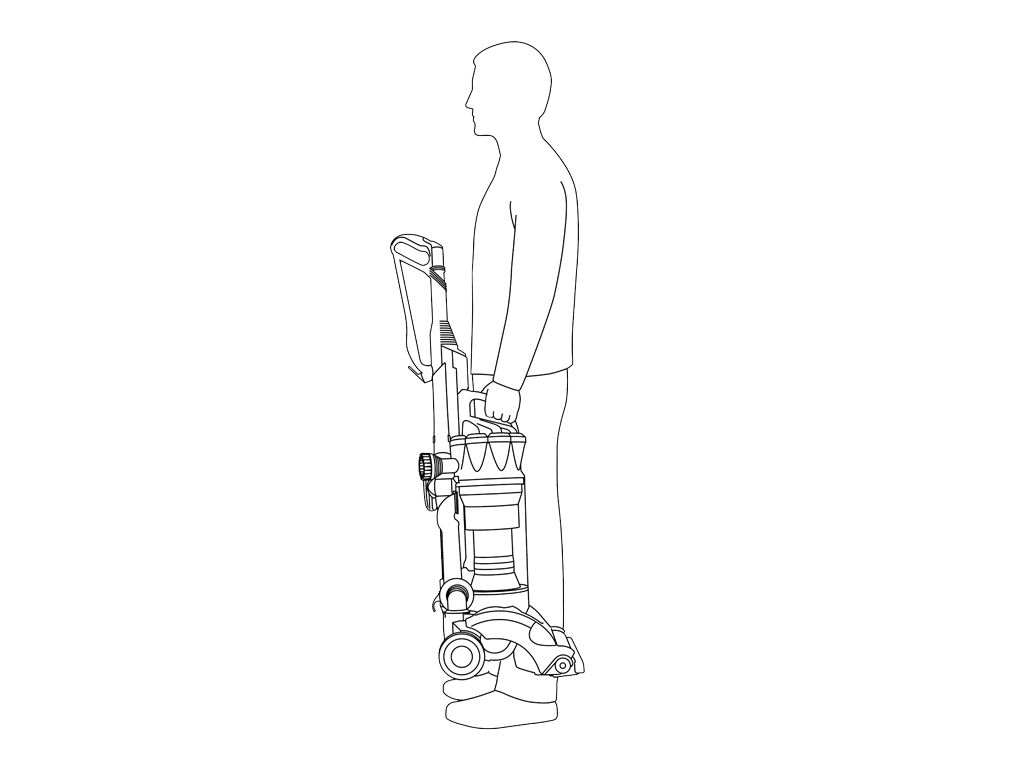
Carrying your Dyson machine
For your safety, do not press the cyclone release catch when carrying your machine.
To lift the machine, use the carrying handle on the cyclone top only.
Removing and replacing the hose
Remove the U-bend from the machine.
With the Wand removed, remove the hose by pulling down through the housing.
When trying to release the hose cuff, push it downwards instead of pulling the hose.
Reconnect the new hose by pushing the hose cuff through the underside of the machine.
Feed the hose through until the hose is seated correctly at the base of the machine.
Reconnect the U-bend, locking the fastener into place.
Serial number location
The serial number is located on the duct, behind the clear bin.

How to operate the brush control
The Brush bar will start automatically once the machine is switched on and lowered in to the vacuuming position.
Turn the machine on. Press the brush control button located next to the power switch to turn the Brush bar off for vacuuming delicate rugs, looped carpets and hard floors.
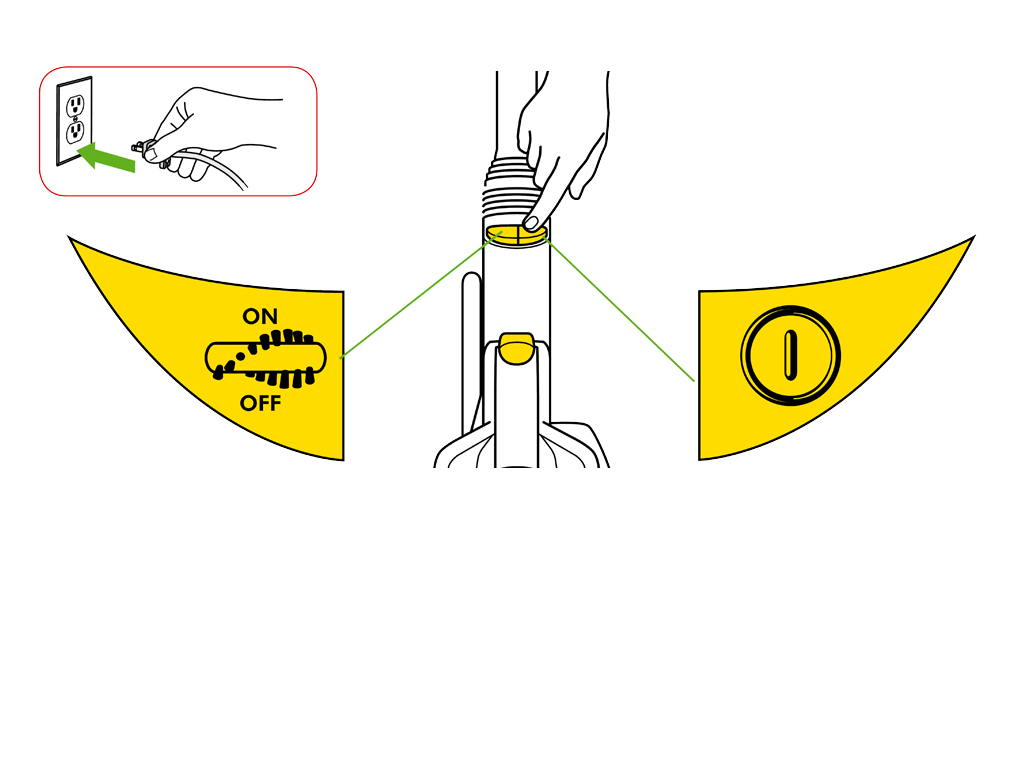
Press the button again to restart the Brush bar for vacuuming carpets.
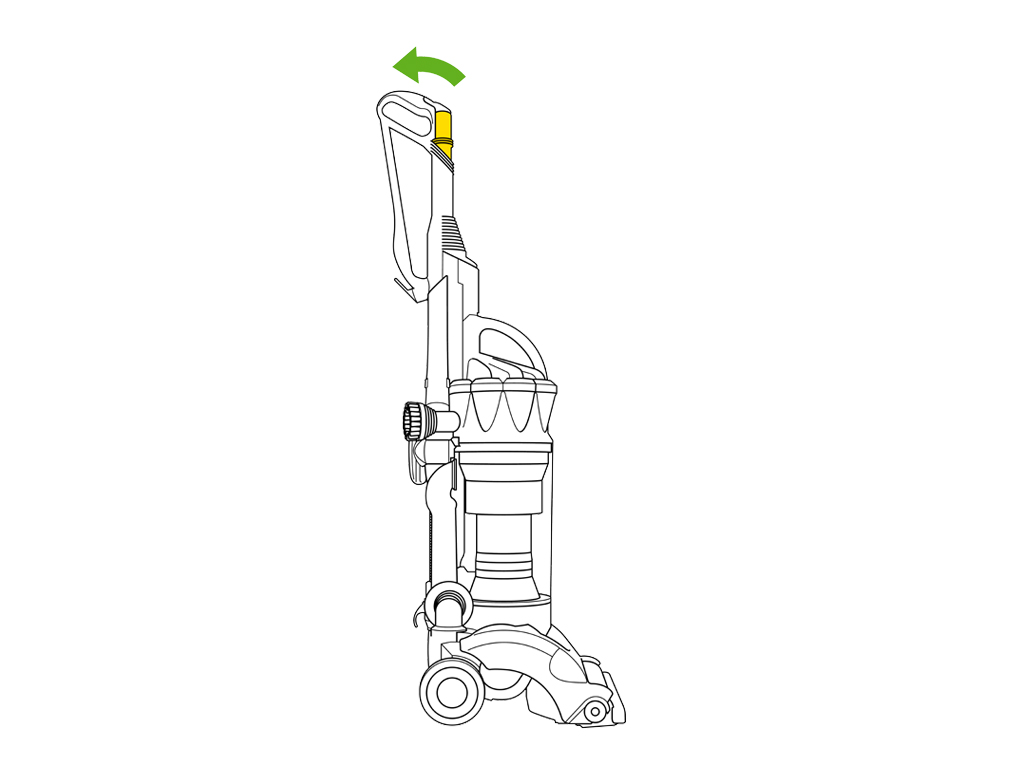
How to attach the Wand, hose and accessories
Push back the Wand cap and pull the metal tube from inside the Wand upwards until the handle and hose come away from the machine.

To separate the Wand from the hose press the release button located on the Wand handle and pull the hose and Wand apart.

Push the accessory tool onto the plastic cuff on the end of the wand or hose until it clicks to ensure that the tool is fitted securely.

How to empty the bin
To ensure your machine continues to clean effectively, the clear bin must be emptied as soon as the dust reaches the MAX mark.
Remove the bin by pressing the catch on top of the carry handle.
Push the button to release dust directly into a dustbin or bag.
Shake or tap firmly to remove all dust from inside the fine dust collector
Press firmly on the center of the clear bin base to close before placing back on the machine
Where is the blockage located?
Check the Brush bar
Turn off power, lay the machine flat on the floor and turn over so that the base can be viewed.
Using a coin, turn each fastener by a quarter. Remove the soleplate.
Check for blockages:
Carefully remove any blockages from the Brush bar using a pair of scissors to cut away any hair and fibers as necessary.
Reassemble and test the machine. If the belt is loose or broken, or the Brush bar is still not spinning, the issue could be resolved by booking a repair.
Checking the hose
Disconnect the Wand from the hose. Stretch out the hose and check for any splits. If the hose is damaged, select 'part broken'.
Plug the machine in and switch ON. Place your hand under the valve carriage and test the suction.
Is the suction from the hose strong or weaker than usual?
Apologies. We can't help you online.
But our Customer Support Team will be able to solve your problem. Call us on 1-877-397-6622
We're glad the problem's been solved.
Please let us know if there's anything else we can help you with.
The Dyson guarantee

'How to ' videos and tips

Exclusive owner benefits

Expert advice. 7 days a week.

Hassle-free repairs and replacement
Please get in touch.
Our experts are ready to help you.
UK based helpline open
8:00am- 8:00pm Monday to Friday
8:00am- 6:00pm Saturday and Sunday
Further help
Dyson DC17 Full Kit