
Unless prompted to do so, do not press the trigger when checking any part of the machine. Operating the machine while it is partially dismantled could result in personal injury.
Please select the appropriate option


Alerts
The screen will alert you when your machine needs your attention.
The alert will flash for approximately 5 seconds, proceeded by a playable graphic. Follow the instructions on screen to maintain performance.
Please select the appropriate option

Low battery
Fully charge the machine.

The machine should be charged with the battery attached to the machine.
Please select the next step
The blue LEDs – one on each side of the battery – will flash on and off during charging.
When the battery is charged, both LEDs will light for 5 seconds, then go out.
The screen will also show the battery charge level at 100%.

The machine can take up to 4.5 hours to fully charge.
Dock charging
If the machine is being charged through the docking station, please disconnect the charger and connect it directly into the machine.
Please check household electrics or use an alternative plug socket.
The blue LEDs – one on each side of the battery – will flash on and off during charging.
When the battery is charged, both LEDs will light for 5 seconds, then go out.
The screen will also show the battery charge level at 100%.
The machine can take up to 4.5 hours to fully charge.
Automatic cut out
Large items may block the machine or tools. If any part becomes blocked or the filter needs washing, the machine may automatically cut out.
Motor is pulsating
This will happen after the motor pulses a number of times (i.e. switches on and off in quick succession) and the blockage indicator will light. Leave to cool down before looking for blockages.
Be careful not to pull the 'ON' trigger while looking for blockages. Operating the machine while it is partially dismantled could result in personal injury.
Remove the tools
Remove all tools and accessories from the machine e.g. wand, cleaner head, crevice tool etc. Please ensure the bin is empty before continuing with any checks.
Press and hold the trigger for 10 seconds.
Check for blockages
Check both ends of the wand for blockages and remove as necessary.

Reattach the cleaner head, tool or accessory to the wand. Reattach the wand to the machine.
Press and hold the trigger for 10 seconds.
Your Hair screw tool doesn't have a washable brush bar. To maintain optimum performance, check your brush bar regularly and clear any obstructions.
Remove the cover and brush bar
Remove the Hair screw tool from the machine.

Push the base plate open. Press the red lever down to release the cleaner head cover.
Pull the cleaner head cover off the main body of the tool.

Look for obstructions
Pull your brush bar firmly to remove it from the main body.
Check and remove any obstructions from all three parts of your Hair screw tool.

Your Hair screw tool isn't washable. Wipe over with a damp lint-free cloth.
Don't put any part of your machine in a dishwasher or use detergents, polishes or air fresheners.
Re-assemble Hair screw tool
Put your brush bar back into position and press firmly until it clicks back into position.
Check the red locking lever is in the unlocked position. Align the cleaner head cover with the guide of the main body. Push it down until it clicks into position.
Push the red locking lever up until it clicks into position and push the base plate back into place.
Check the bin inlet
Check the inlet at the front of the machine for any blockages and remove as necessary.
Check the shroud opening
Hold the machine with the bin in a downwards position. Firmly push the red bin release button. The bin will slide down opening the bin base. The bin base will not open if the red button is not pushed down fully.
Check the opening on the cyclone shroud for any blockages. Remove as necessary.
Close the clear bin by pushing the bin base upwards until it clicks into place.

Press and hold the trigger for 10 seconds.
Remove the bin
Hold the machine with the bin in a downwards position. Firmly push the red bin release button. The bin will slide down opening the bin base. The bin base will not open if the red button is not pushed down fully.
Press the red button located on the bin runner to release the bin and slide the bin off the runner.

Gently tap the side of the cyclone over a bin. This will remove any fine dust clogged up in the cyclone. Using the combination tool, clean the shroud to remove any debris around the cyclone.
Check the cyclone for blockages and remove as necessary.
To refit the clear bin
Insert the spine into the bin runner.
Close the clear bin by pushing the bin base upwards until it clicks into place.
Attach the wand and cleaner head and test the machine.
Removing the filter
Remove the filter by turning it anticlockwise. Gently pull it away from the machine.

Gently tap the filter unit to remove any excess dust and debris before washing it.
Wash the filter in cold water only.
WARNING: Please do not use detergent, do not wash in a dishwasher or washing machine.
Wash the pleated paper element of the filter unit first; hold the filter unit under a cold water tap with the foam element downwards and run cold water over the pleated paper. Continue washing until the water runs clear.

Wash the foam element of the filter unit next; hold the filter unit under a cold water tap with the foam element downwards so that dirty water does not contaminate the pleated paper element. Run cold water over the inside and outside of the foam element and squeeze the foam gently to expel the dirt. Continue washing until the water runs clear.

Wash the outside of the filter unit. Then fill the unit with cold water, place your hands over the open ends and shake gently. Repeat washing the elements and outside of the filter unit until the water runs clear.
Drying
Leave the filter unit to dry completely in a dry environment with good airflow, for a minimum of 24 hours. Check that the filter unit is completely dry.
Refit
To refit, return the filter unit to the main body and twist clockwise until it clicks into place.

The filter unit may require more frequent washing if vacuuming fine dust or if use is mainly in Boost mode.
Clear the floor tool
On the side of the cleaner head, locate the end cap. Using a coin, turn the end cap anticlockwise a quarter of the way to remove it.
Note: There should be a small padlock icon along with directional arrows to help you unlock the end cap.

Remove the brush bar from the Motorbar cleaner head and clear away any hair or fibres. Check the neck of the cleaner head (where the cleaner head connects to the wand) for any blockages. Ensure there is no build-up of dust or debris in the small crevice between where the brush bar sits and the neck of the cleaner head.

The brush bar, now clear of any debris, can be reinserted into the cleaner head. Securely fasten the end cap.

Check the bin inlet
Check the inlet at the front of the machine for any blockages and remove as necessary.
Check the shroud opening
Hold the machine with the bin in a downwards position. Firmly push the red bin release button. The bin will slide down opening the bin base. The bin base will not open if the red button is not pushed down fully.
Check the opening on the cyclone shroud for any blockages. Remove as necessary.
Close the clear bin by pushing the bin base upwards until it clicks into place.
Press and hold the trigger for 10 seconds.
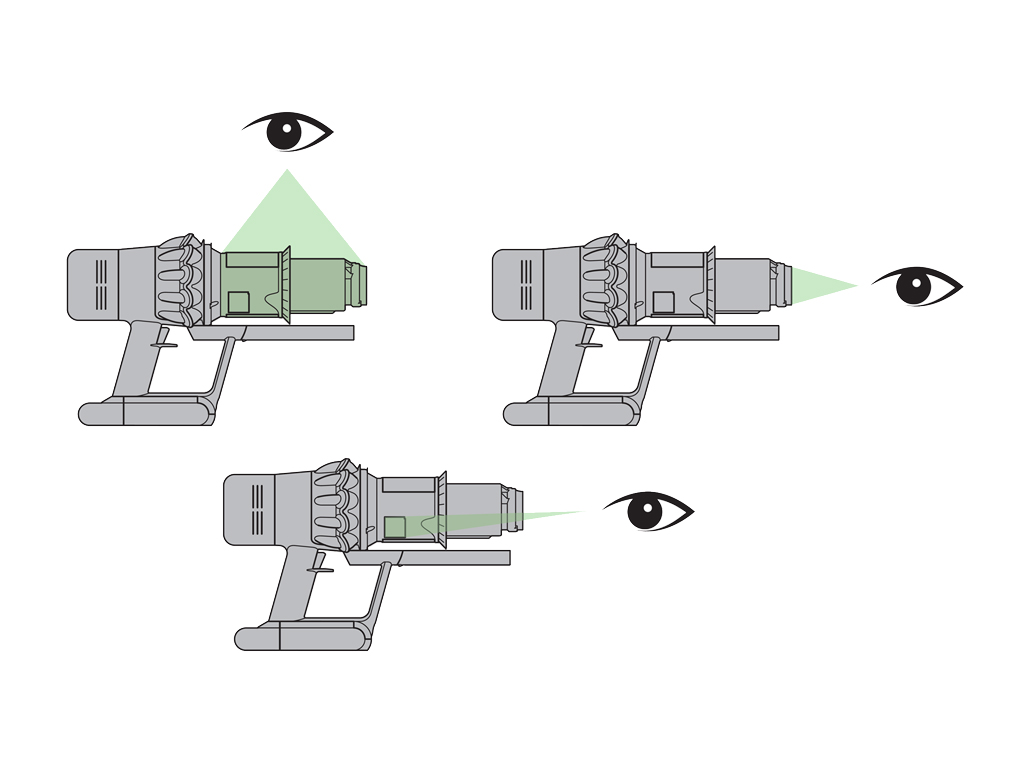
Diagnostic screen
The menu is accessed by pressing the selector button with the filter removed. Three options are displayed when accessing this menu screen.
Versions, displays the software versions of the machine.
Diagnostic, displays a series of numbers, letters and percentages.
Exit, you can exit the menu by selecting this option.

Check the filter
Before exiting the menu, please ensure the filter is fitted correctly.
The filter unit should be securely fitted onto the main body and turned clockwise until it clicks into place.
Exiting the menu
Once the filter is securely in place, press and hold the selector button for approximately 10 seconds or until the screen reverts back to the main display screen.
If the filter isn't correctly fitted, the machine will not turn on when pressing the trigger.
Removing the filter
Remove the filter by turning it anticlockwise. Gently pull it away from the machine.
Refit
Insert the filter back into the machine. Turn the filter clockwise until it clicks into place.
Press and hold the trigger for 10 seconds.
The filter may need to be washed more frequently if you are vacuuming a lot of fine dust, or if the machine is predominantly being used in Eco mode or Medium mode.
Removing the filter
Remove the filter by turning it anticlockwise. Gently pull it away from the machine.
Gently tap the filter unit to remove any excess dust and debris before washing it.
Wash the filter in cold water only.
WARNING: Please do not use detergent, do not wash in a dishwasher or washing machine.
Wash the pleated paper element of the filter unit first; hold the filter unit under a cold water tap with the foam element downwards and run cold water over the pleated paper. Continue washing until the water runs clear.
Wash the foam element of the filter unit next; hold the filter unit under a cold water tap with the foam element downwards so that dirty water does not contaminate the pleated paper element. Run cold water over the inside and outside of the foam element and squeeze the foam gently to expel the dirt. Continue washing until the water runs clear.

Wash the outside of the filter unit. Then fill the unit with cold water, place your hands over the open ends and shake gently. Repeat washing the elements and outside of the filter unit until the water runs clear.
Gently shake the filter unit to remove any excess water and leave to drain with the foam element end facing up.

Drying
Leave the filter to dry for a minimum of 24 hours in an environment with good airflow. Ensure that the filter is completely dry before reinserting it into the machine.

Refit
Insert the filter back into the machine. Turn the filter clockwise until it clicks into place.

This alert will continue until maintenance has been carried out.
This indicates the filter needs washing.
Find the text version of the step-by-step guide instead, under "Has this resolved the problem?"
Leave the filter to dry for a minimum of 24 hours in an environment with good airflow. Ensure that the filter is completely dry before reinserting it into the machine.
Press and hold the trigger for 10 seconds.
Has this resolved the problem?
Check the bin inlet
Check the inlet at the front of the machine for any blockages and remove as necessary.
Check the shroud opening
Hold the machine with the bin in a downwards position. Firmly push the red bin release button. The bin will slide down opening the bin base. The bin base will not open if the red button is not pushed down fully.
Check the opening on the cyclone shroud for any blockages. Remove as necessary.
Close the clear bin by pushing the bin base upwards until it clicks into place.
Press and hold the trigger for 10 seconds.
Before testing the machine please ensure that any hair or loose clothing is clear of the machine.
Automatic cut out
Large items may block the machine or tools. If any part becomes blocked or the filter needs washing, the machine may automatically cut out.
Motor is pulsating
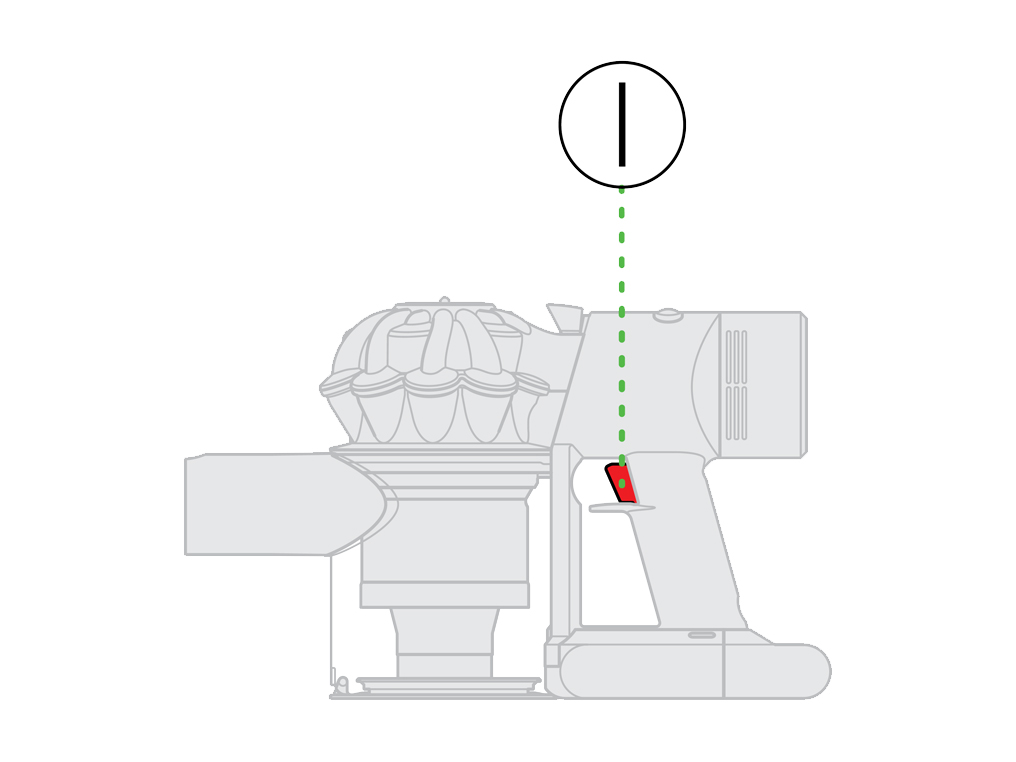
1 solid blue light will indicate the machine has a low level of charge.
If the machine is cutting out/pulsating, this will indicate a blockage.
Be careful not to pull the 'ON' trigger while looking for blockages. Operating the machine while it is partially dismantled could result in personal injury.
Remove the tools
Remove all tools and accessories from the machine e.g. wand, cleaner head, crevice tool etc. Please ensure the bin is empty before continuing with any checks.
Press and hold the trigger for 10 seconds.
Check for blockages
Check both ends of the wand for blockages and remove as necessary.
Reattach the cleaner head, tool or accessory to the wand. Reattach the wand to the machine.
Press and hold the trigger for 10 seconds.
Your Hair screw tool doesn't have a washable brush bar. To maintain optimum performance, check your brush bar regularly and clear any obstructions.
Remove the cover and brush bar
Remove the Hair screw tool from the machine.
Push the base plate open. Press the red lever down to release the cleaner head cover.
Pull the cleaner head cover off the main body of the tool.
Look for obstructions
Pull your brush bar firmly to remove it from the main body.
Check and remove any obstructions from all three parts of your Hair screw tool.
Your Hair screw tool isn't washable. Wipe over with a damp lint-free cloth.
Don't put any part of your machine in a dishwasher or use detergents, polishes or air fresheners.
Re-assemble Hair screw tool
Put your brush bar back into position and press firmly until it clicks back into position.
Check the red locking lever is in the unlocked position. Align the cleaner head cover with the guide of the main body. Push it down until it clicks into position.
Push the red locking lever up until it clicks into position and push the base plate back into place.
Check the bin inlet
Check the inlet at the front of the machine for any blockages and remove as necessary.
Check the shroud opening
Hold the machine with the bin in a downwards position. Firmly push the red bin release button. The bin will slide down opening the bin base. The bin base will not open if the red button is not pushed down fully.
Check the opening on the cyclone shroud for any blockages. Remove as necessary.
Close the clear bin by pushing the bin base upwards until it clicks into place.
Press and hold the trigger for 10 seconds.
Clear the floor tool
On the side of the cleaner head, locate the end cap. Using a coin, turn the end cap anticlockwise a quarter of the way to remove it.
Note: There should be a small padlock icon along with directional arrows to help you unlock the end cap.
Remove the brush bar from the Motorbar cleaner head and clear away any hair or fibres. Check the neck of the cleaner head (where the cleaner head connects to the wand) for any blockages. Ensure there is no build-up of dust or debris in the small crevice between where the brush bar sits and the neck of the cleaner head.
The brush bar, now clear of any debris, can be reinserted into the cleaner head. Securely fasten the end cap.
Check the bin inlet
Check the inlet at the front of the machine for any blockages and remove as necessary.
Check the shroud opening
Hold the machine with the bin in a downwards position. Firmly push the red bin release button. The bin will slide down opening the bin base. The bin base will not open if the red button is not pushed down fully.
Check the opening on the cyclone shroud for any blockages. Remove as necessary.
Close the clear bin by pushing the bin base upwards until it clicks into place.
Press and hold the trigger for 10 seconds.
Test the machine
Remove all tools and accessories from the machine e.g. wand, cleaner head, crevice tool etc. Please ensure the bin is empty before continuing with any checks.
Put the machine in Boost mode.
Press and hold the trigger for 10 seconds.
Remove the bin
Hold the machine with the bin in a downwards position. Firmly push the red bin release button. The bin will slide down opening the bin base. The bin base will not open if the red button is not pushed down fully.
Press the red button located on the bin runner to release the bin and slide the bin off the runner.
Gently tap the side of the cyclone over a bin. This will remove any fine dust clogged up in the cyclone. Using the combination tool, clean the shroud to remove any debris around the cyclone.
Press and hold the trigger for 10 seconds.
Check the bin inlet
Check the opening on the cyclone shroud for any blockages. Remove as necessary.
To refit the clear bin
Insert the spine into the bin runner.
Close the clear bin by pushing the bin base upwards until it clicks into place.
Press and hold the trigger for 10 seconds.
Check the machine
Please ensure the bin is empty before continuing with any checks.
Remove all tools and accessories from the machine e.g. Wand, Cleaner head, Crevice tool etc.

Check both ends of the Wand for blockages and remove as necessary.
Press and hold the trigger for 10 seconds.
Clear the floor tool
On the side of the cleaner head, locate the end cap. Using a coin, turn the end cap anticlockwise a quarter of the way to remove it.
Note: There should be a small padlock icon along with directional arrows to help you unlock the end cap.
Remove the brush bar from the Motorbar cleaner head and clear away any hair or fibres. Check the neck of the cleaner head (where the cleaner head connects to the wand) for any blockages. Ensure there is no build-up of dust or debris in the small crevice between where the brush bar sits and the neck of the cleaner head.
The brush bar, now clear of any debris, can be reinserted into the cleaner head. Securely fasten the end cap.
Before testing the machine please ensure that any hair or loose clothing is clear of the machine.
Automatic cut out
Large items may block the machine or tools. If any part becomes blocked or the filter needs washing, the machine may automatically cut out.
Motor is pulsating
1 solid blue light will indicate the machine has a low level of charge.
If the machine is cutting out/pulsating, this will indicate a blockage.
Be careful not to pull the 'ON' trigger while looking for blockages. Operating the machine while it is partially dismantled could result in personal injury.
Remove the tools
Remove all tools and accessories from the machine e.g. wand, cleaner head, crevice tool etc. Please ensure the bin is empty before continuing with any checks.
Press and hold the trigger for 10 seconds.
The screen will alert you when your machine needs your attention.
The alert will flash for approximately 5 seconds, proceeded by a playable graphic. Follow the instructions on screen to maintain performance.
Which alert is showing?
Before testing the machine please ensure that any hair or loose clothing is clear of the machine.
The suction power of the machine varies depending which power mode you have selected. Boost mode being the most powerful.
Pick up issues are typically caused by a blockage.
Be careful not to pull the 'ON' trigger while looking for blockages. Operating the machine while it is partially dismantled could result in personal injury.
Remove the tools
Remove all tools and accessories from the machine e.g. wand, cleaner head, crevice tool etc. Please ensure the bin is empty before continuing with any checks.
Press and hold the trigger for 10 seconds.
If your machine has recently been fully charged but the battery alert is still present, we recommend that you place the machine back on charge for a few moments.

The display will again show that the battery is fully charged.

Remove the charger from the machine and pull the trigger.
Automatic cut out
This machine is fitted with an automatic cut out. If any part becomes blocked, the machine may automatically cut out.
The display of your machine will alert you when simple maintenance steps are needed.
Which alert is showing?
Please ensure the battery is charged to 100% after every use.
Power modes
The machine has three power modes for different tasks. The overall run time is displayed on the digital display screen in minutes and seconds and will vary between each of the three power modes.
Run time
The overall run time can increase and decrease depending on the power mode, floor type and tool being used. Any change to the run time can take up to 30 seconds to appear on the digital display.
Eco mode
Maximum run time for longer cleans all around your home, with up to 60 minutes of run time.

Med mode
The optimum balance to clean all floors, with up to 40 minutes of run time.

Boost mode
Designed for intensive cleaning on ground-in dirt, with up to 5 minutes of run time.

Is the machine working as expected?
Charge the machine
Connect to the charger either directly or in the docking station.
Charging
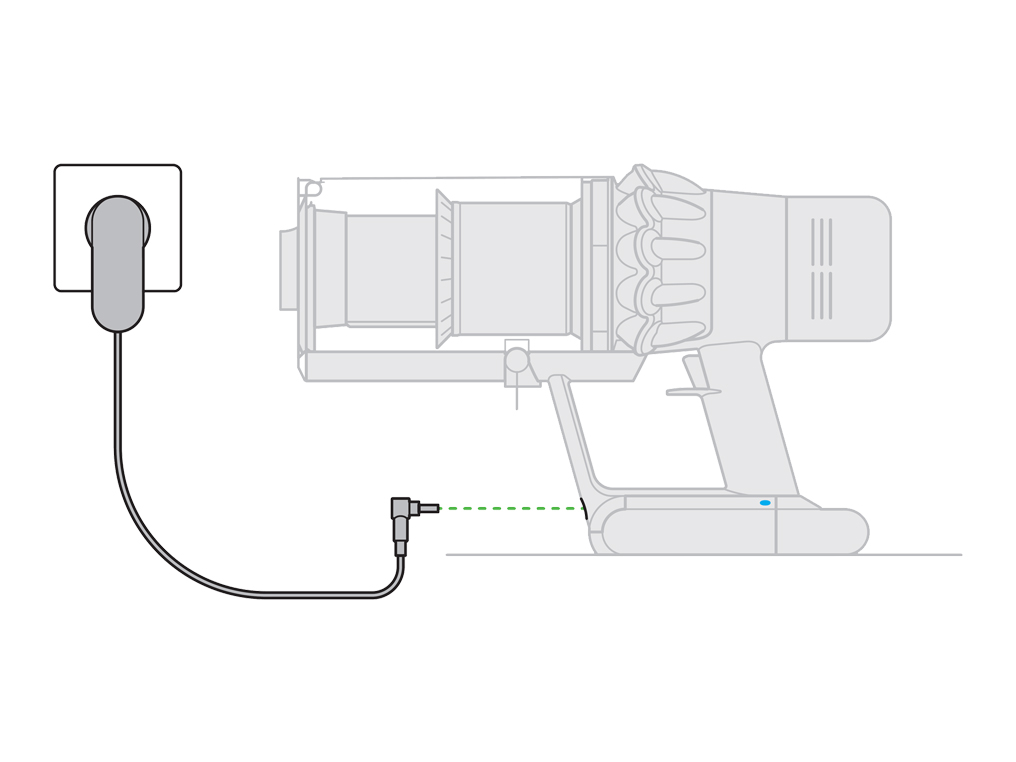
If the machine is being charged through the docking station, please disconnect the charger and connect it directly into the machine.
Please check household electrics or use an alternative plug socket.
Before testing the machine please ensure that any hair or loose clothing is clear of the machine.
Automatic cut out
This machine is fitted with an automatic cut out. If any part becomes blocked, the machine may automatically cut out.
Motor is pulsating
This will happen after the motor pulses a number of times (i.e. switches on and off in quick succession) and the blockage indicator will light. Leave to cool down before looking for blockages.
Be careful not to pull the 'ON' trigger while looking for blockages. Operating the machine while it is partially dismantled could result in personal injury.
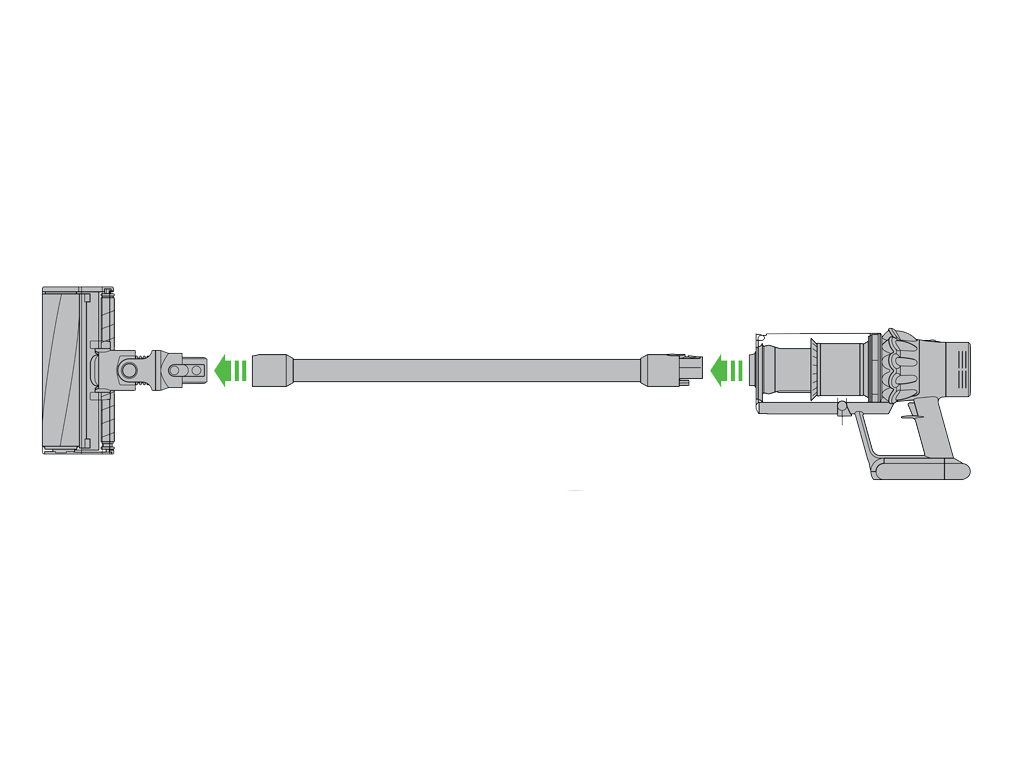
Remove the tools
Remove all tools and accessories from the machine e.g. wand, cleaner head, crevice tool etc. Please ensure the bin is empty before continuing with any checks.
Press and hold the trigger for 10 seconds.
Check the bin inlet
Check the inlet at the front of the machine for any blockages and remove as necessary.
Check the shroud opening
Hold the machine with the bin in a downwards position. Firmly push the red bin release button. The bin will slide down opening the bin base. The bin base will not open if the red button is not pushed down fully.
Check the opening on the cyclone shroud for any blockages. Remove as necessary.
Close the clear bin by pushing the bin base upwards until it clicks into place.
Press and hold the trigger for 10 seconds.
Check for blockages
Check both ends of the wand for blockages and remove as necessary.
Reattach the cleaner head, tool or accessory to the wand. Reattach the wand to the machine.
Press and hold the trigger for 10 seconds.
Charge the machine
Connect to the charger either directly or in the docking station.
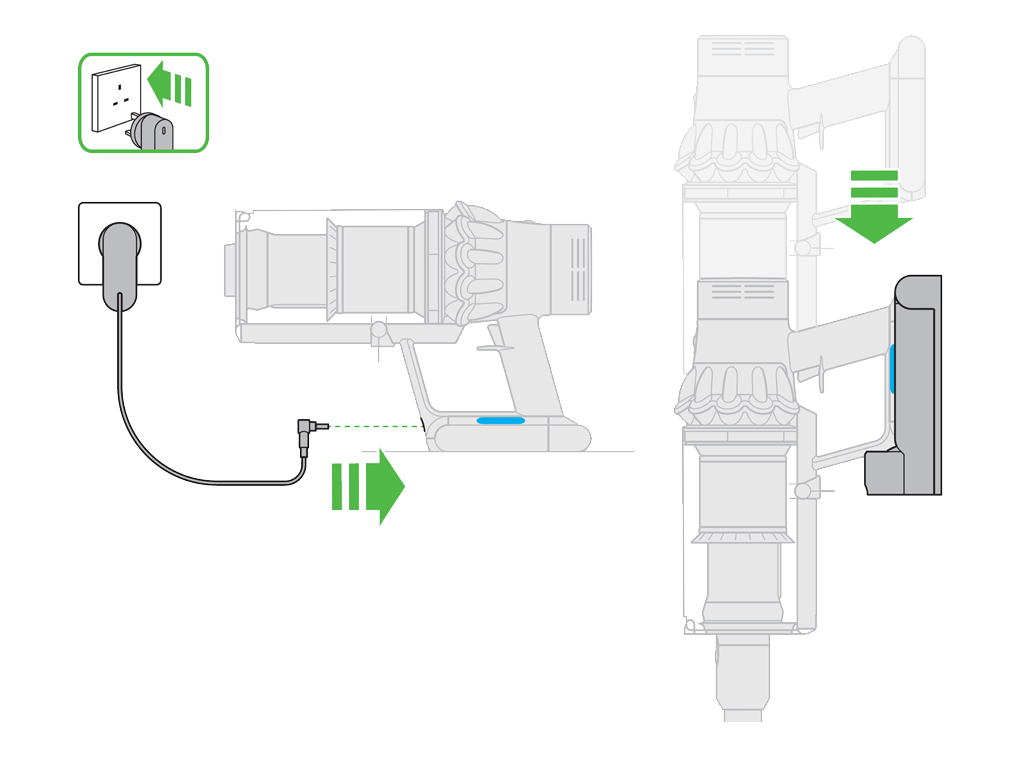
The blue LEDs – one on each side of the battery – will flash on and off during charging.
Remove the bin
Hold the machine with the bin in a downwards position. Firmly push the red bin release button. The bin will slide down opening the bin base. The bin base will not open if the red button is not pushed down fully.
Press the red button located on the bin runner to release the bin and slide the bin off the runner.
Gently tap the side of the cyclone over a bin. This will remove any fine dust clogged up in the cyclone. Using the combination tool, clean the shroud to remove any debris around the cyclone.
Check the opening on the cyclone shroud for any blockages. Remove as necessary.
The clear bin is not dishwasher safe and the use of detergents, polishes or air fresheners to clean the clear bin is not recommended as this may damage your machine. Clean the clear bin with a damp cloth only.
To refit the clear bin
Insert the spine into the bin runner.
Close the clear bin by pushing the bin base upwards until it clicks into place.
Damp or musty smell still present
Under normal use, any unpleasant smell can only be caused by something the machine has picked up. Please select pick up issues to carry out checks.
Please select the next step
Please select the appropriate option


Removing the filter
Remove the filter by turning it anticlockwise. Gently pull it away from the machine.
Gently tap the filter unit to remove any excess dust and debris before washing it.
Wash the filter in cold water only.
WARNING: Please do not use detergent, do not wash in a dishwasher or washing machine.
Wash the pleated paper element of the filter unit first; hold the filter unit under a cold water tap with the foam element downwards and run cold water over the pleated paper. Continue washing until the water runs clear.
Wash the foam element of the filter unit next; hold the filter unit under a cold water tap with the foam element downwards so that dirty water does not contaminate the pleated paper element. Run cold water over the inside and outside of the foam element and squeeze the foam gently to expel the dirt. Continue washing until the water runs clear.
Wash the outside of the filter unit. Then fill the unit with cold water, place your hands over the open ends and shake gently. Repeat washing the elements and outside of the filter unit until the water runs clear.
Gently shake the filter unit to remove any excess water and leave to drain with the foam element end facing up.
Drying
Leave the filter to dry for a minimum of 24 hours in an environment with good airflow. Ensure that the filter is completely dry before reinserting it into the machine.
Refit
Insert the filter back into the machine. Turn the filter clockwise until it clicks into place.
The filter may need to be washed more frequently if you are vacuuming a lot of fine dust, or if the machine is predominantly being used in Eco mode or Medium mode.
Damp or musty smell still present
Under normal use, any unpleasant smell can only be caused by something the machine has picked up. Please select pick up issues to carry out checks.
If you are able to identify which part of the machine the smell is coming from, replacing this part may resolve the issue.
Please select the appropriate option
Clear the floor tool
On the side of the cleaner head, locate the end cap. Using a coin, turn the end cap anticlockwise a quarter of the way to remove it.
Note: There should be a small padlock icon along with directional arrows to help you unlock the end cap.
Remove the brush bar from the Motorbar cleaner head and clear away any hair or fibres. Check the neck of the cleaner head (where the cleaner head connects to the wand) for any blockages. Ensure there is no build-up of dust or debris in the small crevice between where the brush bar sits and the neck of the cleaner head.
The brush bar, now clear of any debris, can be reinserted into the cleaner head. Securely fasten the end cap.
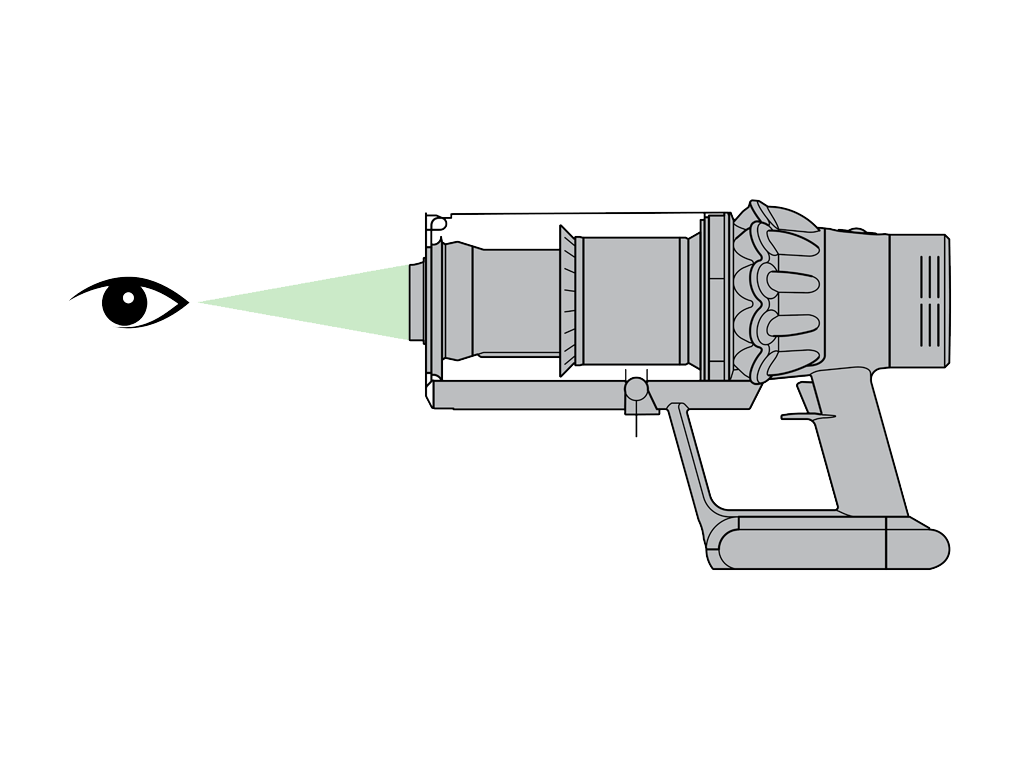
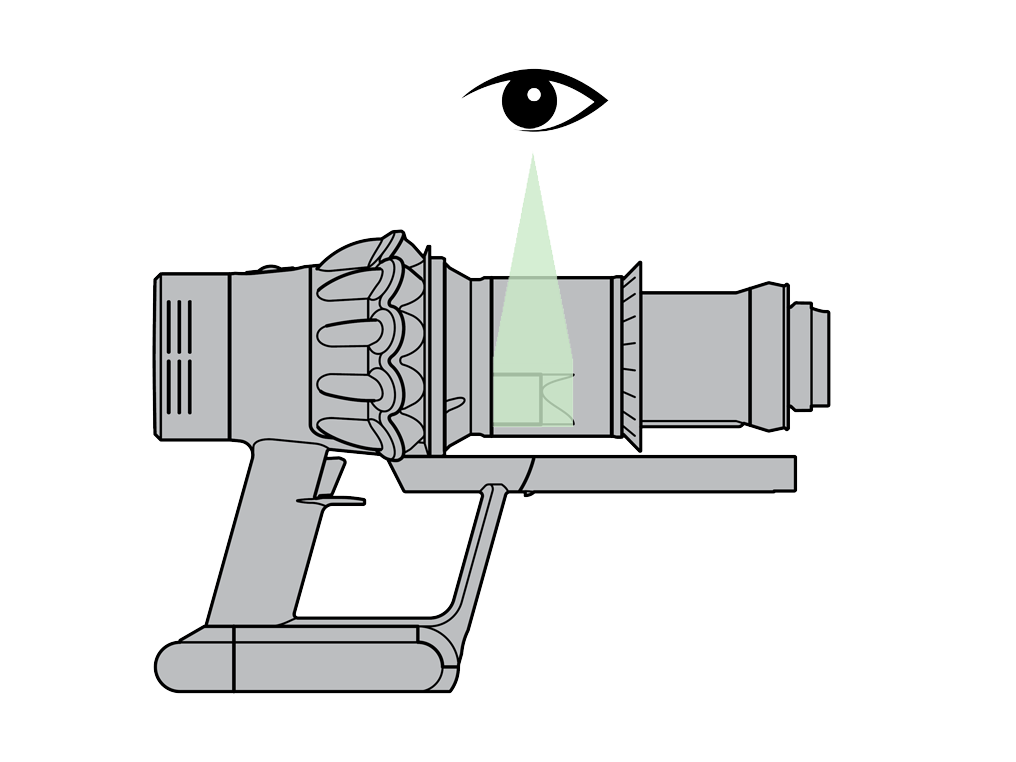
Please ensure that you are emptying the bin as soon as the dirt reaches the level of the MAX mark.
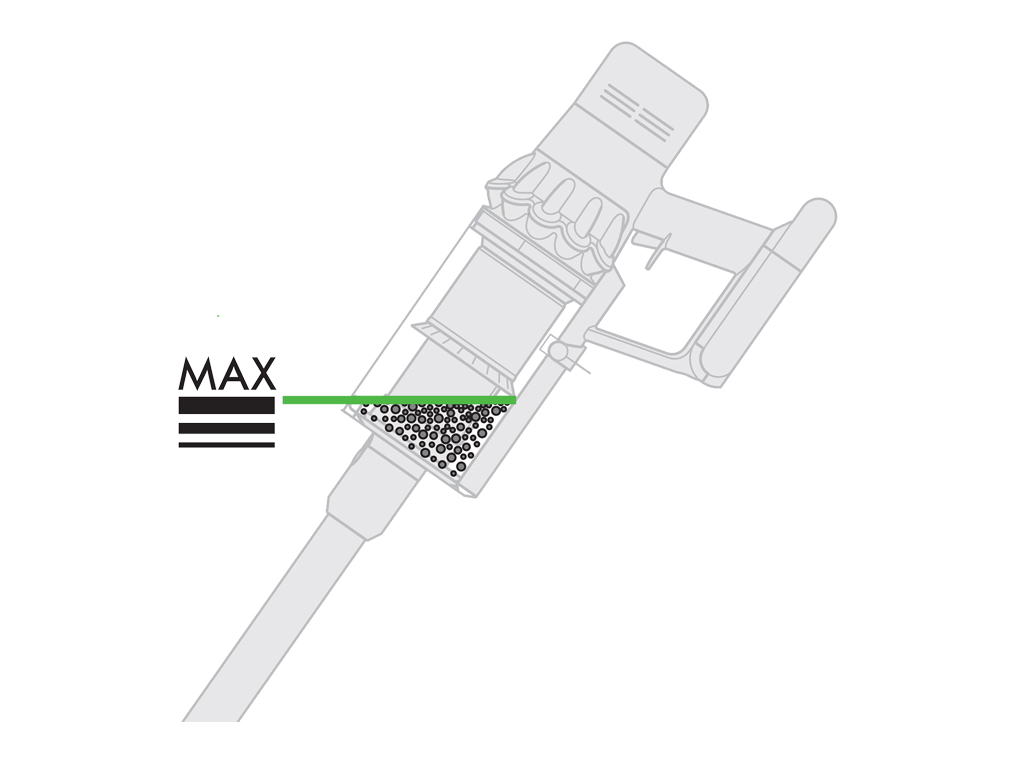
Should the dirt in the bin exceed the MAX mark, the excess dirt can be pulled directly into the filter causing a blockage.
Has this resolved the problem?
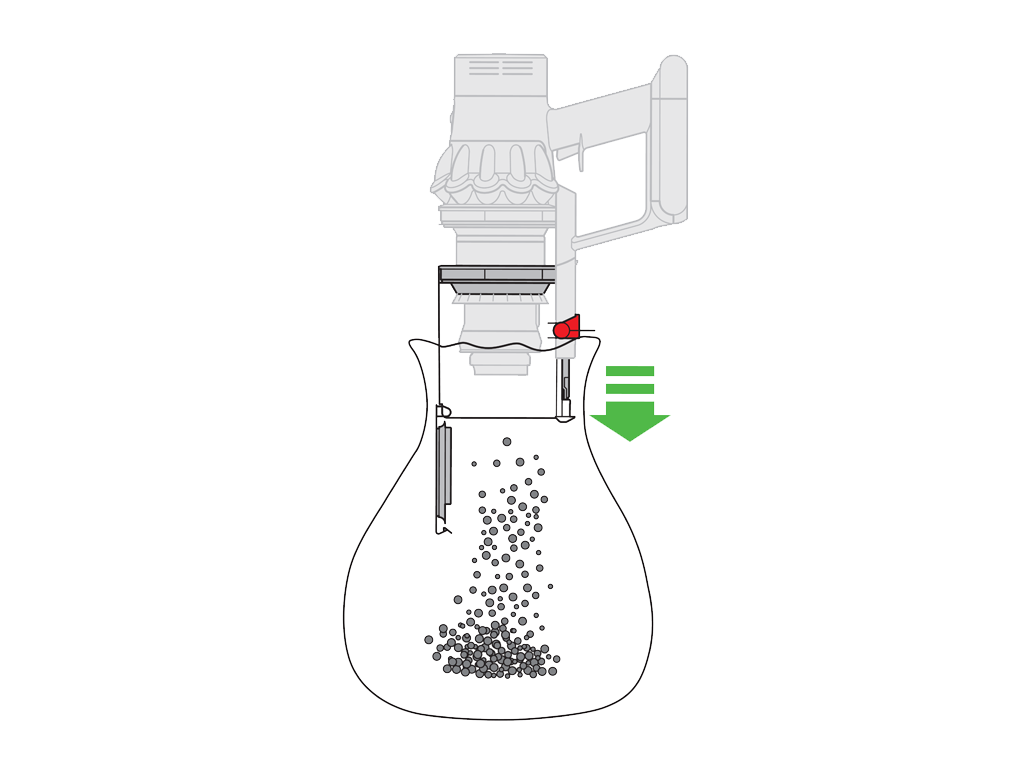
Empty as soon as the dirt reaches the level of the MAX mark - do not overfill. Ensure the machine is disconnected from the charger before emptying the clear bin. Be careful not to pull the 'ON' trigger.
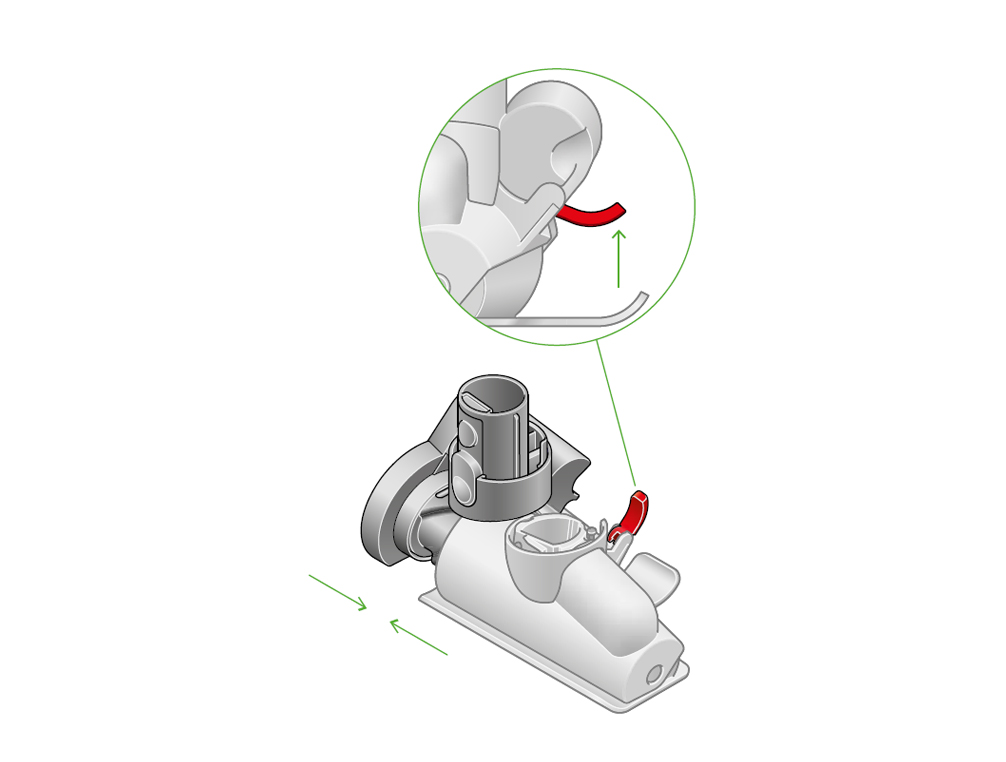
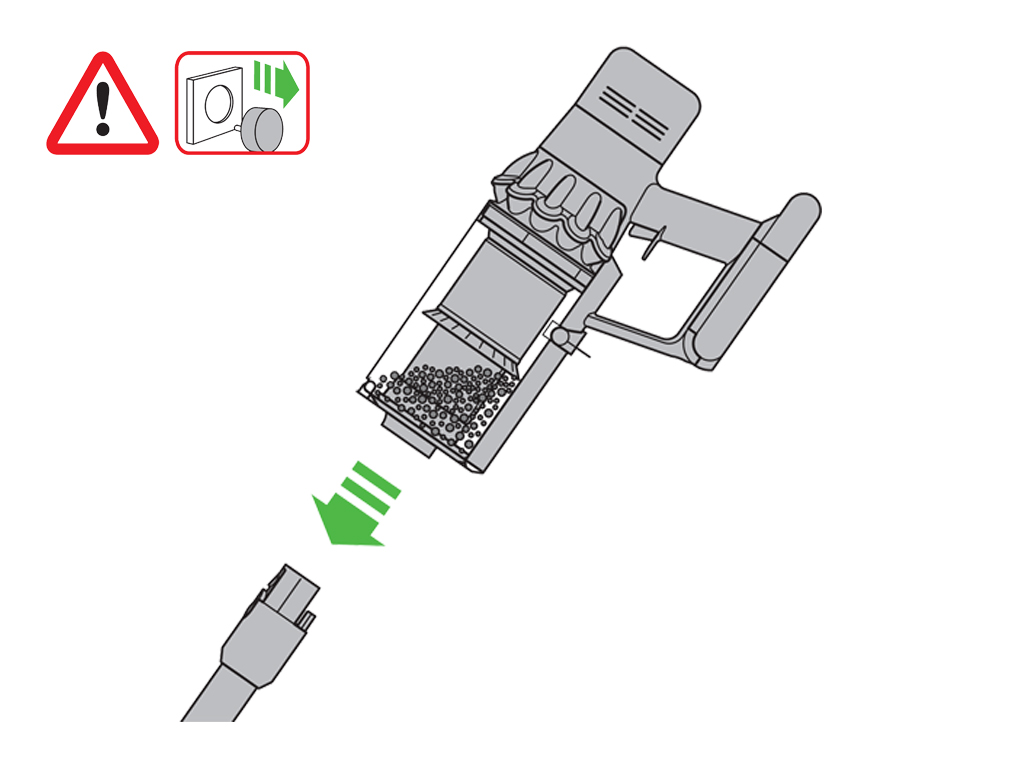
Remove the wand by pressing the red wand release button and pulling away from the bin.

Emptying the bin
Hold the machine with the bin in a downwards position. Firmly push the red bin release button. The bin will slide down opening the bin base. The bin base will not open if the red button is not pushed down fully.
Closing the bin
Close the clear bin by pushing the bin base upwards until it clicks into place.
Power modes
The machine has three power modes for different tasks. The overall run time is displayed on the digital display screen in minutes and seconds and will vary between each of the three power modes.
Run time
The overall run time can increase and decrease depending on the power mode, floor type and tool being used. Any change to the run time can take up to 30 seconds to appear on the digital display.
Eco mode
Maximum run time for longer cleans all around your home, with up to 60 minutes of run time.
Med mode
The optimum balance to clean all floors, with up to 40 minutes of run time.
Boost mode
Designed for intensive cleaning on ground-in dirt, with up to 5 minutes of run time.
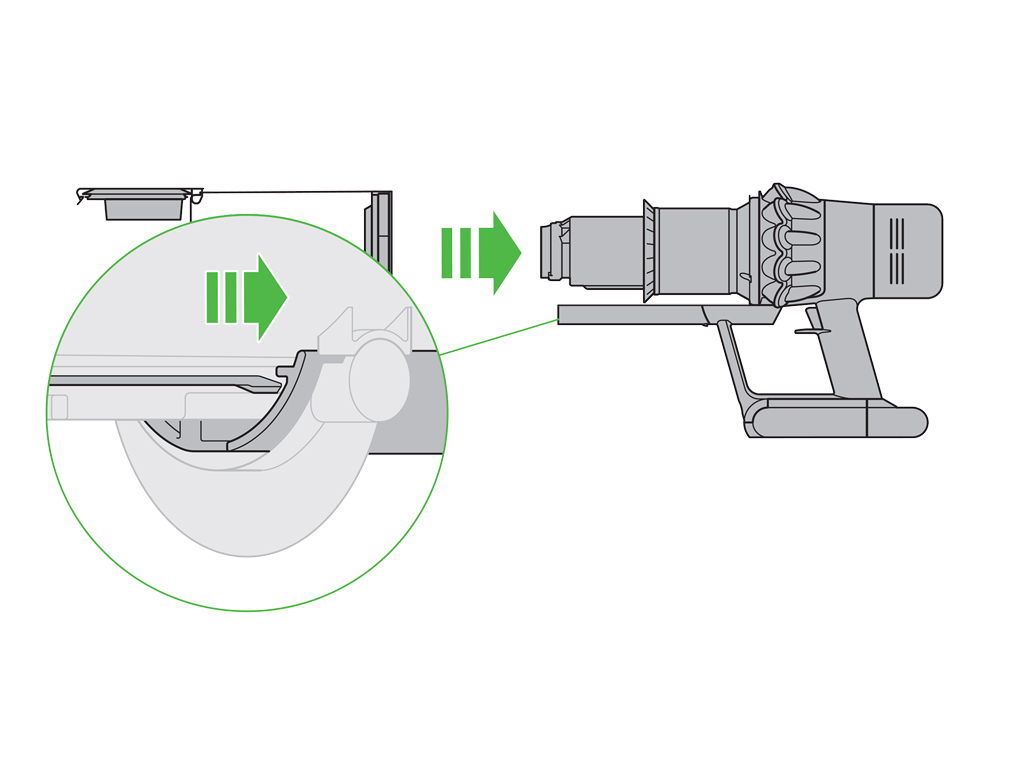
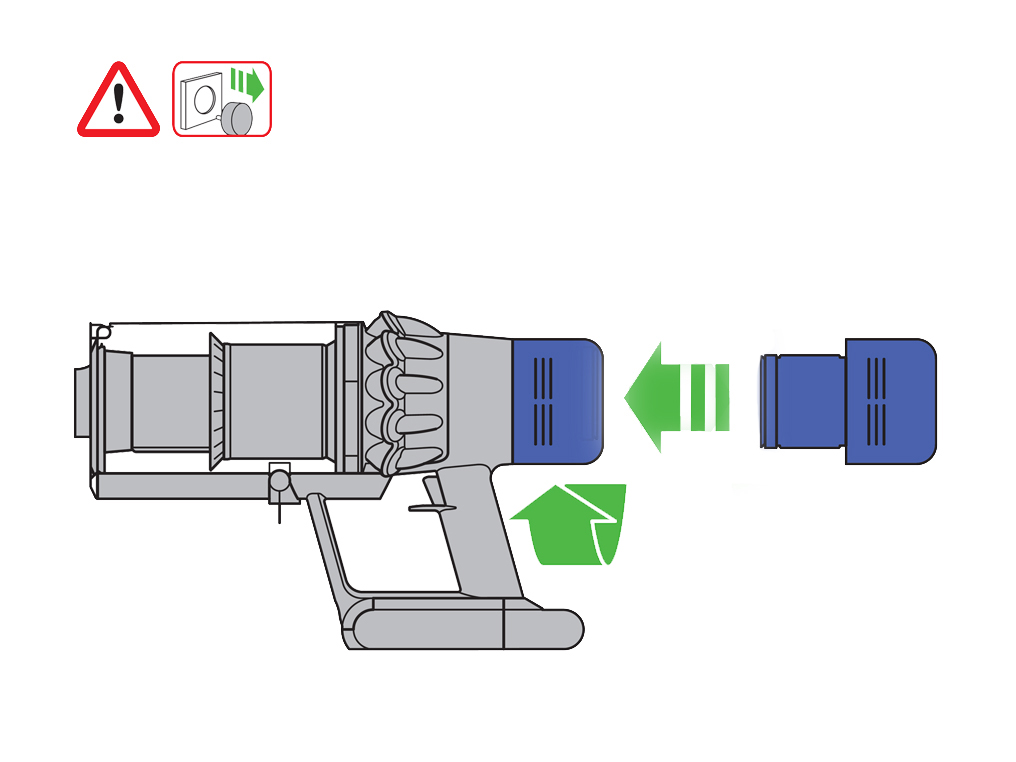
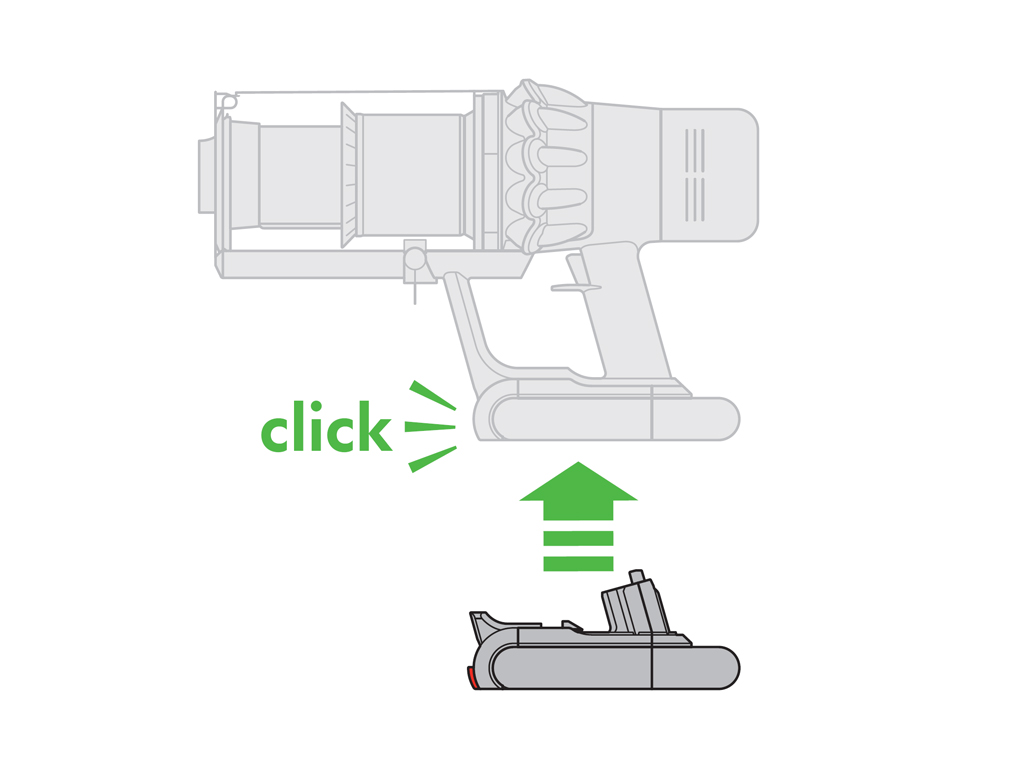
Removing the click-in battery
Hold your hand under the battery to support it. Press the red battery release button and pull the battery away from the handle.

To install a battery
Slide the battery onto the handle until it clicks securely in place.
Looking after your batteries
If you own an additional click-in battery, we recommend fully charging it soon after purchase, and alternating and charging all click-in batteries regularly to prolong battery health.
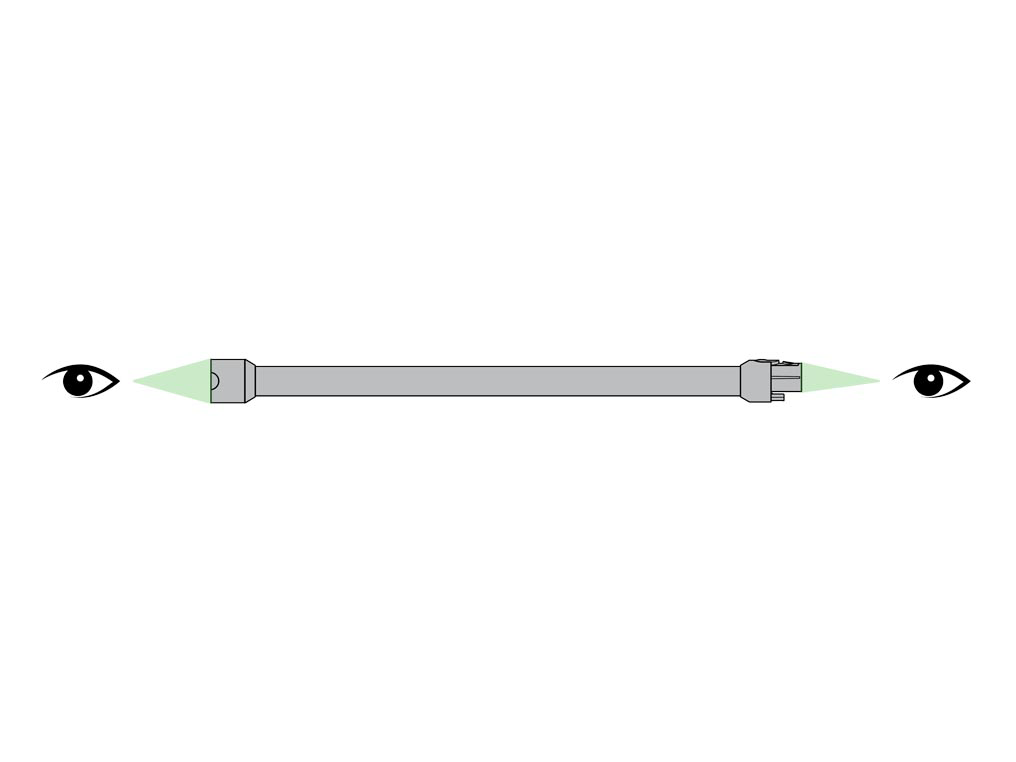
The serial number can be located in two places.
The serial number can be found on the underside of the machine’s click-in battery.
Remove the click-in battery to reveal the serial number inside the machine’s handle.
Changing the battery
Where you have additional click-in batteries, we recommend alternating and charging all click-in batteries regularly to prolong battery health.
To remove a battery
Hold your hand under the battery to support it. Press the red battery release button and pull the battery away from the handle. Place the battery on charge.
To install a battery
Slide the battery onto the handle until it clicks securely in place.
Empty as soon as the dirt reaches the level of the MAX mark - do not overfill. Ensure the machine is disconnected from the charger before emptying the clear bin. Be careful not to pull the 'ON' trigger.
Remove the wand by pressing the red wand release button and pulling away from the bin.
Remove the bin
Hold the machine with the bin in a downwards position. Firmly push the red bin release button. The bin will slide down opening the bin base. The bin base will not open if the red button is not pushed down fully.
Press the red button located on the bin runner to release the bin and slide the bin off the runner.
Gently tap the side of the cyclone over a bin. This will remove any fine dust clogged up in the cyclone. Using the combination tool, clean the shroud to remove any debris around the cyclone.
Check the opening on the cyclone shroud for any blockages. Remove as necessary.
To refit the clear bin
Insert the spine into the bin runner.
Close the clear bin by pushing the bin base upwards until it clicks into place.
Washing the filter
Remove the filter by turning it anticlockwise. Gently pull it away from the machine.
Gently tap the filter unit to remove any excess dust and debris before washing it.
Wash the filter in cold water only. WARNING: Please do not use detergent, do not wash in a dishwasher or washing machine.
Wash the pleated paper element of the filter unit first; hold the filter unit under a cold water tap with the foam element downwards and run cold water over the pleated paper. Continue washing until the water runs clear.
Wash the foam element of the filter unit next; hold the filter unit under a cold water tap with the foam element downwards so that dirty water does not contaminate the pleated paper element. Run cold water over the inside and outside of the foam element and squeeze the foam gently to expel the dirt. Continue washing until the water runs clear.
Wash the outside of the filter unit. Then fill the unit with cold water, place your hands over the open ends and shake gently. Repeat washing the elements and outside of the filter unit until the water runs clear.
Gently shake the filter unit to remove any excess water and leave to drain with the foam element end facing up.
Drying
Leave the filter to dry for a minimum of 24 hours in an environment with good airflow. Ensure that the filter is completely dry before reinserting it into the machine.
Refit
Insert the filter back into the machine. Turn the filter clockwise until it clicks into place.
The filter may need to be washed more frequently if you are vacuuming a lot of fine dust, or if the machine is predominantly being used in Eco mode or Medium mode.
Your Hair screw tool doesn't have a washable brush bar. To maintain optimum performance, check your brush bar regularly and clear any obstructions.
Remove the cover and brush bar
Remove the Hair screw tool from the machine.
Push the base plate open. Press the red lever down to release the cleaner head cover.
Pull the cleaner head cover off the main body of the tool.
Look for obstructions
Pull your brush bar firmly to remove it from the main body.
Check and remove any obstructions from all three parts of your Hair screw tool.
Your Hair screw tool isn't washable. Wipe over with a damp lint-free cloth.
Don't put any part of your machine in a dishwasher or use detergents, polishes or air fresheners.
Re-assemble Hair screw tool
Put your brush bar back into position and press firmly until it clicks back into position.
Check the red locking lever is in the unlocked position. Align the cleaner head cover with the guide of the main body. Push it down until it clicks into position.
Push the red locking lever up until it clicks into position and push the base plate back into place.
Clear the floor tool
On the side of the cleaner head, locate the end cap. Using a coin, turn the end cap anticlockwise a quarter of the way to remove it.
Note: There should be a small padlock icon along with directional arrows to help you unlock the end cap.
Remove the brush bar from the Motorbar cleaner head and clear away any hair or fibres. Check the neck of the cleaner head (where the cleaner head connects to the wand) for any blockages. Ensure there is no build-up of dust or debris in the small crevice between where the brush bar sits and the neck of the cleaner head.
The brush bar, now clear of any debris, can be reinserted into the cleaner head. Securely fasten the end cap.


Further help
Dyson V11