Let's get your machine working
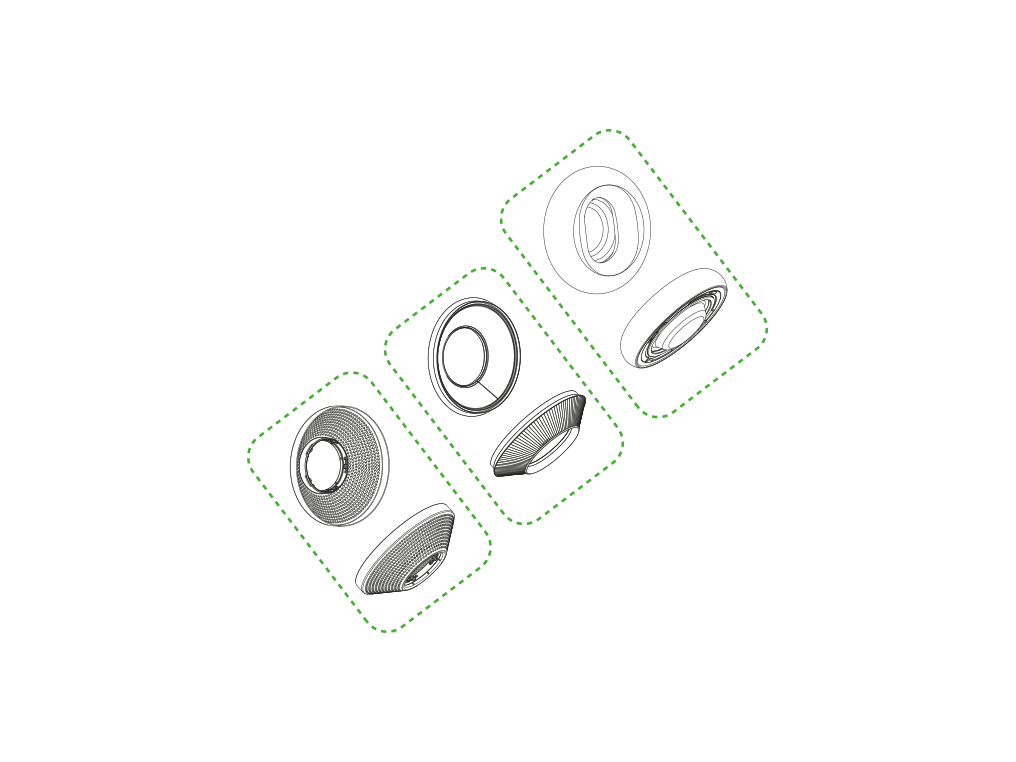
Dyson OnTrac™ (CNC Black Nickel)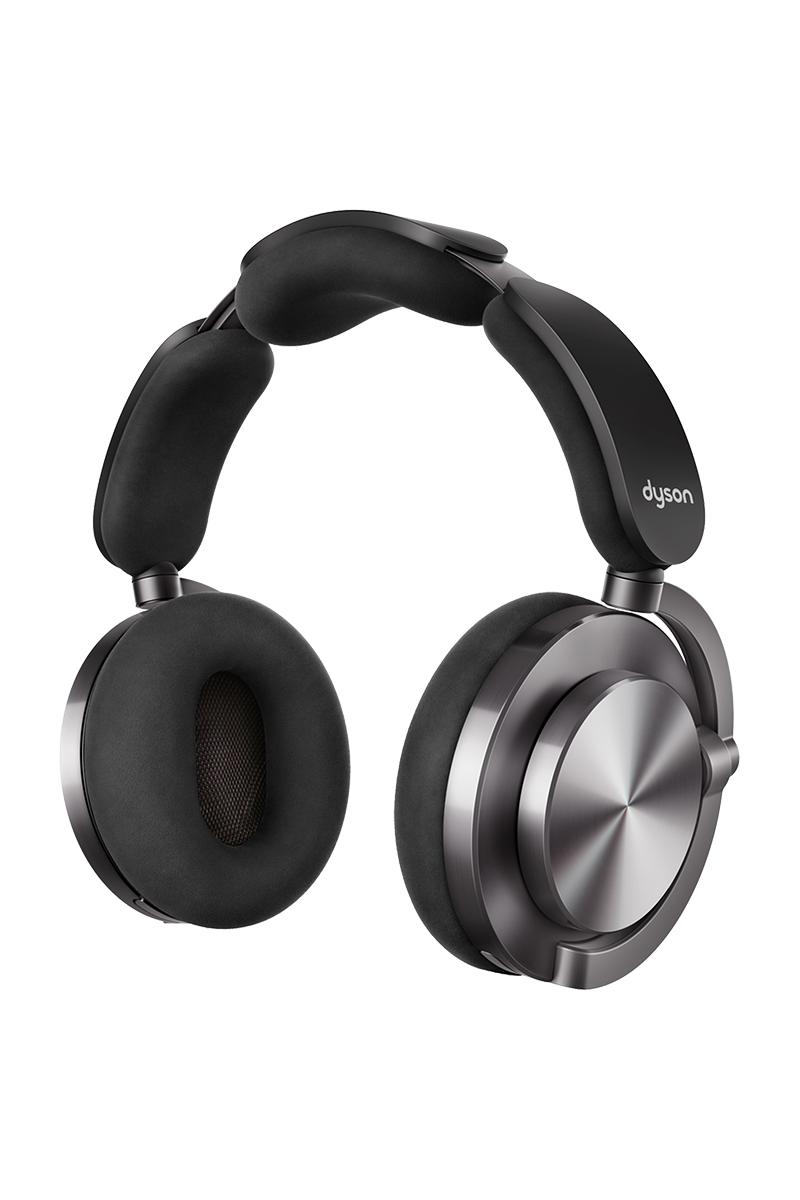
Let's get your machine working
Dyson OnTrac™ (CNC Black Nickel)
Please select the appropriate option
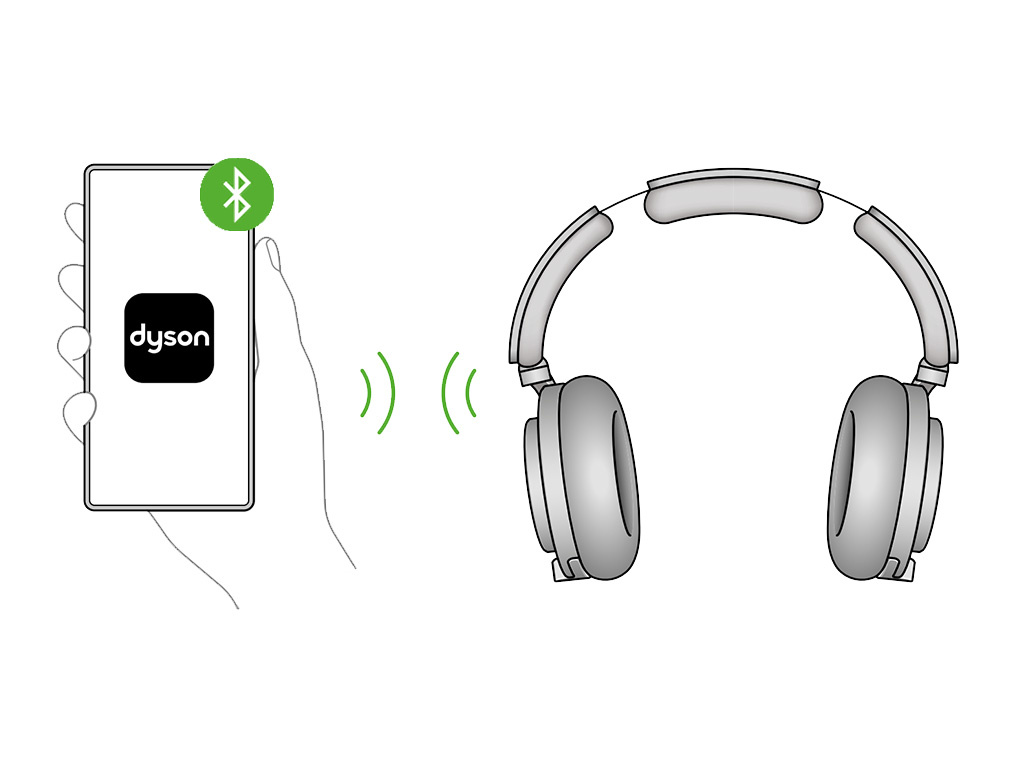
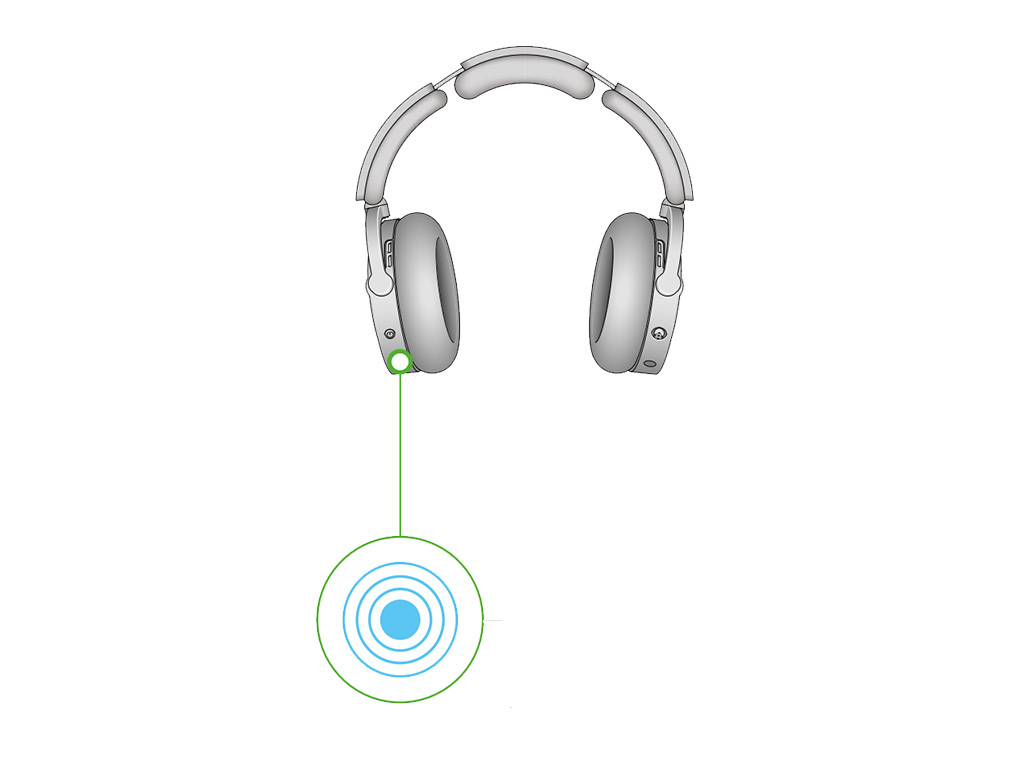
Bluetooth connection
Press and hold the power button for five seconds to activate Bluetooth.
Discoverable mode
A blue pulsing light indicates Bluetooth is in discoverable mode.
Connect your headphones
Select your headphones in your devices audio settings to connect.
Check that your machine has been connected
If you have previously connected your machine to the MyDyson™ app, you should be able to see it on the app home screen.
If you have previously removed this product from the MyDyson™ app, you need to open your mobile settings, select Bluetooth and unpair ('forget') the headphone connection.
If you have multiple machines connected, you can switch between them using the 'back' arrow menu in the top left of the home screen.
Unpair your machine from the MyDyson™ app
Open your mobile settings, select Bluetooth and unpair ('forget') the headphones connection, then try to connect the headphones again.
Please select the appropriate option from the list.
Stay within Bluetooth range
The range of Bluetooth is around 30 feet or 10 meters.
This communication range can become reduced however, depending on obstacles or the environment the headphones are being used in.
Software update required
Some MyDyson™ app features may not be available if your headphones are not up to date.
Please ensure auto-update is turned on. You can do this by going to your machine's settings.
This will ensure you automatically receive the latest features and your machine functions correctly.
It can take up to 24 hours for your machine to receive updates after it is enabled.
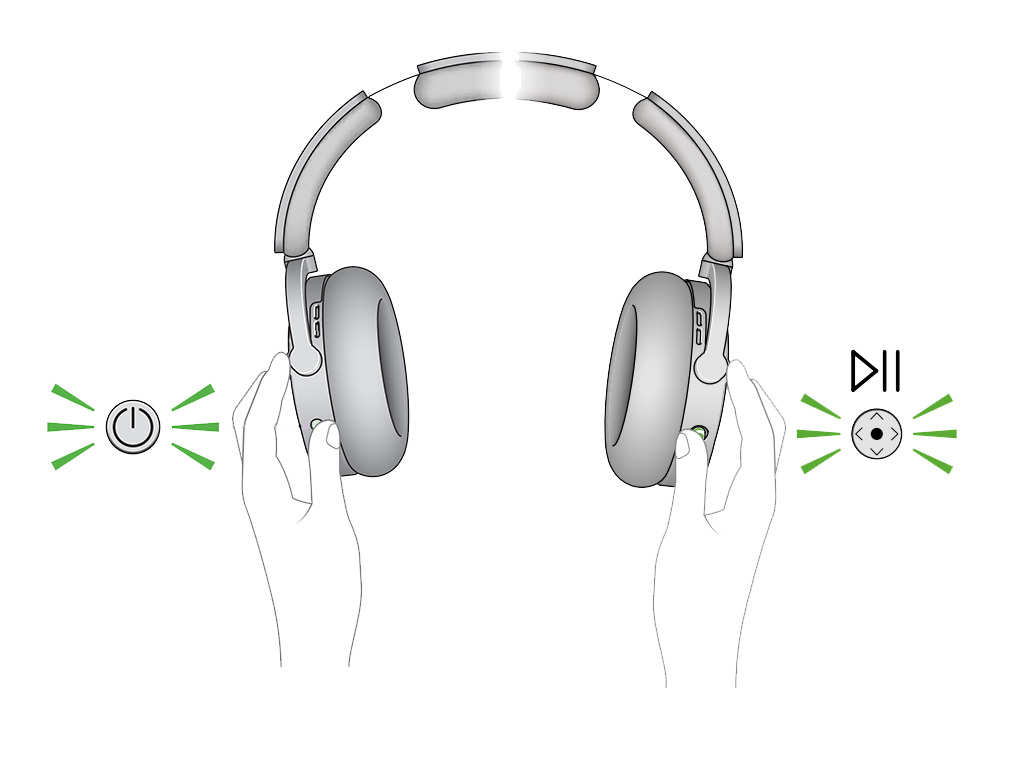
Switch on your headphones
Your headphones will need to be on charge or switched on to show the live sound data.
Enable Bluetooth
The headphones will also need to be connected via Bluetooth.
Please ensure Bluetooth is enabled on your device.
Historic data
Historic data can take 2 hours to pull the data through, if the headphones have been turned off.
Enable auto-update
Please ensure auto-update is turned on. You can do this by going to your machine's settings through the settings icon.
This will make sure you automatically receive the latest features and your app functions correctly.
It can take up to 24 hours for your machine to receive updates after it is enabled.
Switch on your headphones
Your headphones will need to be on charge or switched on in order to be controlled via the app.
Enable Bluetooth
The headphones will also need to be connected via Bluetooth.
Please ensure Bluetooth is enabled on your device.
Ensure your headphones are connected to your Bluetooth device
If your headphones are connected to a device via Bluetooth, the LED light on the headphones will show solid blue when taken off the head.
You will also be able to see your machine in your device’s list of connected devices.
Ensure your audio is connected to your Bluetooth device
Open your mobile settings, go to Bluetooth and make sure you have selected 'Audio OnTrac' under 'Other devices'.
Device connected
Ensure that your headphones are connected to your device and not another device.
Stay within Bluetooth range
The range of Bluetooth is around 30 feet or 10 meters. This communication range can become reduced however, depending on obstacles or the environment the headphones are being used in.
Check the settings in the app you're using
Check to see if the issue remains when using another device program.
If the issue only exists when using a specific program, the issue is likely related to that program.
Wireless traffic
Please be aware that if you are using your headphones in a location with a lot of wireless traffic, this can interfere with the Bluetooth signal and affect the audio of your headphones.
Reset your headphones
Plug your headphones in to charge.
Press and hold the power button and joystick simultaneously for 5 seconds to reset your headphones.
Bluetooth connection
Press and hold the power button for five seconds to activate Bluetooth.
Discoverable mode
A blue pulsing light indicates Bluetooth is in discoverable mode.
Connect your headphones
Select your headphones in your devices audio settings to connect.
Stay within Bluetooth range
The range of Bluetooth is around 30 feet or 10 meters. This communication range can become reduced however, depending on obstacles or the environment the headphones are being used in.
Check the settings in the app you're using
Check to see if the issue remains when using another device program.
If the issue only exists when using a specific program, the issue is likely related to that program.
Two-factor authentication
Check that the email address shown on the login screen is correct. The code will be sent to the address shown.
Code expiry
The email may have incorrectly been marked as spam or junk. Please check any junk folders for the code email.
Please note that the authentication code will expire 5 minutes after being sent. Codes will also expire when a new one is sent.
Locked out
If you enter the password or authentication code incorrectly more than four times, your account will be locked. It will be automatically unlocked after 30 minutes.
MyDyson™ app
Download the latest version of the MyDyson™ app from the app store on your phone. For users of Android phones, it can be downloaded from major Android app stores.
Minimum requirements:
- iOS 16.0
- Android 9.0
Your MyDyson™ account
Once you have downloaded and updated the MyDyson™ app, please log in or register a Dyson account.
Account set up
To set up an account you will require a valid email address and password.
What stage of the connection journey are you having trouble with?
Mobile device
The method to connect your headphones will be slightly different depending on the type of device you have. Please select the type of device you're using.
Connect the audio using Bluetooth
Allow the audio to pair.
Once paired, continue to the next step.
Please follow the next step
Machine connected
Your headphones are now connected to your MyDyson™ app.
Please follow the rest of the steps to complete the set-up process.
Taking ownership
If this product is not new, the previous owner will be notified and will no longer be able to use this machine with their MyDyson™ app.
Setup complete
Your headphones are now fully connected and setup.
Open the Bluetooth settings
If you receive an error message while connecting, open the Bluetooth settings on your device.
Your headphones should appear on the list of devices.
Select your headphones
Select your headphones and return to the app when connected.
Please follow the next step
Connect the audio using Bluetooth
Once prompted open the Bluetooth settings on your device.
Your headphones should appear on the list of devices.
Ensure your audio is connected to your Bluetooth device
Make sure you have selected 'Audio OnTrac' under 'Other devices'.
Select your headphones
Select your headphones and return to the app when connected.
Please follow the next step
Restart the connection journey
Make sure you’re not leaving the app before being prompted to do so.
If you do this, you will need to restart the connection journey again.
Please follow the next step
Reattempt to pair the headphones
If an error message appears during the pairing process, follow the prompt in the app to reattempt.
Keeping your mobile device close to your headphones will assist the connection process.
Please follow the next step
Initialising the sensors
Allow the sensors to initialise. This will take at least two minutes.
Mobile device
The next step to connect your headphones will be slightly different depending on the type of device you have. Please select the type of device you're using.
Ensure your headphones are in discoverable mode
Press and hold the power button for 5 seconds until the LED light pulses blue.
This indicates Bluetooth is in discoverable mode.
Please follow the next step
Mobile device
The method to connect your headphones will be slightly different depending on the type of device you have. Please select the type of device you're using.
Please select the appropriate option
MyDyson™ app
You'll need to have the MyDyson™ app installed to connect to your machine.
Enable Bluetooth
Ensure Bluetooth is enabled on your device.
Dyson account
You have the option to create a new account or log in if you have previously created a Dyson account on the app or online.
Select the appropriate option.
Please follow the next step
Password reset
After changing the password on your Dyson account, you'll need to wait 30 minutes before logging back in.
Locked out
If you enter the password or authentication code incorrectly more than four times, your account will be locked. It will be automatically unlocked after 30 minutes.
Please select the appropriate option
MyDyson™ app
To get the most out of your headphones, please ensure you have the MyDyson™ app installed.
You can download the MyDyson™ app from the App Store or Google Play.

Create an account or log in
Open the app and follow the on-screen instructions to create a new account.
Alternatively, if you already have an account, simply log in.
Enable Bluetooth
Ensure that Bluetooth is enabled on your device.
Switch on your headphones
Make sure your headphones are switched on by holding the power button for two seconds.
After two seconds, the LED light will turn white to show that your headphones are on.
Please select the appropriate option
Add machine
You can add a machine from the hamburger menu or from the main screen if no machines are registered.
If Bluetooth is not enabled, you will be prompted to enable it.
Select your headphones
Select your headphones to pair with the app.
Please follow the next step
Please select the appropriate option
Check your home screen
Your sound readings can be found on the home screen of your app.
Please select the appropriate option
Check your machine’s settings
The location of your headphones can be changed by selecting the city/town in your machine’s settings
Location list
Select the location from the list.
You can also search for a location to filter the list.
Update
Once a new location has been chosen, update to save.
Volume limiter
The volume limiter can be turned on/off at any time in the machine settings.
Check your machine's settings
The name of your headphones can be changed in your machine’s settings.
Notification settings
The MyDyson™ app will occasionally send you notifications from your machines to keep you informed on their status.
You can control which notifications you see from your headphones in the settings menu.
Current software
The current software your headphones are running on can be checked within the machine's settings.
Update software
If your software is not fully up to date, you will have an option to update the software in the menu.
Check your home screen
Your sound readings can be found on the home screen of your app.
Check your home screen
You can control your active noise cancellation and equaliser settings in the app.
Select the icon on the home screen to switch between the available settings.
Switching machines
To switch between your machines, select the hamburger menu. A list of your machines will show on the left.
You can also swipe between your connected machines by swiping the sides of your screen.
For Android users, screen gestures may need to be disabled for this feature to work.
Please select the appropriate option
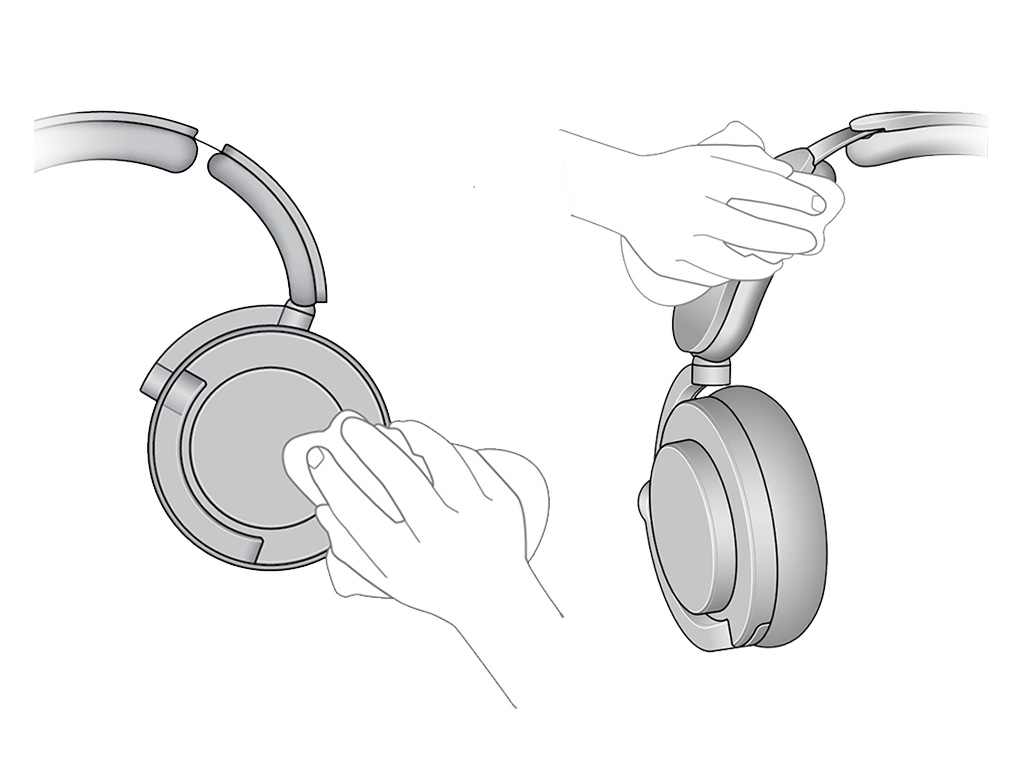
Outer caps
Wipe away dust or debris from the perforations in the ear cup covers with a soft, damp, lint-free cloth.
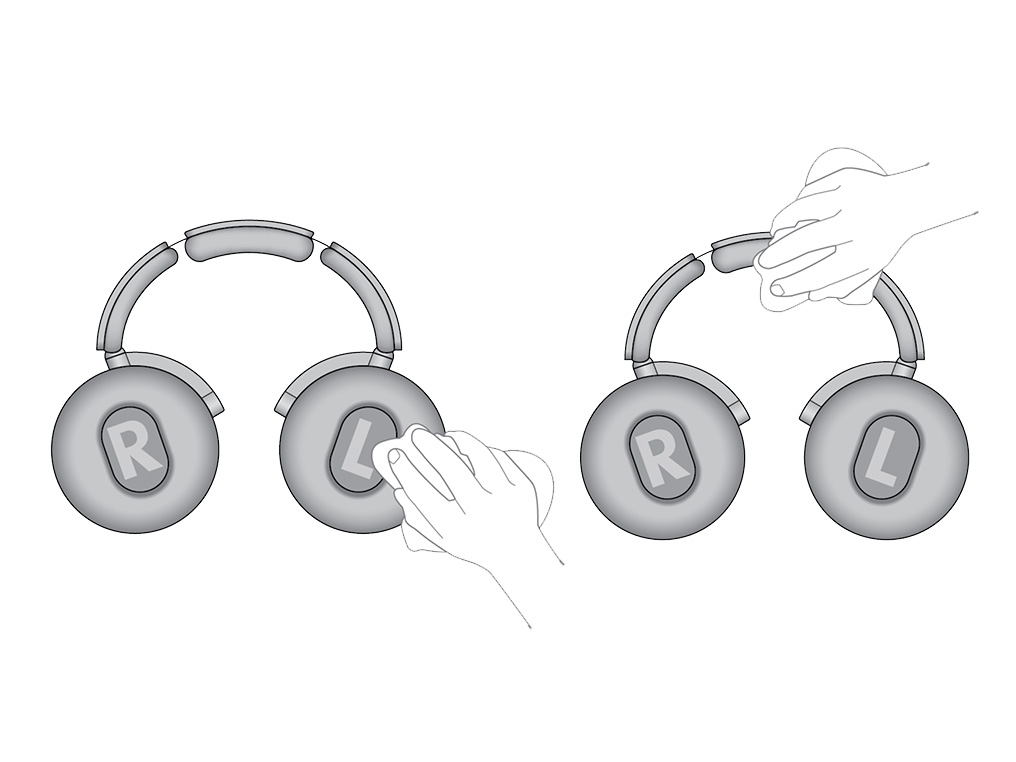
Ear cushions and headband
Wipe away dust or debris with a soft, damp, lint-free cloth.
Please select the appropriate option
Please select the appropriate option


Please select the appropriate option
Place your headphones on your head
Your headphones must be worn on the head for ANC to engage.
Ensure the microphones on the earcups aren't covered as this will impact the performance of the ANC.
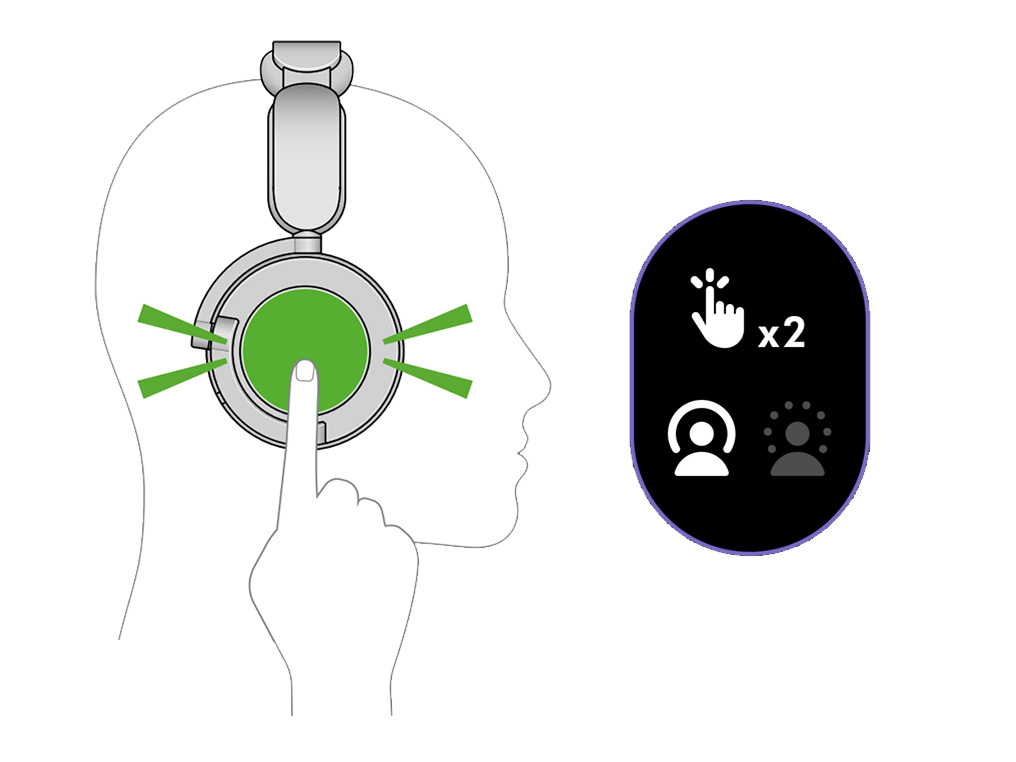
Using your Active noise cancelling (ANC)
Use Active noise cancellation (ANC) to reduce the background noise around you.
There are two modes of ANC. You can double tap either outer cap to switch between noise cancelling modes, or select your preferred level within the MyDyson™ app.
Reset your headphones
Plug your headphones in to charge.
Press and hold the power button and joystick simultaneously for 5 seconds to reset your headphones.
Check your Active noise cancelling (ANC) settings
Your active noise cancelling (ANC) settings may have been changed unintentionally.
You can use ANC to reduce the background noise around you.
There are two modes of ANC. You can double tap either outer cap to switch between noise cancelling modes.
Alternatively, you can change the level of ANC from the home screen of the MyDyson™ app.
Change the settings to find your personal preference.
Check the EQ settings in the MyDyson™ app
You can change the EQ settings from the home screen of the MyDyson™ app.
Change the settings to find your personal preference.
Check the MyDyson™ software
Make sure your OnTrac™ headphones are running on the latest software.
You can check what version of the software you are running in the settings of the app. To access your headphones settings, select your machine from the hamburger menu and then select the settings menu icon.
By turning auto-update on, you can make sure you automatically receive the latest features and your app functions correctly.
It can take up to 24 hours for your headphones to receive updates after it is enabled.
Check the settings in the app you're using
Check to see if the issue remains when using another device program.
If the issue only exists when using a specific program, the issue is likely related to that program.
Check the settings on your device
In the settings of your device, you may have a volume limiter.
Check within the settings of your device and ensure no options are selected that reduces the volume of media.
Check the software on your device
If your device uses LHDC Bluetooth, sound distortion can occur if the device software isn’t up to date.
Please ensure your device is using the latest software.
Reset your headphones
Plug your headphones in to charge.
Press and hold the power button and joystick simultaneously for 5 seconds to reset your headphones.
Head detect
If hair or clothing (for example a hoodie) is in between your head and the headphones, it may affect the head detect sensor. This could cause your audio to start and stop unexpectedly.
Moving your hair or clothing out of the way should help.
Alternatively, you can turn off the head detect sensor in the MyDyson™ app’s product settings. Be aware that this deactivates the following features:
- Auto off
- Auto pausing and playing
- Auto muting in calls
Also, your headphones will collect sound data continuously, unless you turn them off manually.
Head detect
If hair or clothing (for example a hoodie) is in between your head and the headphones, it may affect the head detect sensor. This could cause your audio to start and stop unexpectedly.
Moving your hair or clothing out of the way should help.
Turn off head detect
Alternatively, you can turn off the head detect sensor in the MyDyson™ app’s product settings. Be aware that this deactivates the following features:
- Auto off
- Auto pausing and playing
- Auto muting in calls
Also, your headphones will collect sound data continuously, unless you turn them off manually.
Recalibrate your headphones
We recommend that you recalibrate the headphones after changing the ear cushions.
You'll find instructions in the MyDyson™ app.
Stay within Bluetooth range
The range of Bluetooth is around 30 feet or 10 meters. However, this communication range can become reduced depending on obstacles or the environment the headphones are being used in.
Check the settings in the app you're using
Check to see if the issue remains when using another device program.
If the issue only exists when using a specific program, the issue is likely related to that program.
Reset your headphones
Plug your headphones in to charge.
Press and hold the power button and joystick simultaneously for 5 seconds to reset your headphones.
Check the ear cushions
Ensure the ear cushions are correctly attached.
Twist the ear cushions clockwise until they’re locked in place.
Check your Active noise cancelling (ANC) settings
Your active noise cancelling (ANC) settings may have been changed unintentionally.
You can use ANC to reduce the background noise around you.
There are two modes of ANC. You can double tap either outer cap to switch between noise cancelling modes.
Alternatively, you can change the level of ANC from the home screen of the MyDyson™ app.
Change the settings to find your personal preference.
Check the EQ settings in the MyDyson™ app
You can change the EQ settings from the home screen of the MyDyson™ app.
Change the settings to find your personal preference.
Check the MyDyson™ software
Make sure your OnTrac™ headphones are running on the latest software.
You can check what version of the software you are running in the settings of the app. To access your headphones settings, select your machine from the hamburger menu and then select the settings menu icon.
By turning auto-update on, you can make sure you automatically receive the latest features and your app functions correctly.
It can take up to 24 hours for your headphones to receive updates after it is enabled.
This issue only affects devices using HarmonyOS.
Open the phone Settings page and click to enter the Bluetooth interface.
Click the Settings button next to your connected Bluetooth device.
Tap the Bluetooth device volume sync button on your phone.
Make sure the Bluetooth volume sync function is turned on.
Reset your headphones
Plug your headphones in to charge.
Press and hold the power button and joystick simultaneously for 5 seconds to reset your headphones.
Please select the appropriate option
Battery-saving head detect
After 30 minutes of inactivity your headphones will automatically turn off to save battery.
To turn them back on, hold the power button down for 2 seconds.

Recalibrate your headphones
If you are experiencing intermittent power, we recommend you go to the Product settings section of the MyDyson™app and recalibrate your headphones.
Head detect
Head detect can be toggled on and off in the app.
If audio pauses unexpectedly while wearing your headphones, try turning off the head detect sensor. Be aware that this deactivates the following features:
- Auto off
- Auto pausing and playing
- Auto-muting in calls
- Status LED and tones
Also, your headphones will collect sound data continuously, unless you turn them off manually.
Updating your machine's software
For best performance, please ensure that your headphones always have the latest software version installed.
Current software
The current software your headphones are running on can be checked within the machine's settings.
Update software
If your software is not fully up to date, you will have an option to update the software in the menu.
Reset your headphones
Press and hold down the power button and joystick simultaneously for 15 seconds.
Please be aware that your headphones will not operate at a temperature of, or below, -6°C /21°F.
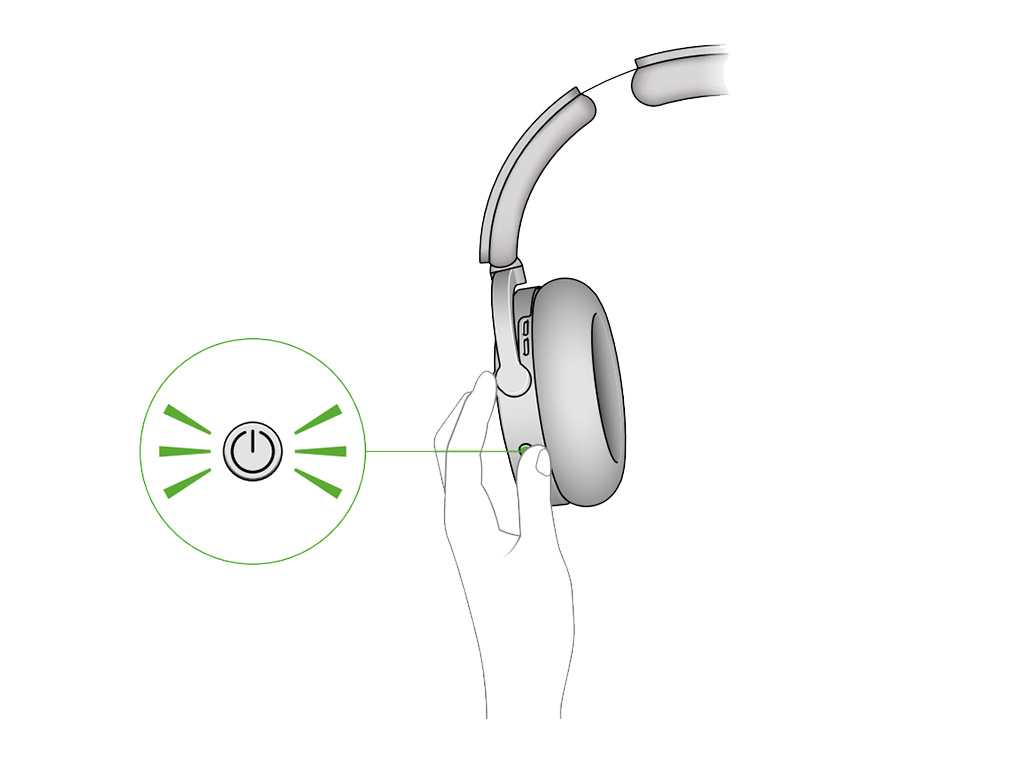
Test your headphones
Press and hold the power button for two seconds.
LED
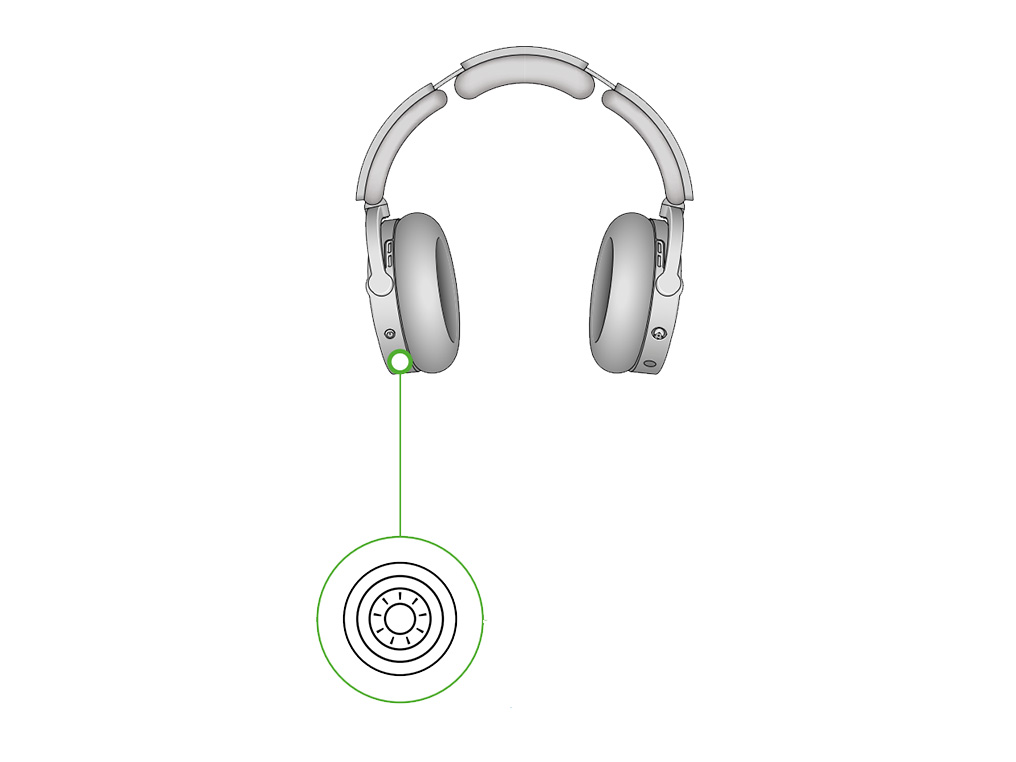
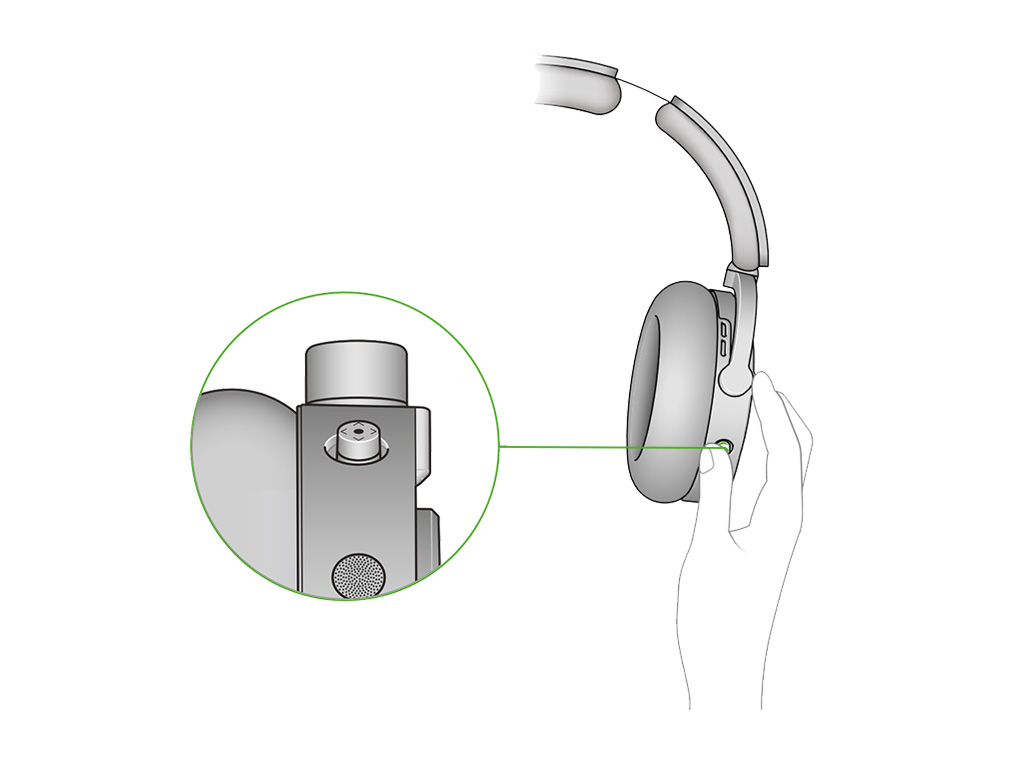
Locate the charge indicator at the front centre of the left ear cup.

What light is showing on your headphones?
Charge from another source of power
Try charging your headphones in a different plug socket or from a different USB port.
Charge with another USB-C cable
Try using another USB-C cable to charge your headphones.
Updating your machine's software
For best performance, please ensure that your headphones always have the latest software version installed.
Current software
The current software your headphones are running on can be checked within the machine's settings.
Update software
If your software is not fully up to date, you will have an option to update the software in the menu.
Reset your headphones
Unplug your headphones, the reset will not be successful when the headphones are plugged in to charge.
Press and hold the power button for 15 seconds.
When the headphones have reset the LED will flash either once white and once green or twice white - either behaviour indicates a successful reset.
Put the headphones on to check if you can hear the audio welcome tone.
Charge your headphones – If required
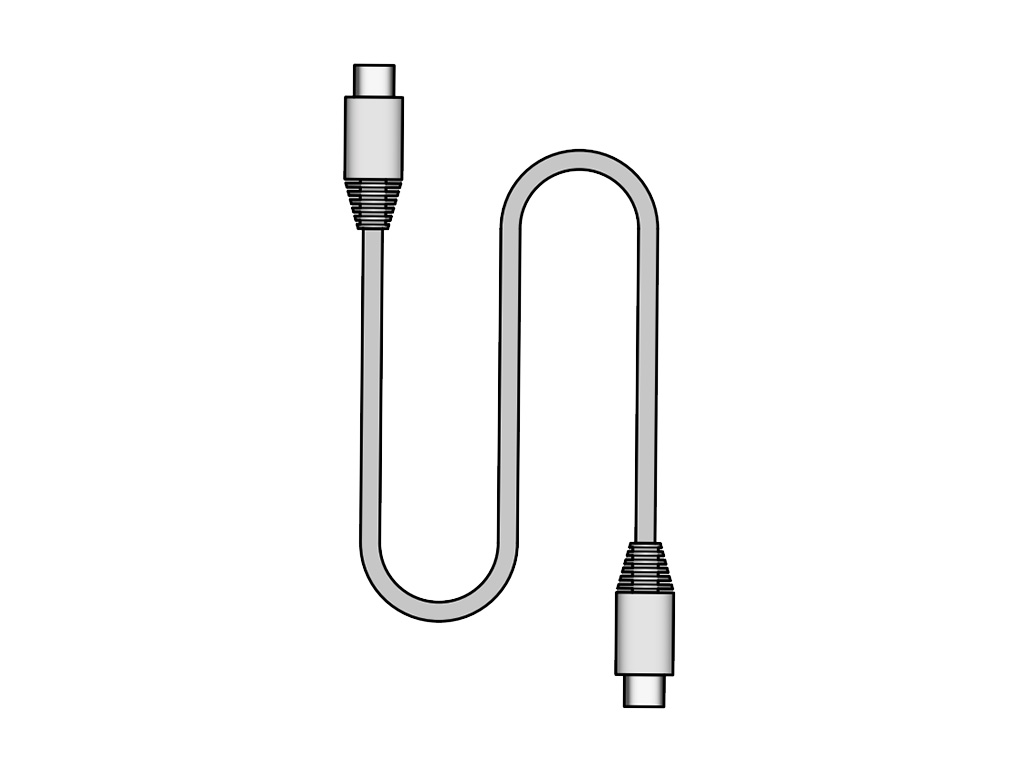
Charge your headphones using the Dyson USB-C cable.
Plug the USB-C cable into a wall plug or another power source.
When connected to a power supply, the LED on the left earcup will pulse amber, and change to a green light when the battery is more than 10% charged
When fully charged, the green light will fade to off.
Update installing
A pulsed flashing white light indicates that the headphones are installing an over-the-air software update.
Your headphones cannot be used while the update is installing.
Low battery
If the battery is under 10% charged, the LED will flash amber for 5 seconds.
Charge your headphones
Charge your headphones using the Dyson USB-C cable.
Plug the USB-C cable into a wall plug or another power source.
When connected to a power supply, the LED on the left earcup will pulse amber, and change to a green light when the battery is more than 10% charged
When fully charged, the green light will fade to off.
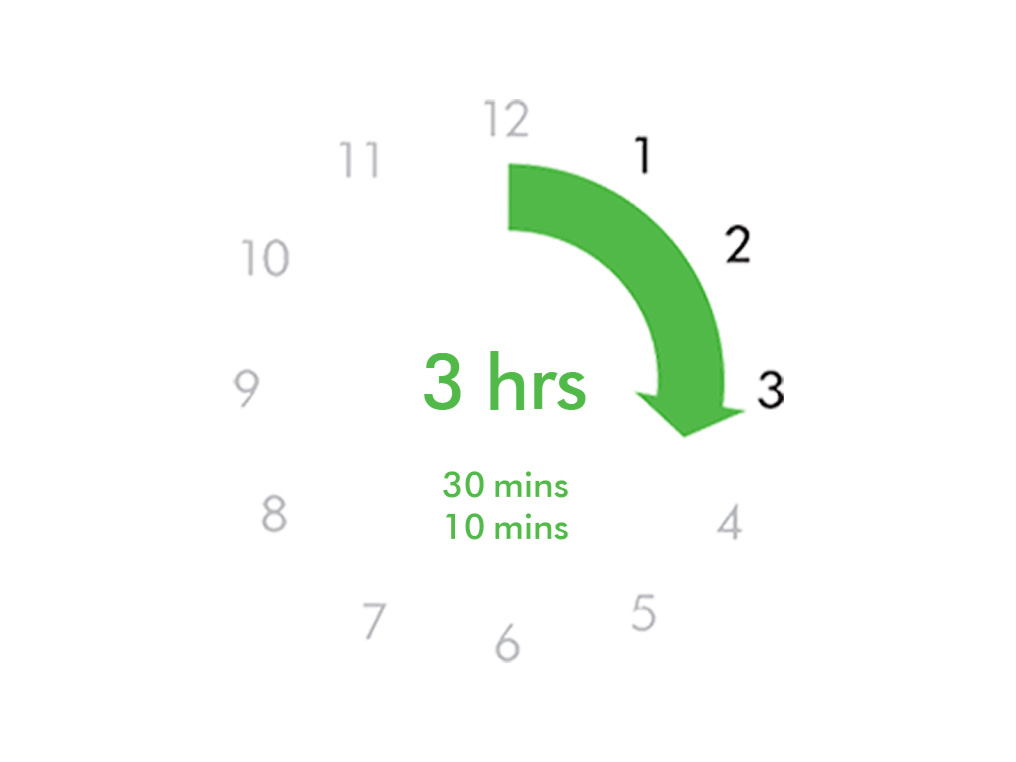
Charging times
3 hours will provide a full charge and up to 55 hours of listening time.
30 minutes charging will provide up to 9.5 hours of listening time.
10 minutes charging will provide up to 2.5 hours of listening time.
Please note these timings can change based off the USB-C cable being used as well as the charging adapter.
Charging from laptops and power supplies less than 15W can take significantly longer to charge the headphones.
What light is showing on your headphones?
Headphones charged
When the battery is more than 10% charged The LED will turn green.
Test your headphones
Remove your headphones from the charger and reattempt to use.
Leave your headphones to charge
When connected to a power supply and charging, the LED will pulse amber.
When fully charged the LED will turn green and then fade to off.
Test your headphones
Remove your headphones from the charger and reattempt to use.
Charge your headphones
Charge your machine using the Dyson USB-C cable.
Plug the USB-C cable into a wall plug or another power source.
The LED on the left earcup will pulse amber when charging and change to a green ring of light when fully charged. After 5 minutes the green ring of light will fade to off.
What light is showing on your headphones?
Run time
3 hours of charging will provide a full charge and up to 55 hours of listening time.
30 minutes charging will provide up to 9.5 hours of listening time.
10 minutes charging will provide up to 2.5 hours of listening time.
Please note these timings can change based off the USB-C cable being used as well as the charging adapter.
Charging from laptops and power supplies less than 15W can take significantly longer to charge the headphones.
Battery-saving head detect
After 30 minutes of inactivity your headphones will automatically turn off to save battery.
To turn them back on, hold the power button down for 2 seconds.
Toggling head detect on/off
Head detect can be toggled on and off in the app.
Be aware that turning off the head detect sensor deactivates the following features:
- Auto off
- Auto pausing and playing
- Auto-muting in calls
- Status LED and tones
This can reduce the run time of your headphones.
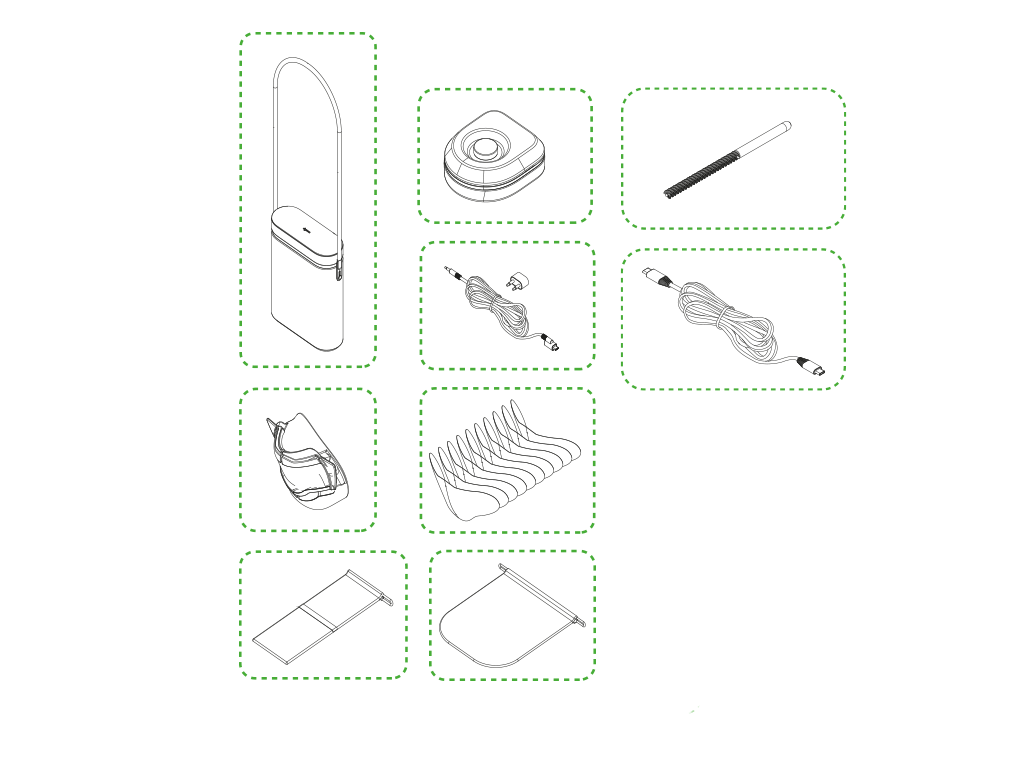
How to buy and fit parts for your machine
Get original replacement parts direct from Dyson and learn how to fit them with your machine.
Outer caps and ear cushions
Please choose the part you would like to replace:
- Outer caps
- Ear cushions
Accessories
Please choose the part you would like to replace:
- In-flight adaptor kit
- USB-C Charger
Please select the appropriate option
Accessories
Please choose the part you would like to replace:
- In-flight adaptor kit
- USB-C Charger
Please select the appropriate option
Check your guarantee
Please check if your machine is under guarantee or purchase replacement parts below - your part will then be delivered to you.
Your machine comes with complimentary parts when covered under your guarantee policy. To check if yours is still under guarantee, visit MyDyson
Please select the appropriate option
Outer caps and ear cushions
Please choose the part you would like to replace:
- Outer caps
- Ear cushions
Please select the appropriate option
Check your guarantee
Please check if your machine is under guarantee or purchase replacement parts below - your part will then be delivered to you.
Your machine comes with complimentary parts when covered under your guarantee policy. To check if yours is still under guarantee, visit MyDyson
Please select the appropriate option
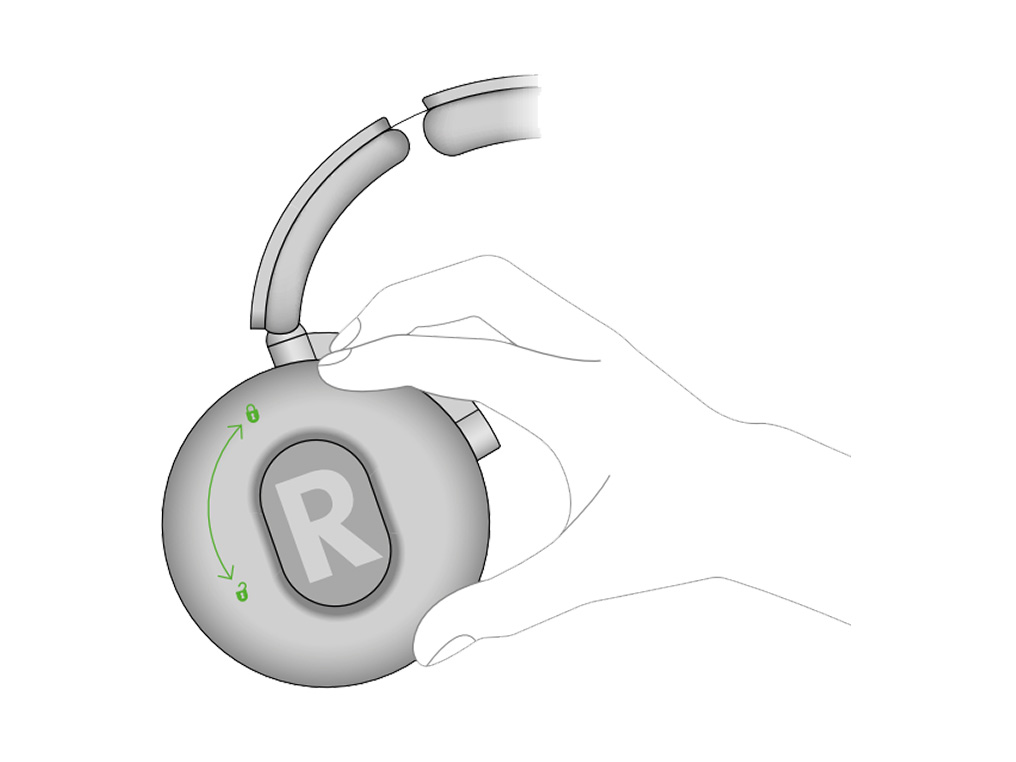
Replacing the ear cushions
To remove an ear cushion, twist it anti-clockwise.
Select the correct replacement for the left or right ear. These are marked with an L and an R on both the headset and the ear cushions themselves.
Fit your ear cushions
Line up the long and short slots on the ear cushions with the matching ridges on the headset. Push down and twist clockwise, until it clicks into place.
Make sure the ear cushion is flush to the headphones to ensure proper functionality.
Recalibrate your headphones
When you replace the ear cushions, we recommend you go to the Product settings section of the MyDyson™app and recalibrate your headphones.
You’ll find this under Replacing accessories.
Check your guarantee
Please check if your machine is under guarantee or purchase replacement parts below - your part will then be delivered to you.
Your machine comes with complimentary parts when covered under your guarantee policy. To check if yours is still under guarantee, visit MyDyson
Please select the appropriate option
Replacing the outer caps
To remove an outer cap, twist the outermost circular part anti-clockwise.
Align the replacement outer cap on the headphones and twist clockwise until it clicks.

Serial number location
Your serial number can be found behind the right earcup on your headphones under the ear cushion.
To remove the ear cushion, twist it anti-clockwise.
Please select the appropriate option
Please select the appropriate option
Reset your headphones
Plug your headphones in to charge.
Press and hold the power button and joystick simultaneously for 5 seconds to reset your headphones.
Please select the appropriate option
Please select the appropriate option
Active noise cancellation
Use Active noise cancellation (ANC) to reduce the background noise around you.
There are two modes of ANC. You can double tap either outer cap to switch between noise cancelling modes, or select your preferred level within the MyDyson™ app.
Isolation mode
The maximum level of ANC, reducing surrounding background noise.
This is the default setting for your headphones.
Transparency mode
To hear the environment around you.
If cap appears to be difficult to remove, use thumb to push it upwards in the middle of the outer cap sidewall. The removal will become easier after a few cycles of fitting/ removing.
Replacing the outer caps
Please follow the steps in the animation.
Find the text version of the step-by-step guide instead, under "Is there anything else we can help you with?”
Is there anything else we can help you with?
If cap appears to be difficult to remove, use thumb to push it upwards in the middle of the outer cap sidewall. The removal will become easier after a few cycles of fitting/ removing.
Replacing the outer caps
To remove an outer cap, twist the outermost circular part anti-clockwise.
Align the replacement outer cap on the headphones and twist clockwise until it clicks.
Replacing the ear cushions
Please follow the steps in the animation.
Find the text version of the step-by-step guide instead, under "Is there anything else we can help you with?”
Recalibrate your headphones
When you replace the ear cushions, we recommend you go to the Product settings section of the MyDyson™app and recalibrate your headphones.
You’ll find this under Replacing accessories.
Is there anything else we can help you with?
Replacing the ear cushions
To remove an ear cushion, twist it anti-clockwise.
Select the correct replacement for the left or right ear. These are marked with an L and an R on both the headset and the ear cushions themselves.
Fit your ear cushions
Line up the long and short slots on the ear cushions with the matching ridges on the headset. Push down and twist clockwise, until it clicks into place.
Make sure the ear cushion is flush to the headphones to ensure proper functionality.
Recalibrate your headphones
When you replace the ear cushions, we recommend you go to the Product settings section of the MyDyson™app and recalibrate your headphones.
You’ll find this under Replacing accessories.
Charging your headphones
Charge your headphones using the Dyson USB-C cable.
Plug the USB-C cable into a wall plug or another power source.
When connected to a power supply, the LED on the left earcup will pulse amber, and change to a green light when the battery is more than 10% charged
When fully charged, the green light will fade to off.
Charging times
3 hours will provide a full charge and up to 55 hours of listening time.
30 minutes charging will provide up to 9.5 hours of listening time.
10 minutes charging will provide up to 2.5 hours of listening time.
Please note these timings can change based off the USB-C cable being used as well as the charging adapter.
Charging from laptops and power supplies less than 15W can take significantly longer to charge the headphones.
Open the PDF
Please open the PDF for the user safety and compliance information.
Quick start guide
Please follow the steps in the animation.
Find the text version of the step-by-step guide instead, under "Is there anything else we can help you with?”
Is there anything else we can help you with?
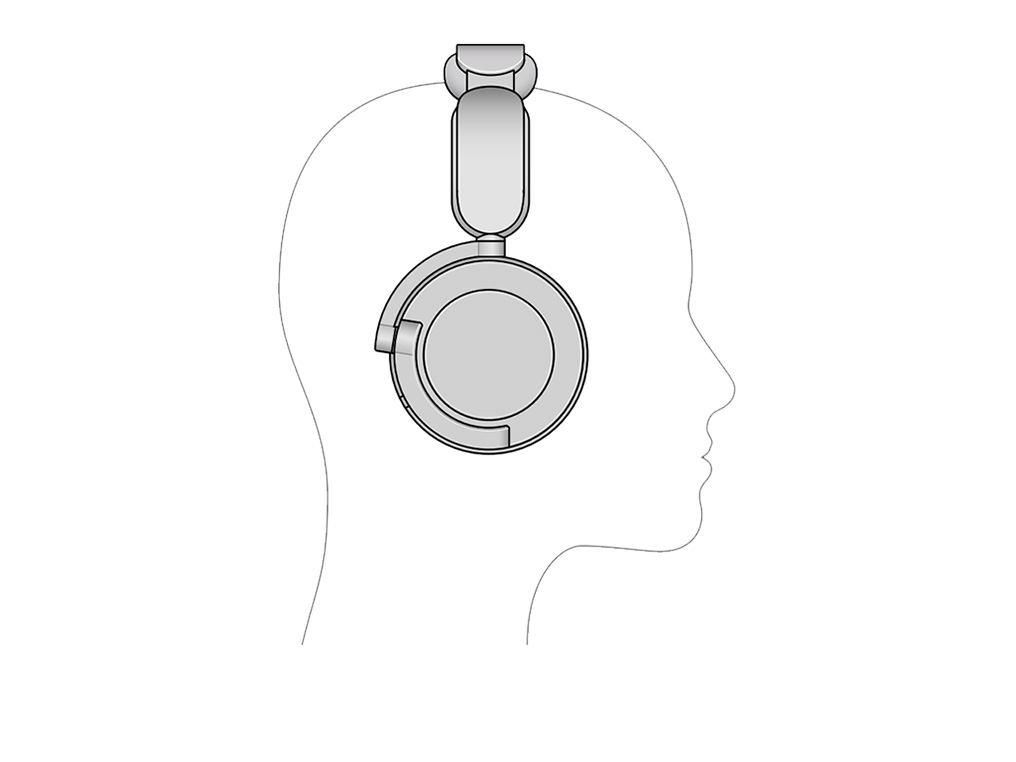
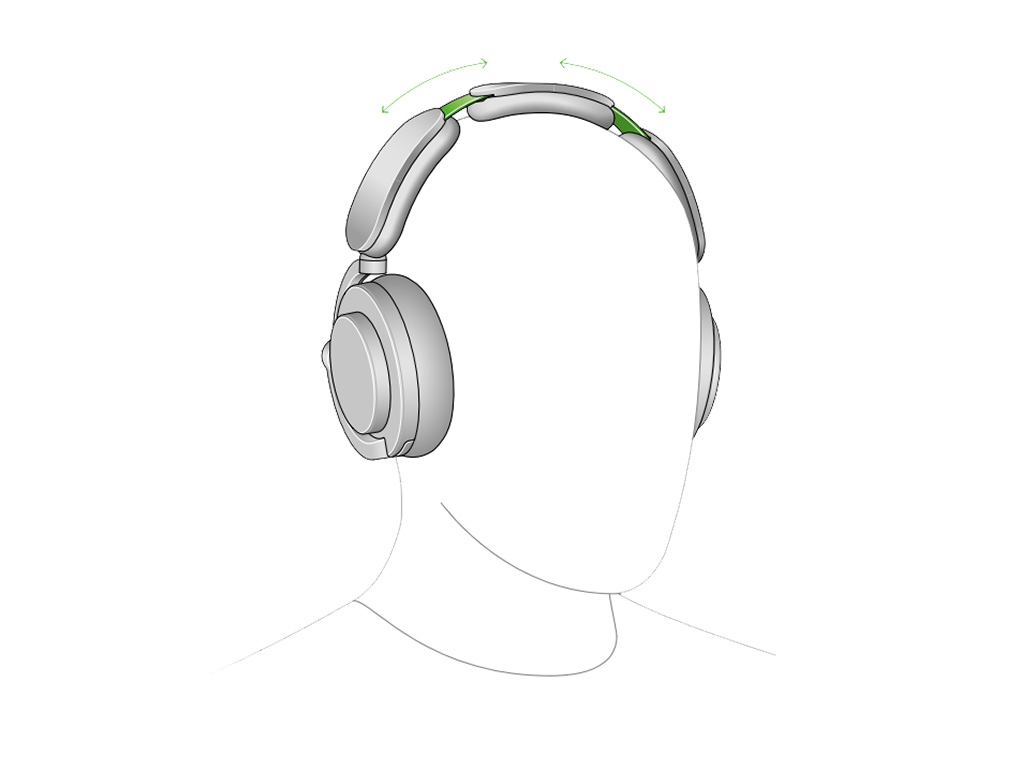
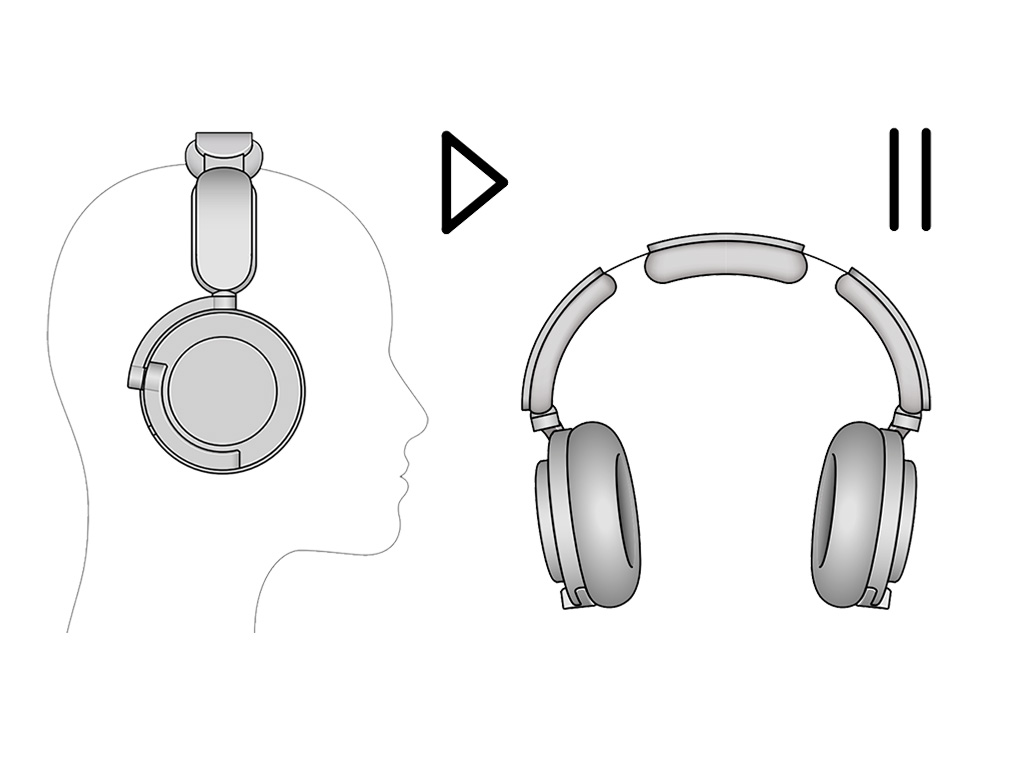
Adjust your headphones
Put your headphones on.
To adjust the headband, grip and slide into place for a comfortable fit.
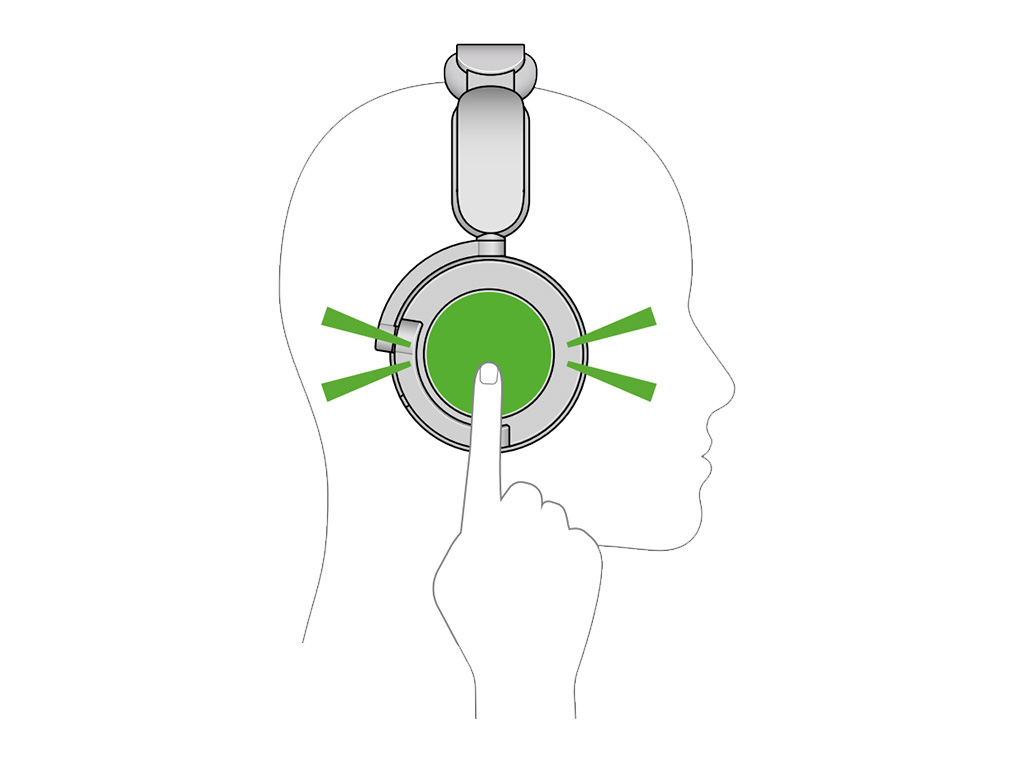
Power button
Turn your headphones on and off, and connect to a Bluetooth wireless technology device.
Hold for two seconds to turn on or off, and five seconds to pair.
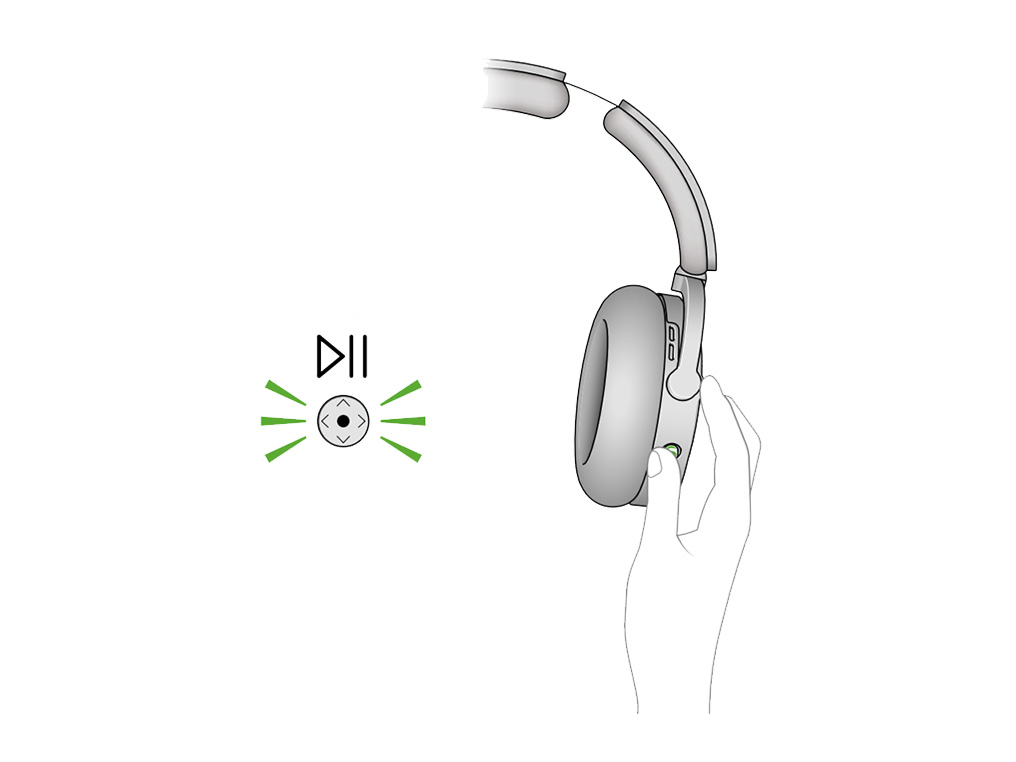
Joystick
Lets you control music, adjust volume and access your voice assistant – on the back of your right ear cup.
Active noise cancellation
To switch between modes, double tap either ear cup.
Autopause/Play
Your headphones will automatically pause your audio when you take them off, and automatically play your audio when you put them back on.
Battery-saving head detect
After 30 minutes of inactivity your headphones will automatically turn off to save battery. To turn them back on, hold the power down for 2 seconds.
Head detect
Head detect can be toggled on and off in the app.
If audio pauses unexpectedly while wearing your headphones, try turning off the head detect sensor. Be aware that this deactivates the following features:
- Auto off
- Auto pausing and playing
- Auto-muting in calls
- Status LED and tones
Also, your headphones will collect sound data continuously, unless you turn them off manually.
WARNING: The In-flight 2-pin adaptor is for connection to an audio outlet only. Plugging in to a mains socket outlet may result in a fire or pose a risk of an electric shock.
In-flight adaptor (available separately)
Connect the In-flight cable to the 2-pin adaptor, then plug into the plane's entertainment system via the audio port.
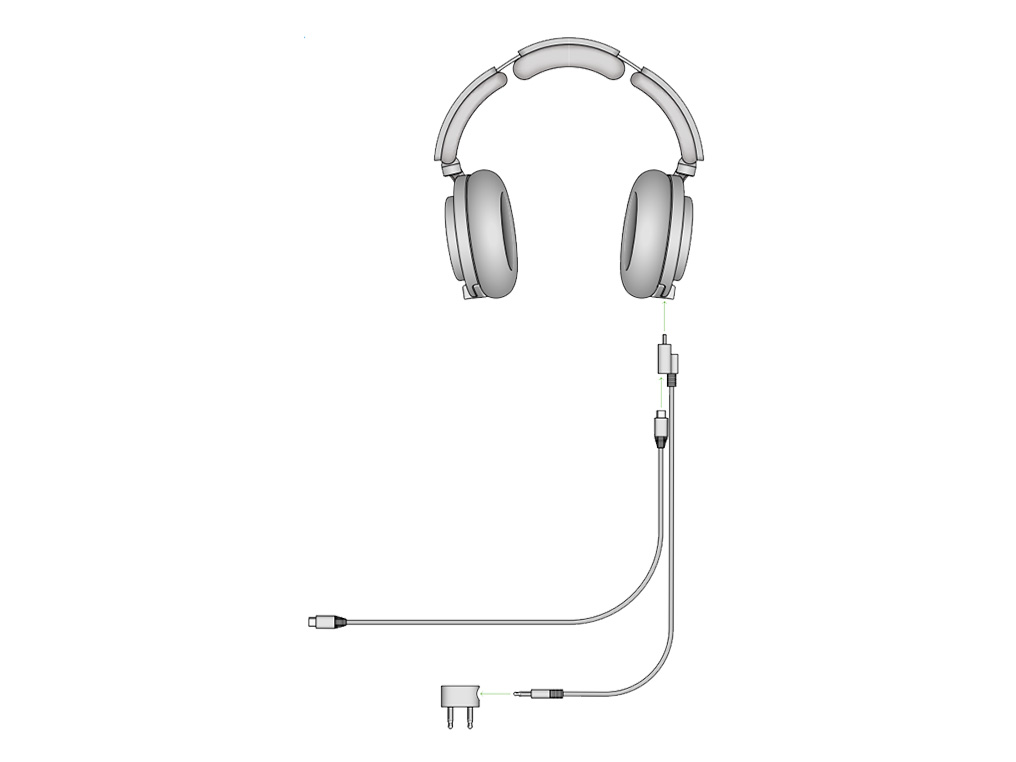
Compatible with most in-flight entertainment systems.
Charging
The In-flight adaptor will only charge your Dyson OnTrac™ noise-cancelling headphones when the USB-C cable is also used.
Audio controls
Please note that the audio controls on your headphones will not function when the In-flight adaptor is in use.
Using the intuitive joystick
Control your audio using the MyDyson™app or the joystick on the back of your right ear cup.
Please select the appropriate option
The following joystick functions may not work with certain applications: pause/play, move to previous/next file, rewind, or fast forward. This is due to the sound source application, rather than the headphones.
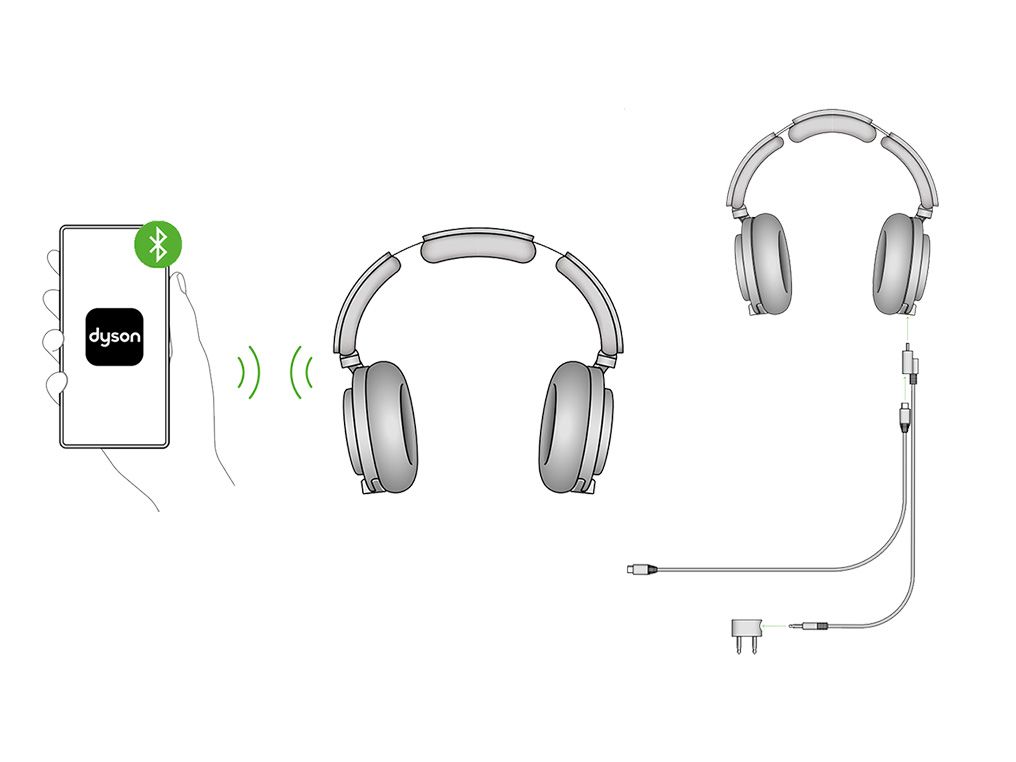
Controlling your audio
To play audio through your headphones, you’ll need to either connect them using Bluetooth or the in-flight adaptor cable.
Play and pause
Press the middle of the joystick to play.
Press it again to pause.
Skip and seek
Tap the joystick on the left or right to skip tracks.
Press and hold to fast forward or rewind.
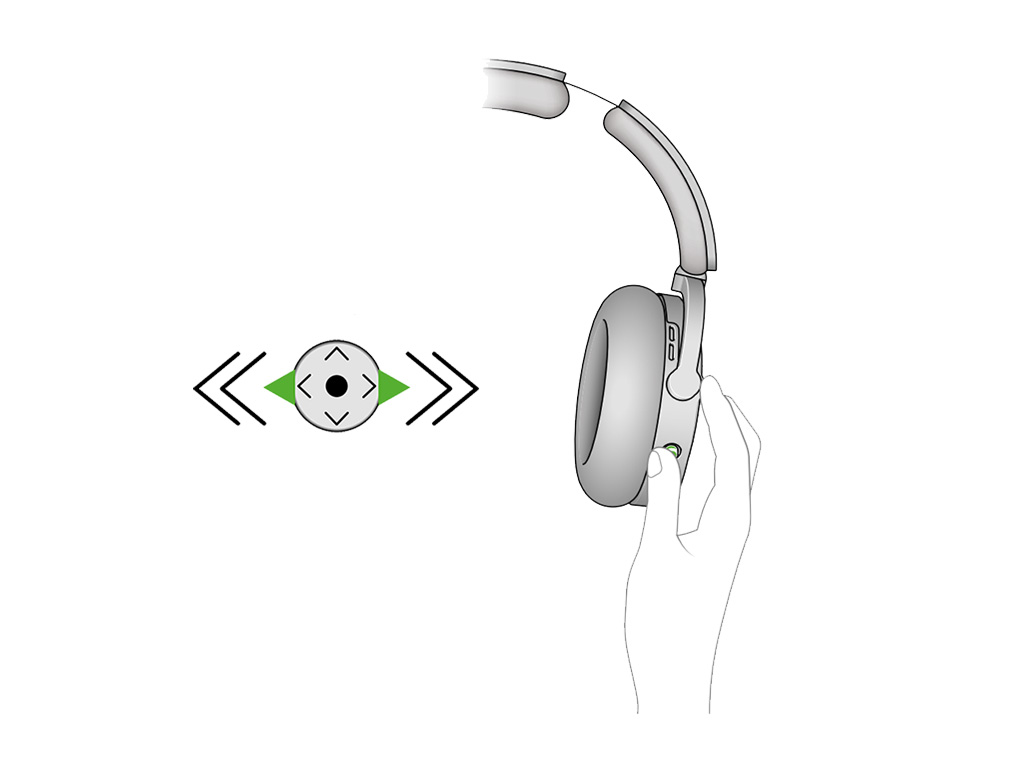
When using all music apps, the fast forward and rewind feature will only work on supported tracks.
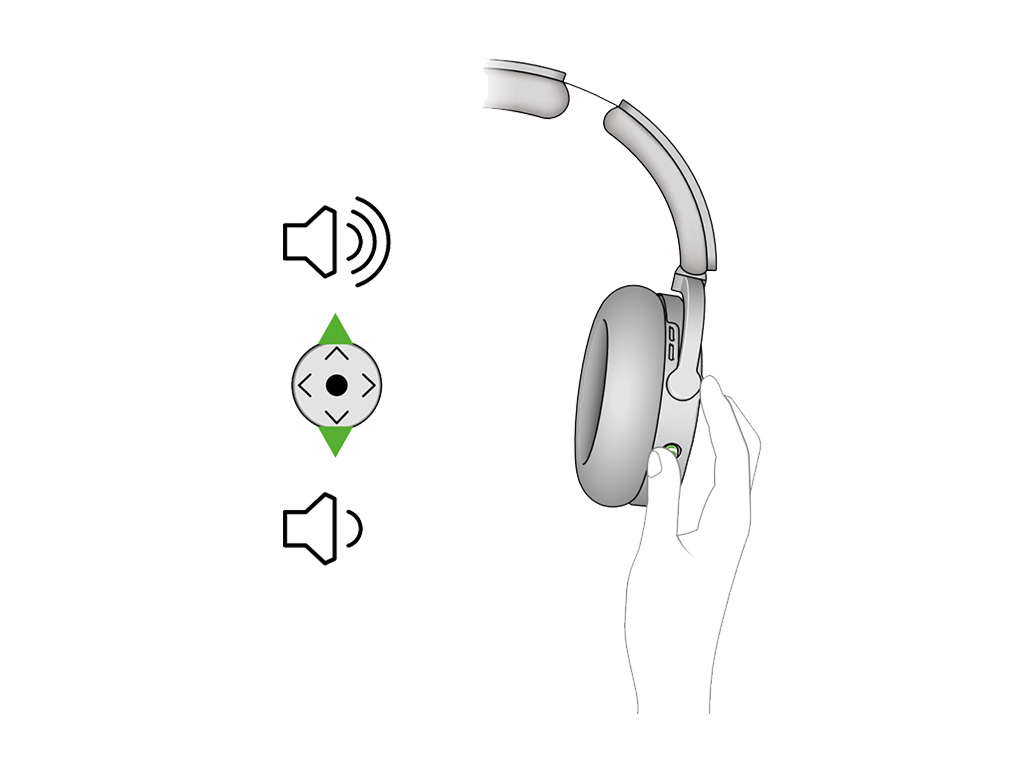
Volume
Push the joystick up or down to adjust the volume.
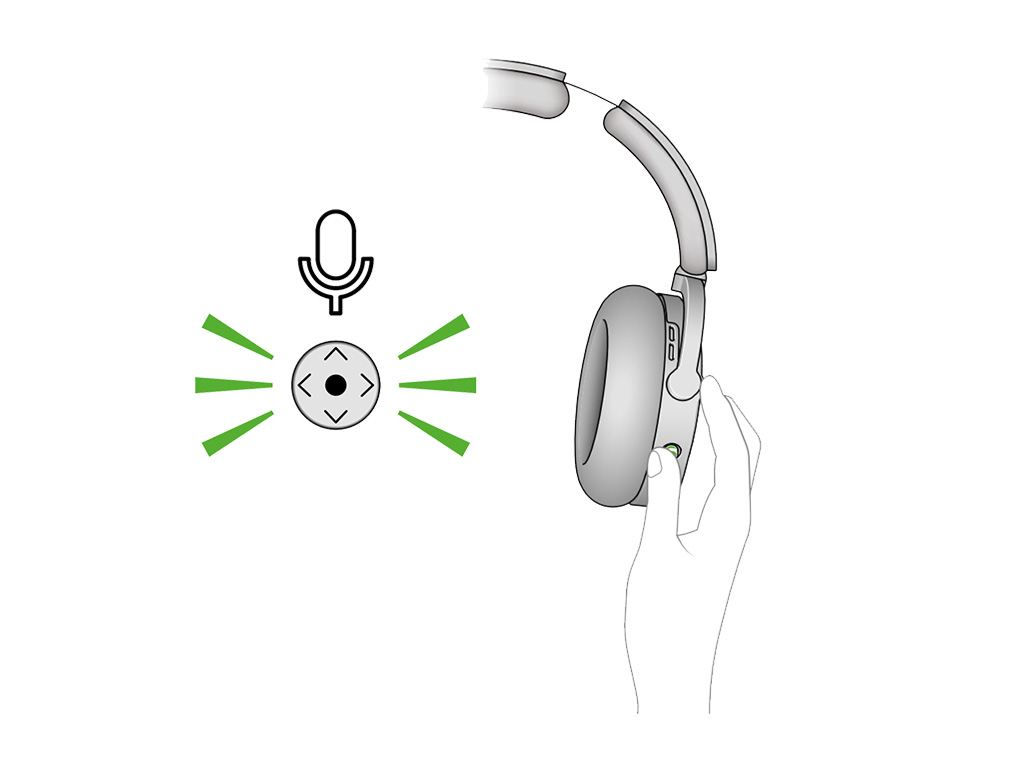
Activating voice assistant
Press and hold the middle of the joystick for two seconds to activate the voice control on your mobile device.
Answering phone calls
To accept an incoming call, press the joystick.
To decline a call, press and hold the joystick.
To end a call, press the joystick.

Battery life
Your headphones will provide up to 55 hours of listening, even with ANC switched on. And if you’re running low, a 10-minute charge delivers 2.5 hours of battery, and a 30-minute charge delivers 9 hours.
LED
Locate the charge indicator at the front centre of the left ear cup.
Please select the appropriate option
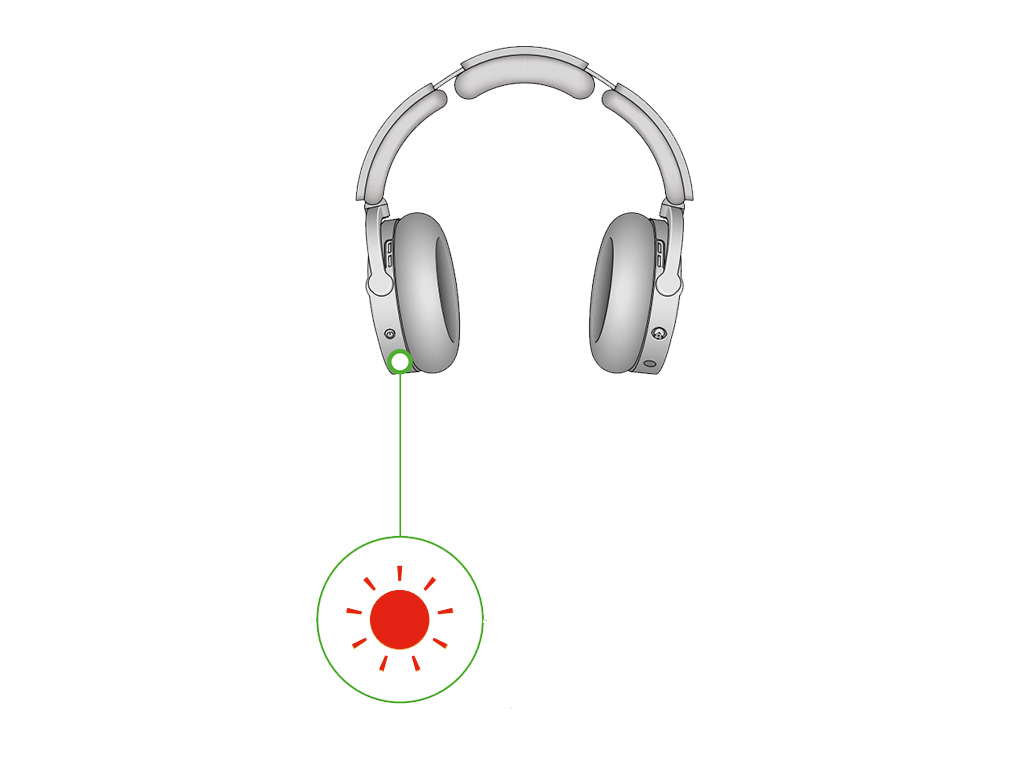
Seek Dyson support
Red LED – flash for 5 seconds.
Update installing
White LED – pulsed flashing.
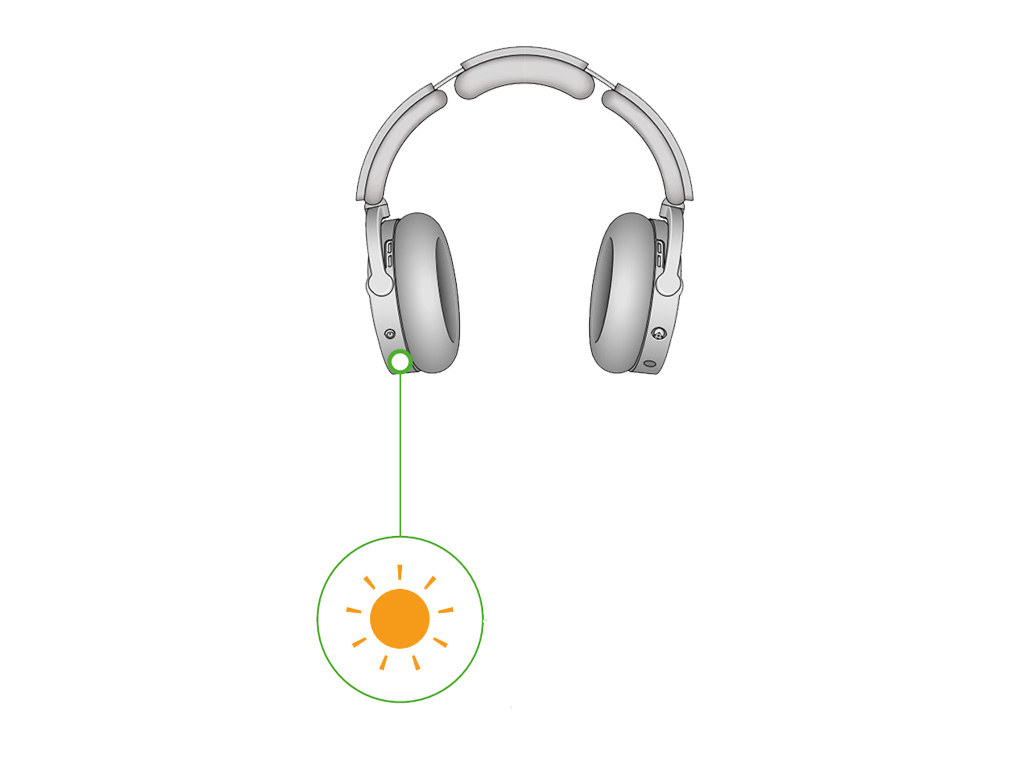
Battery is more than 10% charged
When the battery is more than 10% charged The LED will turn green.
Low battery
If the battery is under 10% charged, the LED will flash amber for 5 seconds.
Auto power off
When the product turns off after 30 minutes of inactivity, you will see a white LED.

Charging
When connected to a power supply and charging, the LED will pulse amber.
When fully charged the LED will turn green and then fade to off.
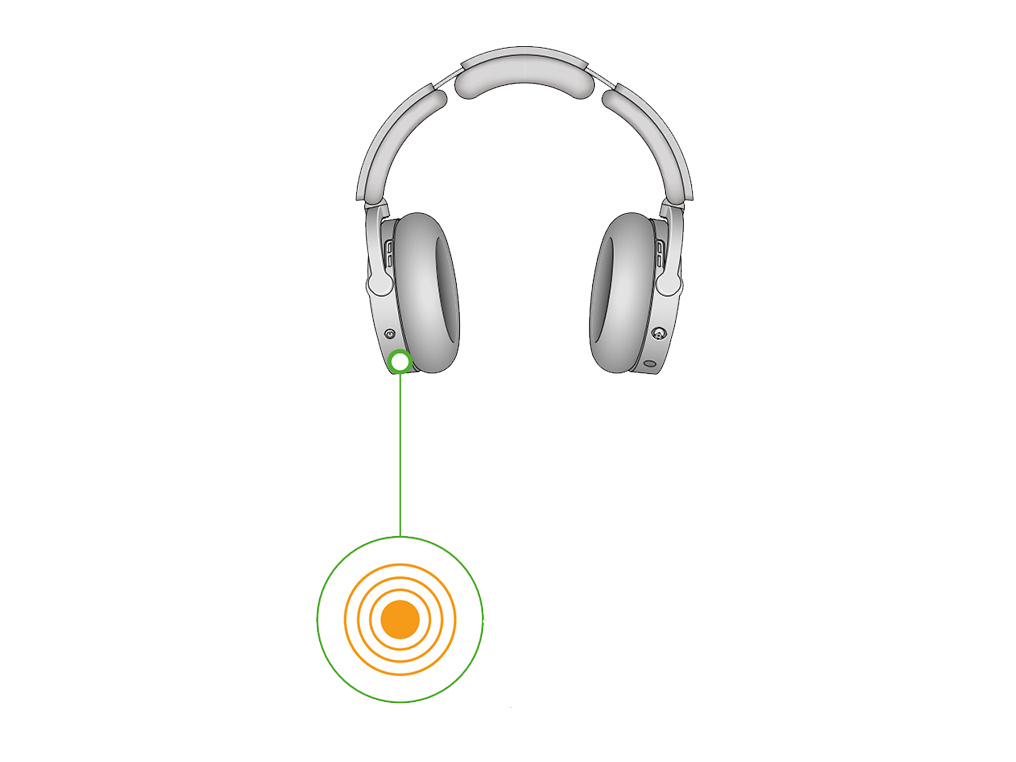
Bluetooth in discoverable mode
Blue LED – continuous pulse.
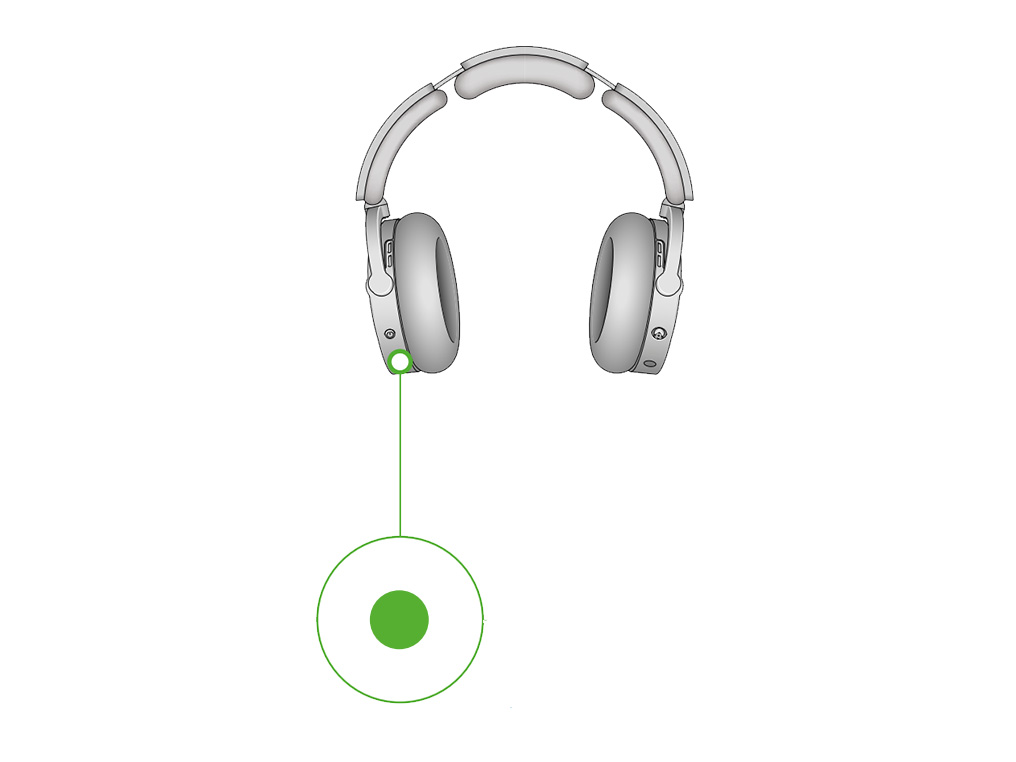
Bluetooth successfully connected
Blue LED – continuous pulse ends.
Audio – welcome tone.
Apologies. We can't help you online.
But our Customer Support Team will be able to solve your problem. Call us on 1-877-397-6622
We're glad the problem's been solved.
Please let us know if there's anything else we can help you with.
The Dyson warranty

'How to ' videos and tips

Exclusive owner benefits

Expert advice. 7 days a week.

Hassle-free repairs and replacement
Expert customer service, 6 days a week.
Further help
Dyson OnTrac™ (CNC Black Nickel)