
Most common topics
Please select the appropriate option


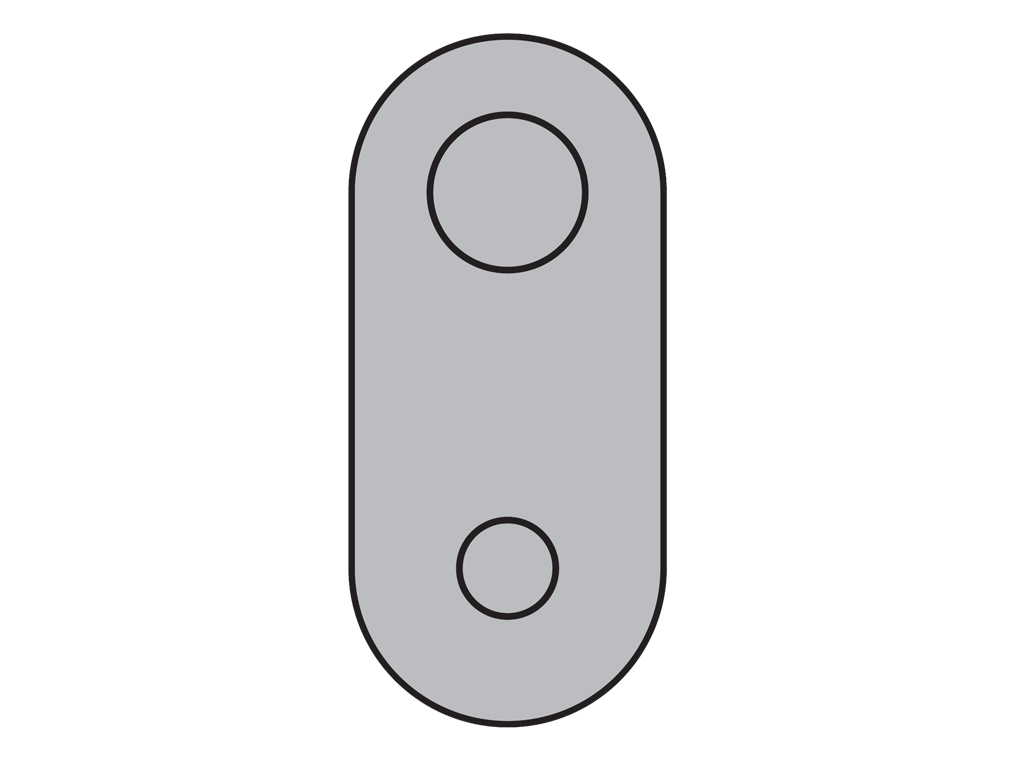
Airspeed control
Please ensure the correct button is being pressed.
On/Off

Airspeed control

Test the remote control
Please ensure the correct button is being pressed.
On/Off

Fan only mode

Airspeed control
Manual humidity level control
Sleep timer

Automatic humidity mode

F1
An F1 message indicates an issue with the Piezo.
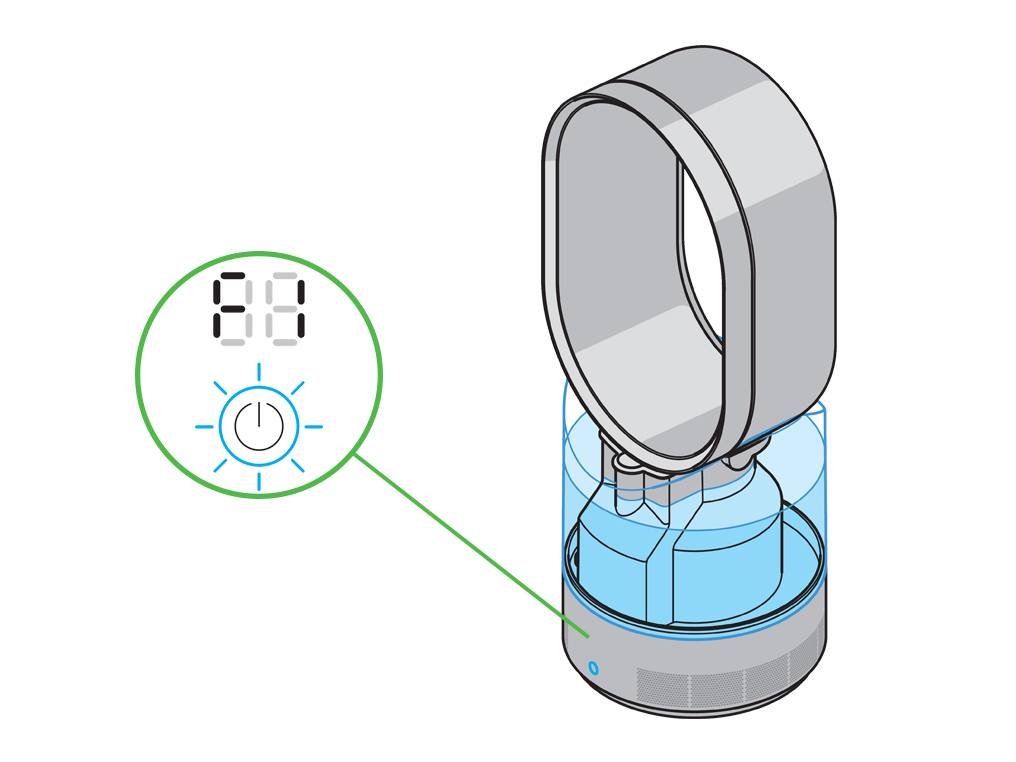
Turn off & unplug the machine, leave it for 60 seconds and then retest.
This process may need to be repeated up to 3 times.
F2
An F2 message indicates an issue with the UV-C emitter.
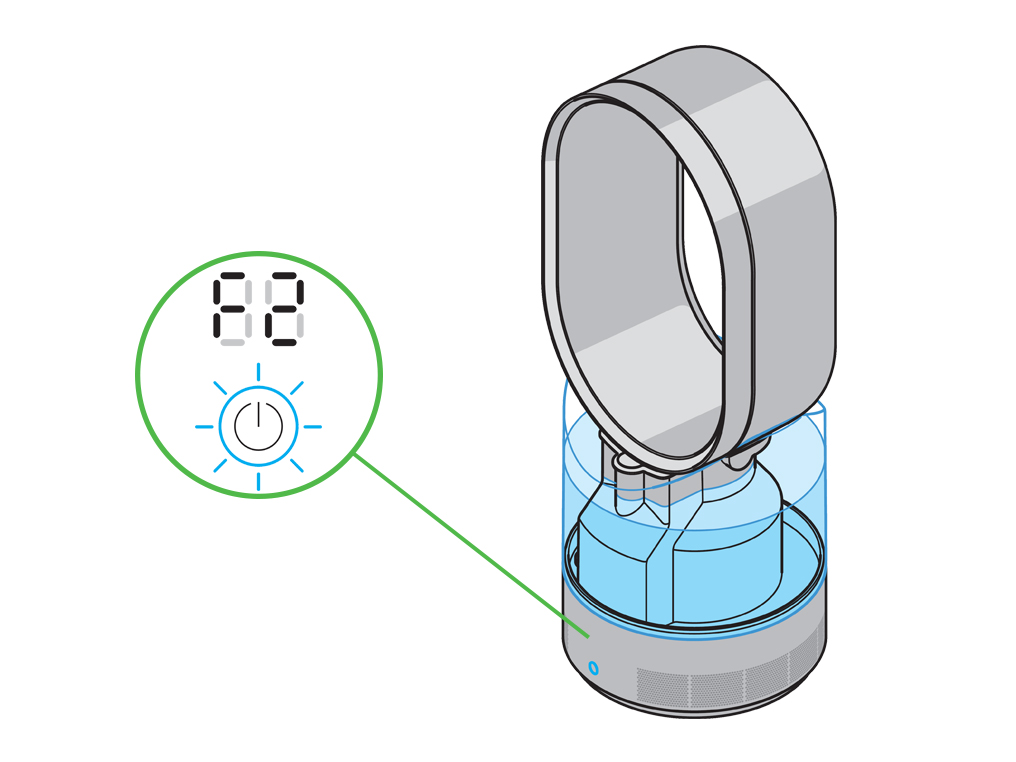
Turn off & unplug the machine, leave it for 60 seconds and then retest.
This process may need to be repeated up to 3 times.
F3
A F3 failure message means the appliance is too cold.
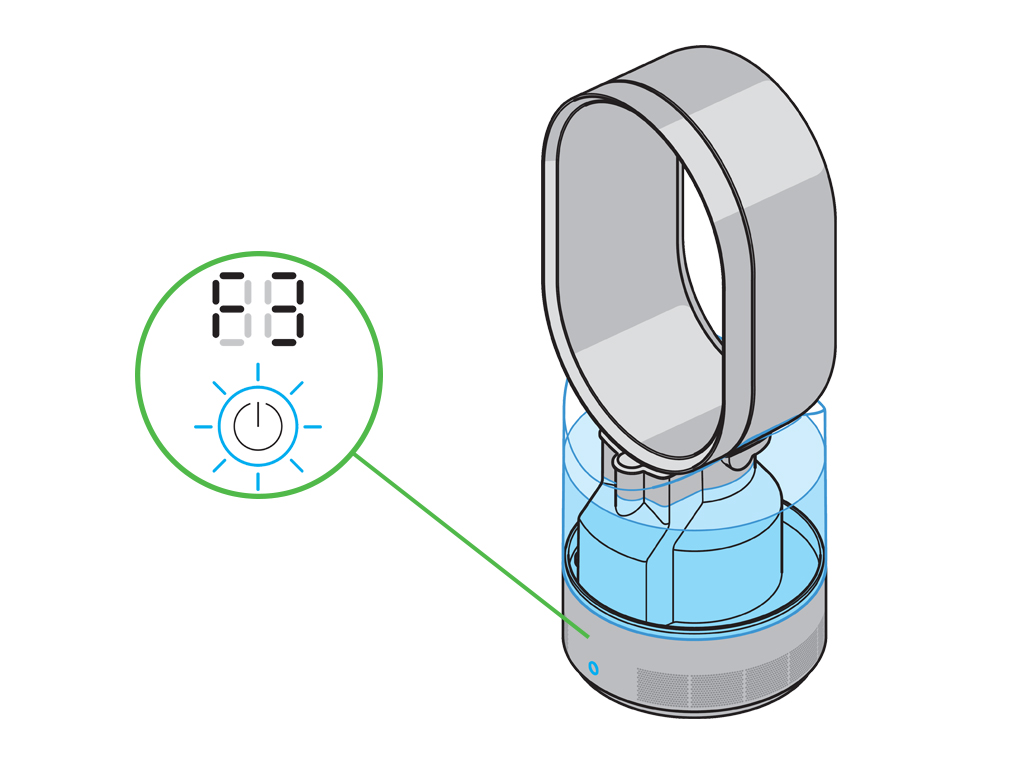
The appliance will operate when it is above 5°C (41°F).
If your machine displays an error code F3, please turn the power off and unplug the machine for 60 seconds.
Increase room temperature to 5°C or above before restarting machine.
Plug the machine back in and retest.
Please repeat this process up to 3 times if your machine continues to display an error code.
F4
Turn off & unplug the machine, leave it for 60 seconds and then retest.

This process may need to be repeated up to 3 times.
F5
Turn off & unplug the machine, leave it for 60 seconds and then retest.

This process may need to be repeated up to 3 times.
Humidifier mode
Adjust the humidity control to 70%.
Adjust the airflow to the lowest setting.
It is easier to see the mist when the machine is in front of a dark background.
If no mist is visible then clear the amplifier of any obstructions.
If the machine is in automatic mode then it may shut off
The appliance selects a comfortable humidity for the room, based on environmental factors such as current humidity level and air temperature.
When the room reaches the appropriate humidity level the appliance will switch itself ‘ON’ or ‘OFF’ as necessary to maintain that level. The fan will remain running when the target humidity has been reached.
Clear the loop amplifier
Remove the loop amplifier and press the button at the front of the loop.
Lift the loop off the machine and pull the amp surround off the loop, one end at a time.

Wipe both parts with a damp cloth.
WARNING: Do not clean any part in a dishwasher.

Reattach the surround and line up the surround with the amp.
Push the surround firmly until it clicks into place.
Turn on and test the machine.
Airflow
Switch off the humidity and set the fan speed to 10.
You will see the fan speed changing on the digital display.
Clean the machine
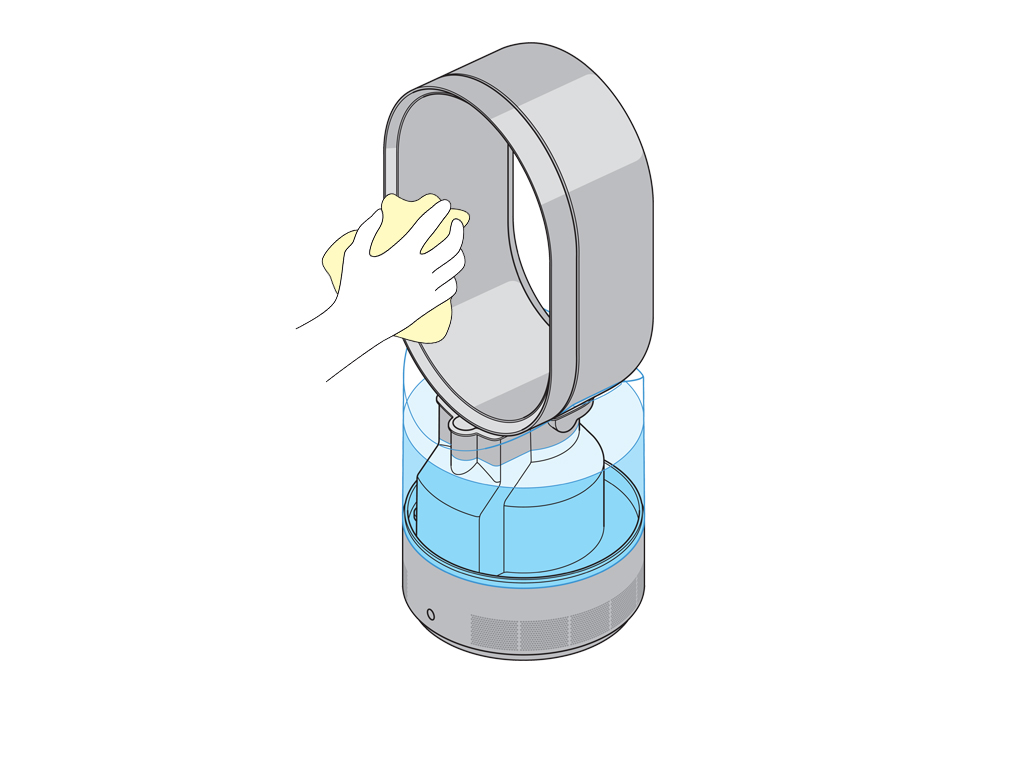
Clean the loop amplifier with a microfiber, lint-free cloth.

Ensure there is no dust or debris blocking the openings.
Clear any dust or debris away from the inlet vents at the base of the machine.
Clear the amplifier
Press the button at the front of the loop amplifier.
Lift the amplifier from the machine.
Pull the amp surround off the loop, one end at a time.
Clear the loop amplifier and surround of blockages as necessary.
Weekly maintenance
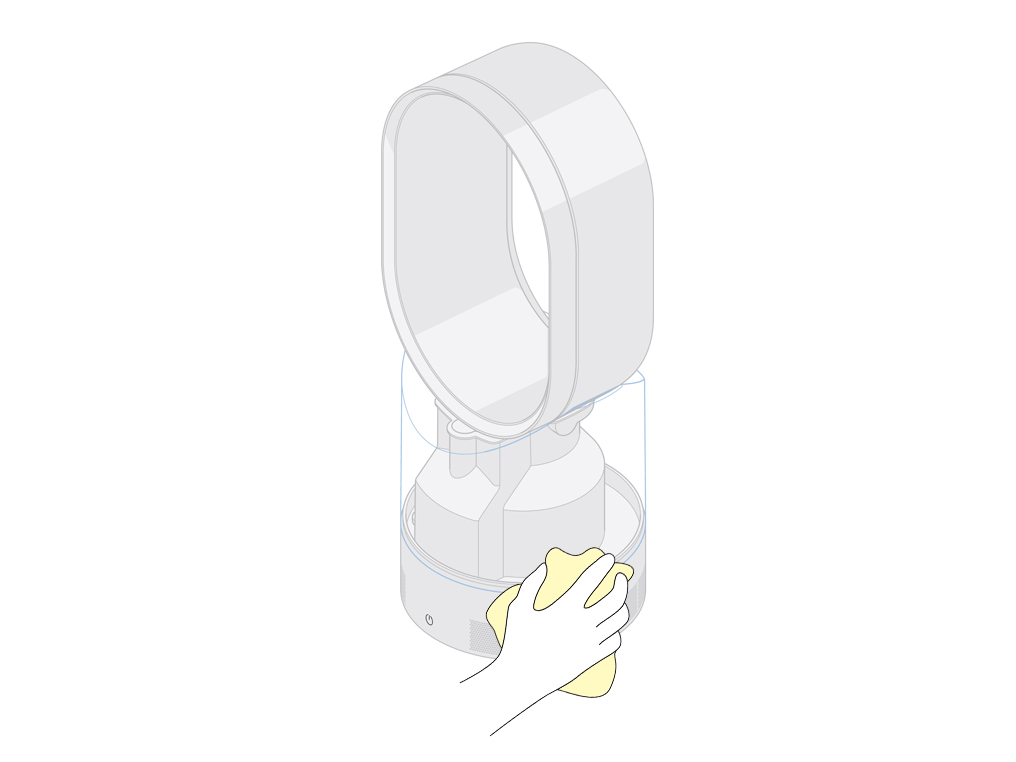
Wipe the loop and inlets:
Wipe over air loop amplifier, paying close attention to the air gaps.
Wipe with a lint-free microfiber cloth.
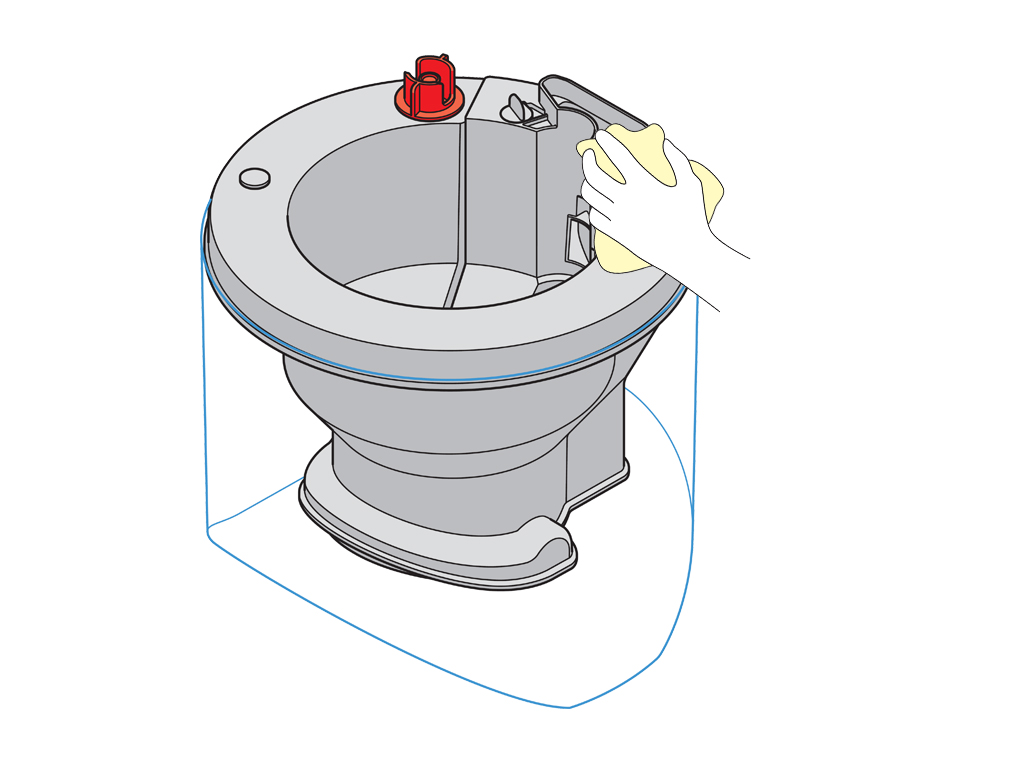
Clean the tank
Empty the water tank.
Rinse and wipe over all surfaces.
Repeat if necessary.
Empty the trough
Tip the contents of the trough into the sink
Wipe away any spillages
Clean the base
WARNING: Do not rinse under the tap or put in the dishwasher.
While not dangerous, care should be taken to avoid water entering the inlets.
Wipe the exterior with a lint free microfiber cloth.
Check the machine
If the power button flashes 3 times when switching on check that the machine has been assembled correctly.
Check that the tank is sat flush onto the Main body, when fitting the loop amplifier make sure that it clicks into place securely.
Please select the appropriate option
Check the electrics
Ensure the machine is plugged in and the socket is switched on.
On the rear of the machine, just beneath where the power cord plugs in is a power indicator light that should illuminate when the machine is plugged in.
Press the ON/OFF button again to start the machine.

If the machine cuts out or will not switch on, please turn it off at the socket and remove the plug.
Wait 10 seconds, plug the machine back in and ensure the socket is switched on.
Press the ON/OFF button again to start the machine.
Has checking the electrics resolved the problem?
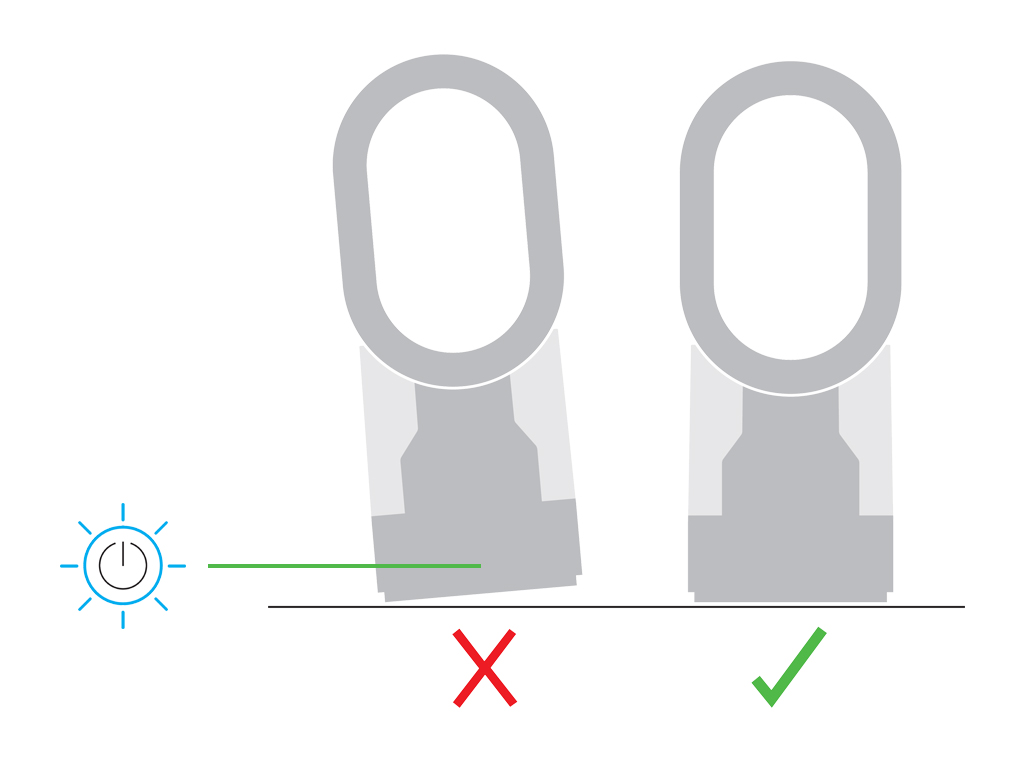
Is the machine tilted?
The machine will not operate if tilted by over 5 degrees and the display will show a 'tilted' graphic.
The blue LED surrounding the Standby ON/OFF button will flash if the base is not level.
Make sure it is on a level surface and clear up any spillage.
The machine will cut out when the humidity target is reached.
Check the tank
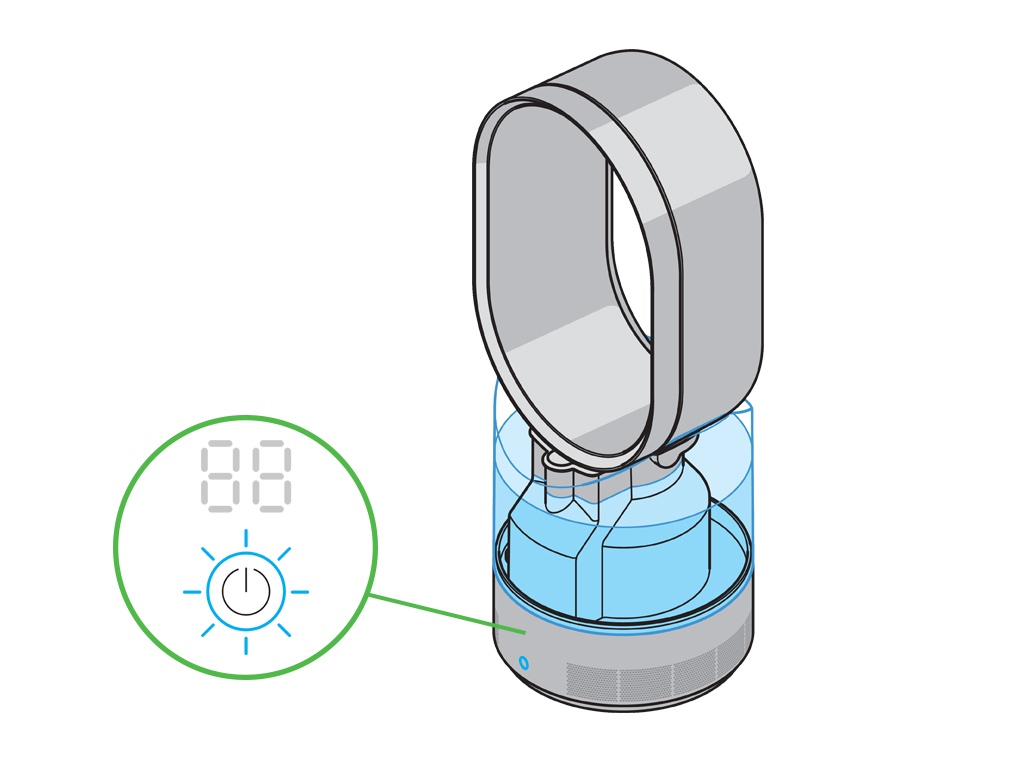
The machine will cut out if the tank is empty.
The blue LED surrounding the Standby ON/OFF button will remain solid as the water level changes.

When the tank is empty, an animation sequence appears.
If the tank is empty, switch off the machine and refill.
Ensure the tank is full.
Has checking the water and float resolved the problem?
Refill the tank
Turn the machine off.
Unplug the appliance and push the button to unlock.
Lift the loop amplifier away from the tank.
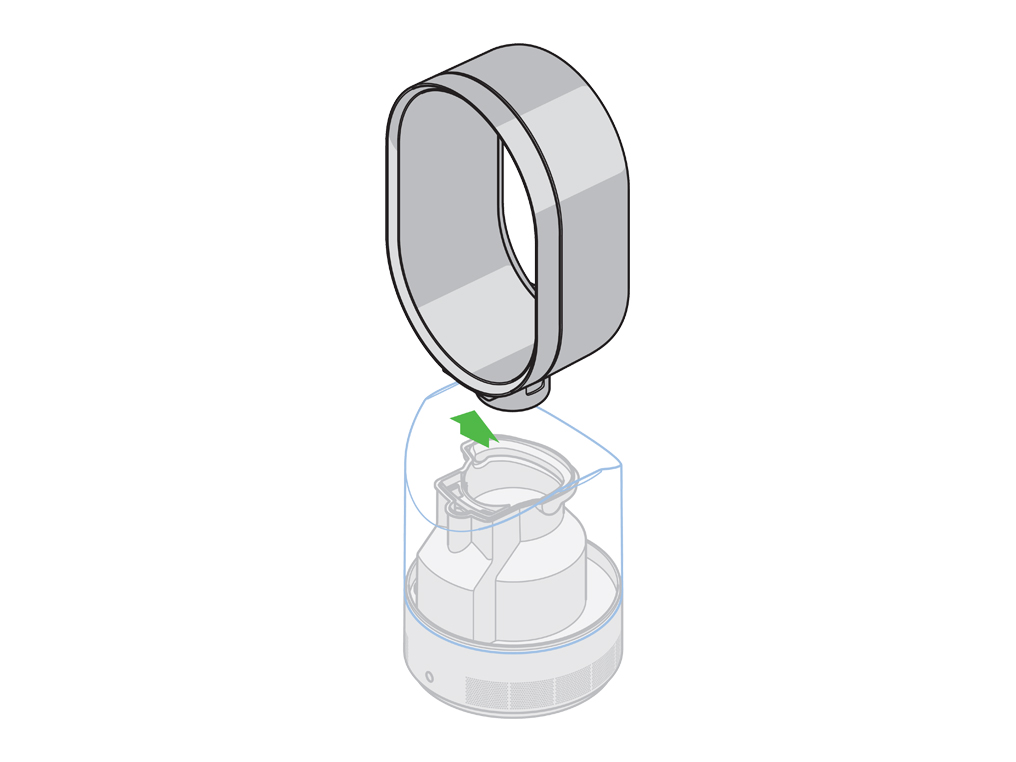
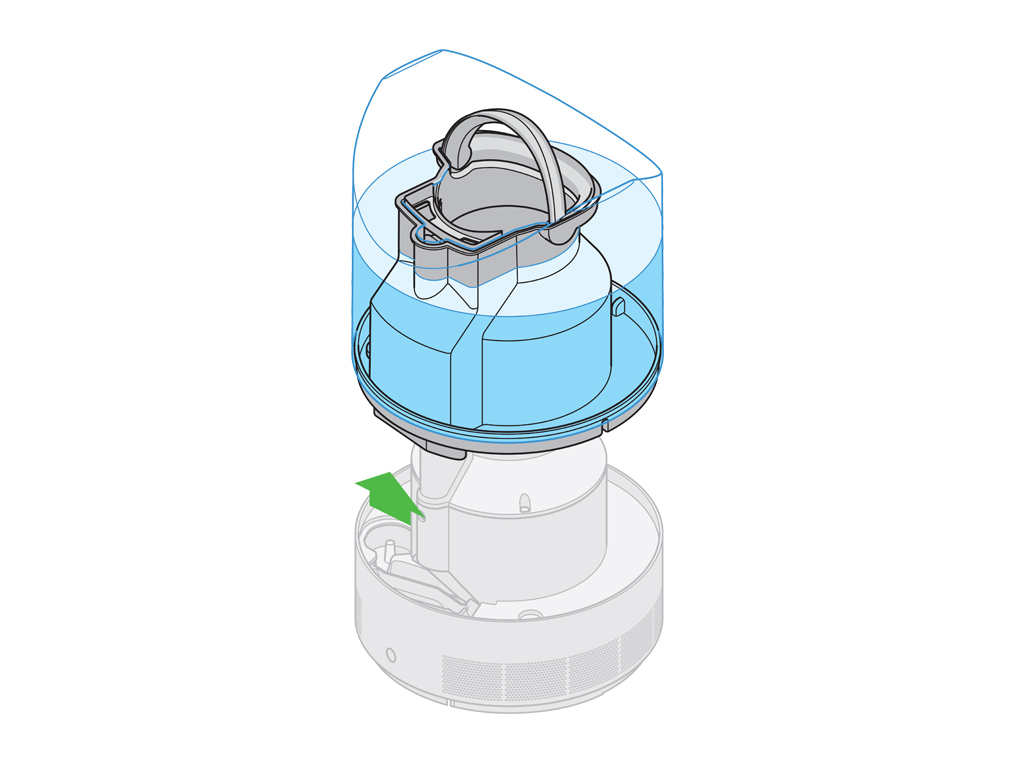
Lift the tank away from the base.
Remove the cap and fill the tank (no other part) to the top with cold tap water.
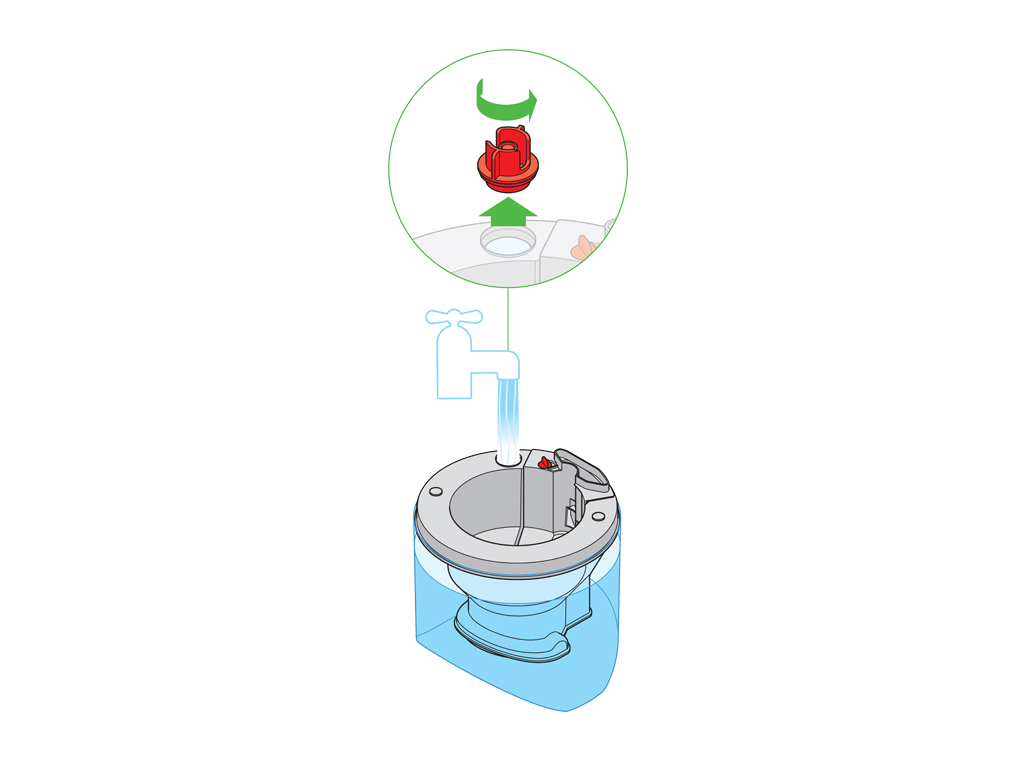
Replace the cap.
Replace the tank and ensure it is fitted flush.
When replacing the loop ensure it 'clicks' into place securely.
Use the handle for easier handling.
Please be aware that water drips may be present on the underside of the tank when removed. If the power button on the machine flashes three times this may indicate that the machine has been reassembled incorrectly.
Please follow the next step.
Do not use alcohol and strong acid mixes, solvent (acetone) and oil based products, alkali bleach mixes, air fresheners, aroma oils, scented oils, hot water, brushes or abrasive materials on any part of the machine. This will invalidate the warranty.
Weekly maintenance
Weekly maintenance
Wipe the loop and inlets:
Wipe over air loop amplifier, paying close attention to the air gaps.
Wipe with a lint-free microfiber cloth.
Clean the tank
Empty the water tank.
Rinse and wipe over all surfaces.
Repeat if necessary.
Empty the trough
Tip the contents of the trough into the sink
Wipe away any spillages
Clean the base
WARNING: Do not rinse under the tap or put in the dishwasher.
While not dangerous, care should be taken to avoid water entering the inlets.
Wipe the exterior with a lint free microfiber cloth.
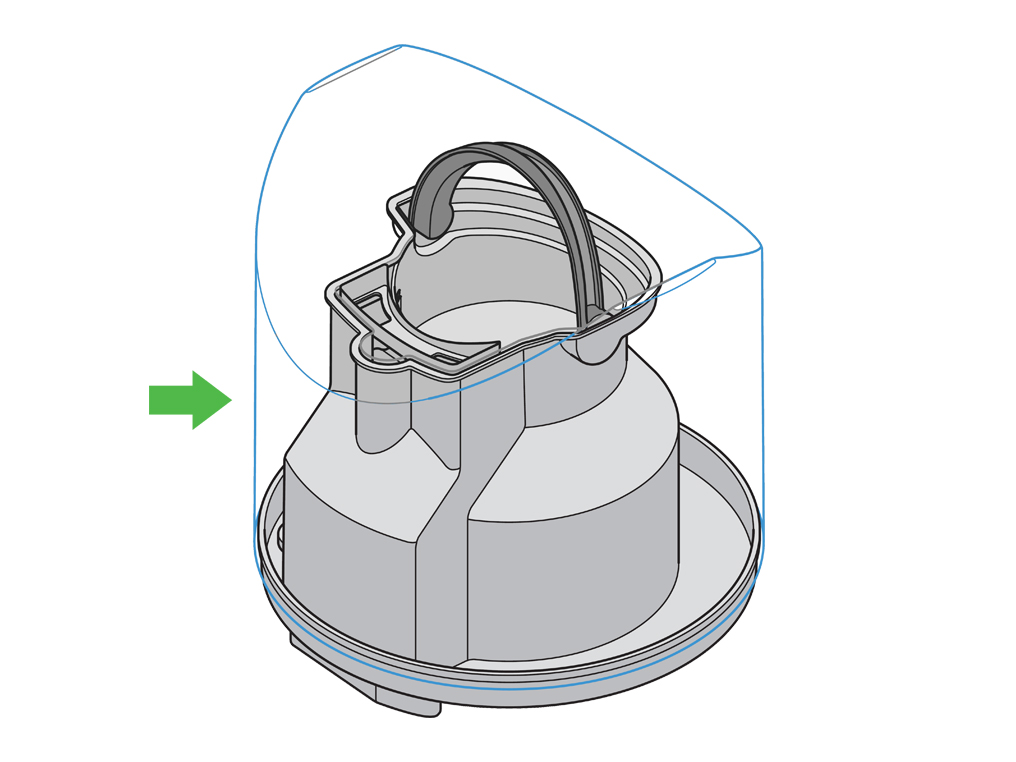
Remove the tank
Remove the tank from the Main body.
With the tank removed, fit the loop amplifier onto the Main body.


Water in the tank
The AM10 will display the 'Empty' light sequence when there is still a small amount of water in the tank.

Empty the tank
Empty the tank and turn it upside down.
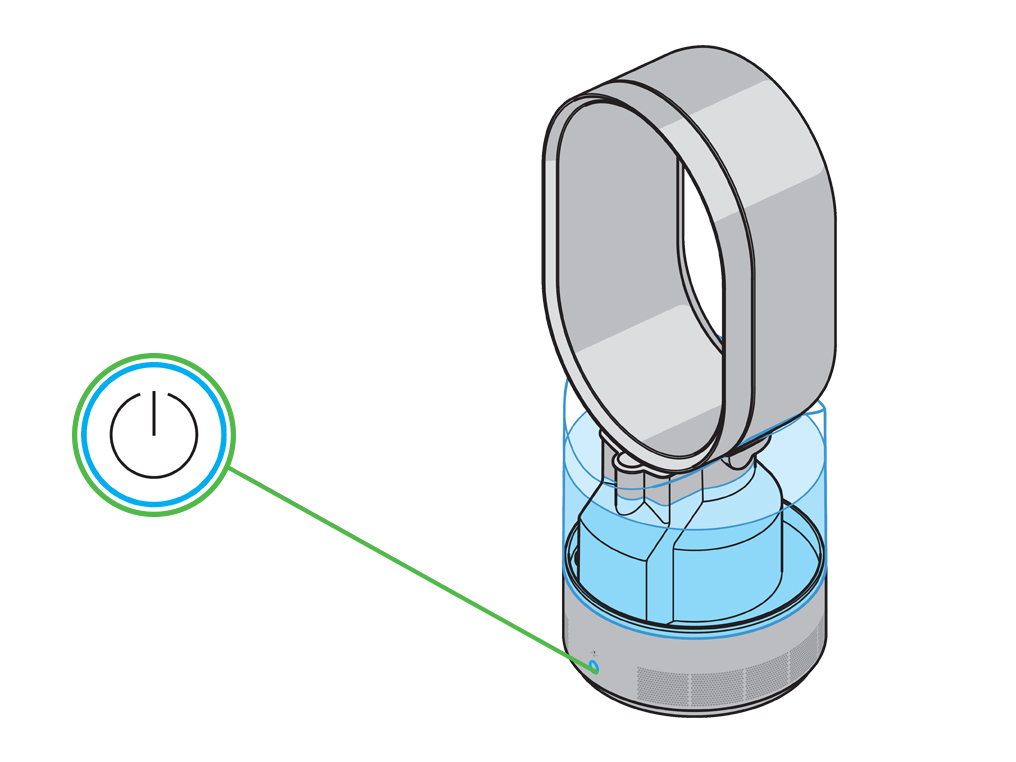
ON/OFF button
3 flashes - Check that the machine has been assembled correctly
Solid blue - The machine is running in humidity mode
Solid white - The machine is running in fan mode
Water treatment procedure
When the machine is switched on, a 3 minute water treatment cycle begins
The blue LED surrounding the Standby ON/OFF button will remain solid throughout the water treatment cycle.
Once the animation stops, the machine is ready to begin humidification
Water level
The blue LED surrounding the Standby ON/OFF button will remain solid as the water level changes
When the tank is empty the LCD will display the animation shown
If the tank is empty, switch ‘OFF’ the machine and refill
Tilt indicator
The blue LED surrounding the Standby ON/OFF button will flash if the base is not level
When the machine is tilted by over 5° the display will show a ‘tilted’ graphic
If the machine has been tilted make sure it is level and clear up any spillage
Is there anything else we can help with?
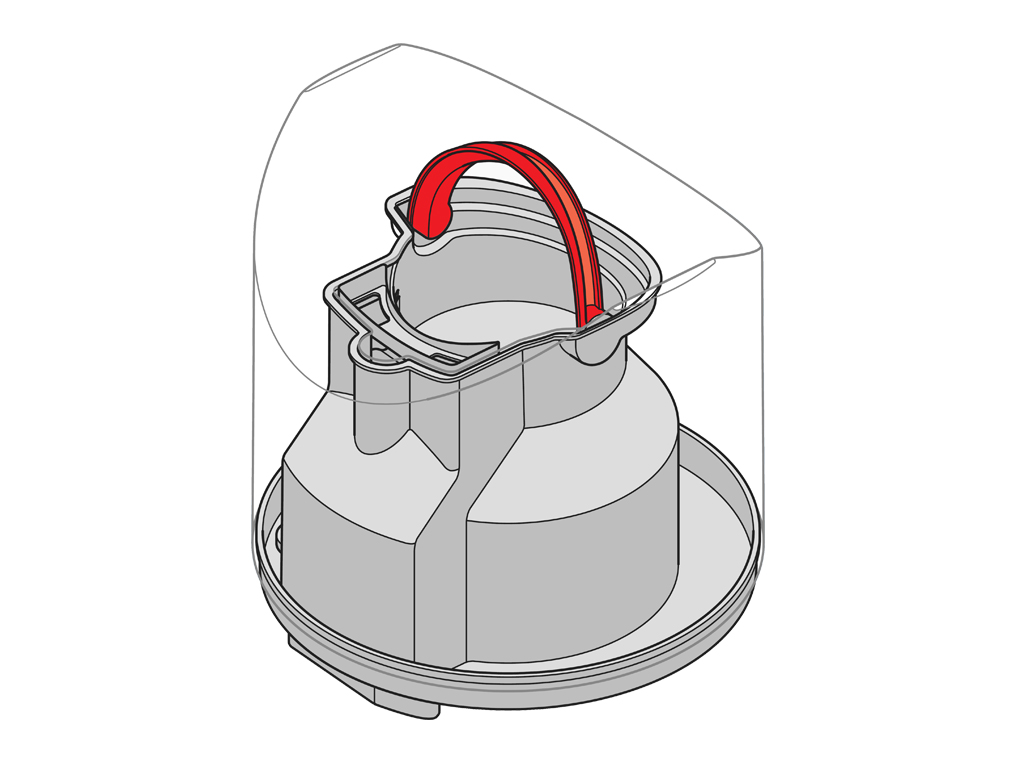
Check inner chimney and seals
Check that the inner chimney is located correctly and the seals are located in the correct location.
Ensure that the product is on a level surface.

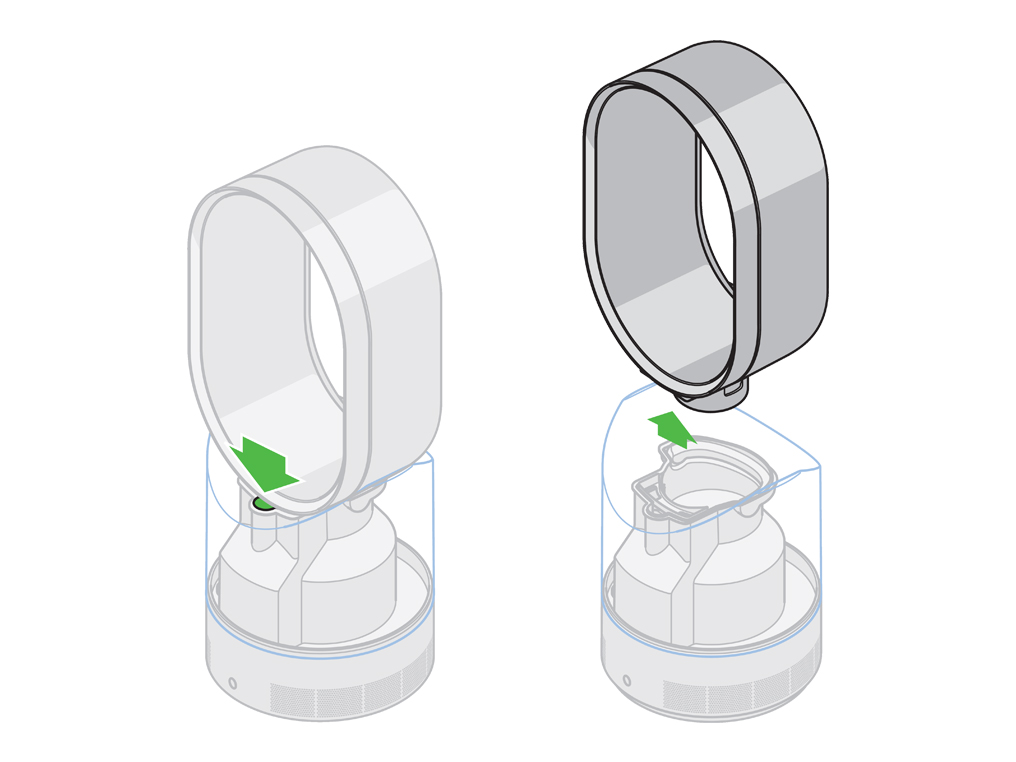
Clear the loop amplifier
Ensure the machine is in humidifier mode, if no mist is visible then clear the amplifier of any obstructions.
Remove the loop amplifier
Press the button at the front of the Loop
Lift the Loop off the machine
Pull the amp surround off the loop, one end at a time.
Wipe both parts with a damp cloth
WARNING: Do not clean any part in the dishwasher.
Reattach the surround
Line up the surround with the amp
Push the surround firmly until it clicks into place
Turn on and test the machine
Adjust the humidity control to 70%.
Adjust the airflow to the lowest setting.
It is easier to see the mist when the machine is in front of a dark background.
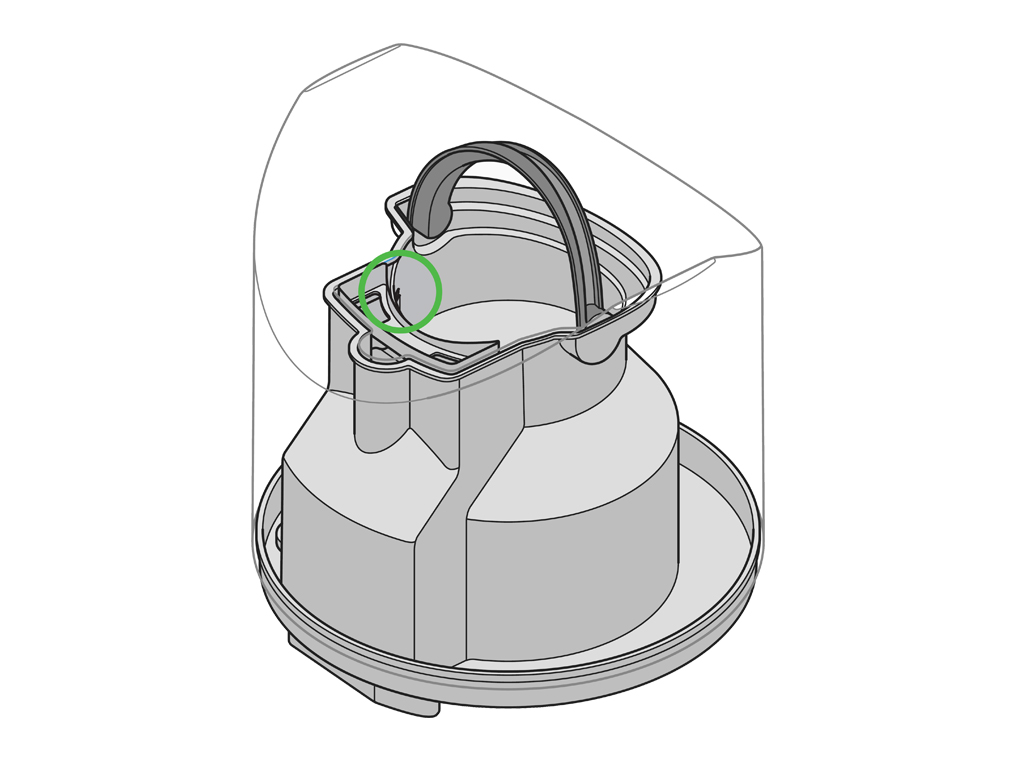
If this fault persists remove the loop and ensure that the seal is free to move up and down before re-engaging. Sealing can be aided by applying a thin film of water over the seal.
Test the Main body controls
Test the controls on the Main body of the machine.
Press the button to turn the machine on or off.
Press and hold the button to adjust the humidity.
The airspeed cannot be adjusted using the controls on the machine.
Main body controls
Press the button to turn the machine on or off.
Press and hold the button to adjust the humidity.
The airspeed and timer functions cannot be adjusted using the controls on the machine.
Empty the tank
Remove the loop amplifier:
Push the button to unlock the loop amplifier
Lift the loop away from the tank
Lift the tank away from the base.
Carefully empty the water from the trough in the base and undo the red cap on the underside of the tank and pour away the water.
Replace the cap.
Replace the tank and ensure it is fitted flush.
When replacing the loop ensure it 'clicks' into place securely.
Some water may be present on the underside of the tank as it is removed.
Is there anything else we can help with?
Know your humidifier
Remote control
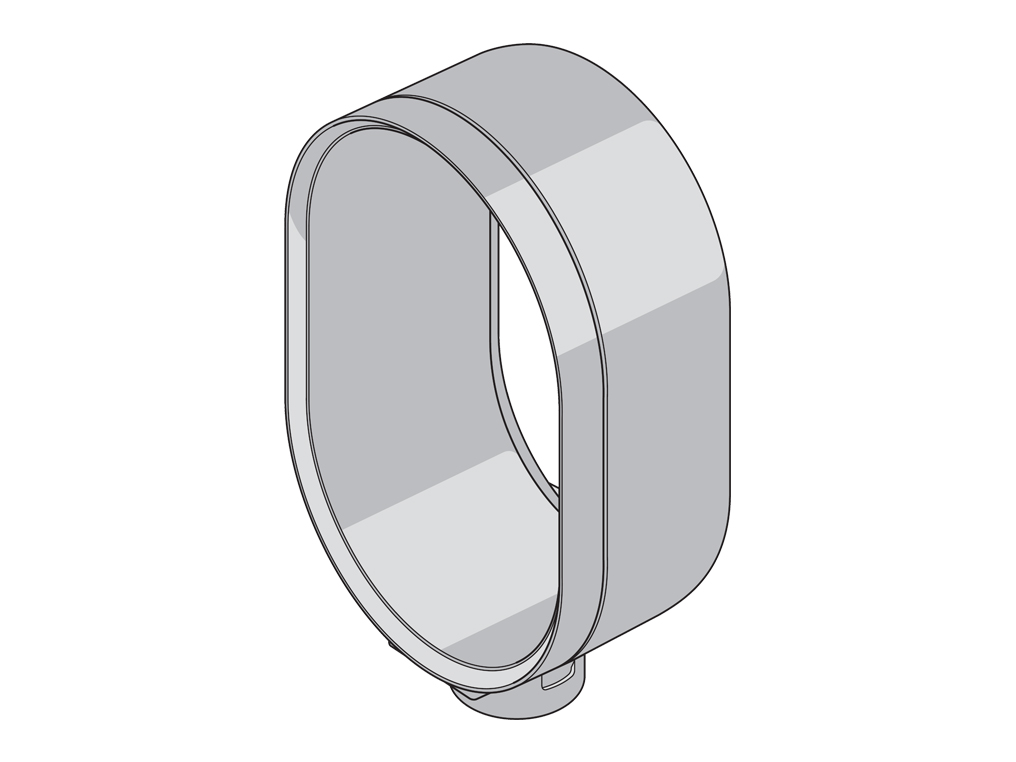
Loop amplifier.
Power cord.

Handle.
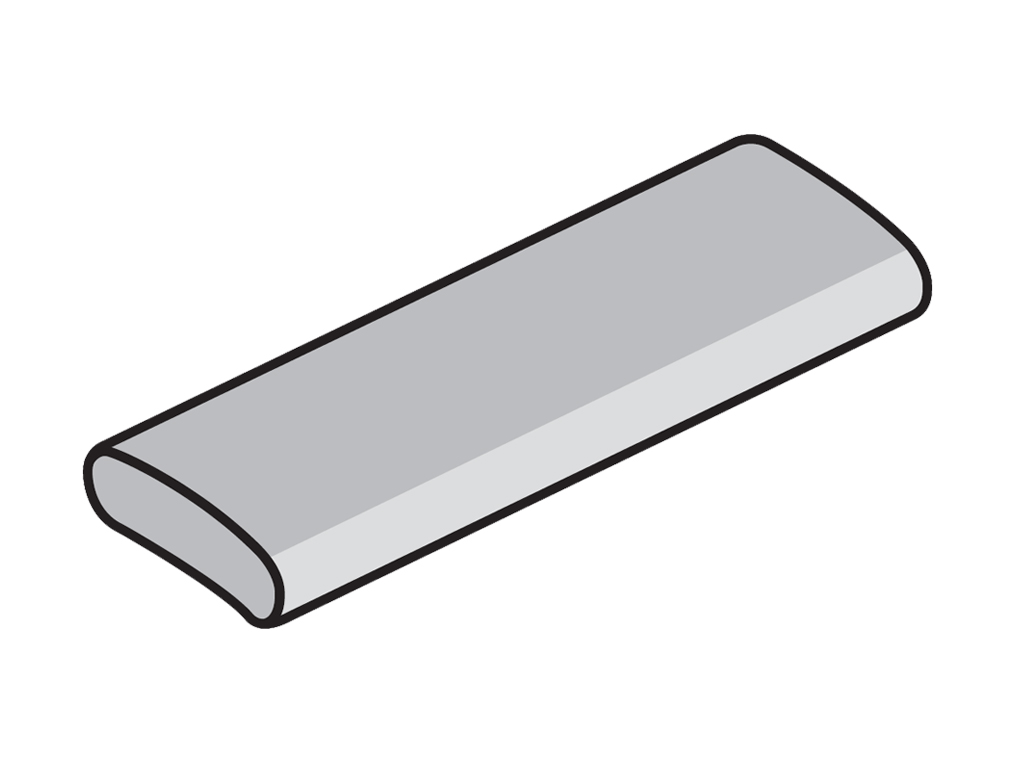
Seal.
Water tank.
Water tank plug.
Tank chimney.

Loop release button.
Main body.

UV-C emitter.

Piezo.

LED display.
ON/OFF button.

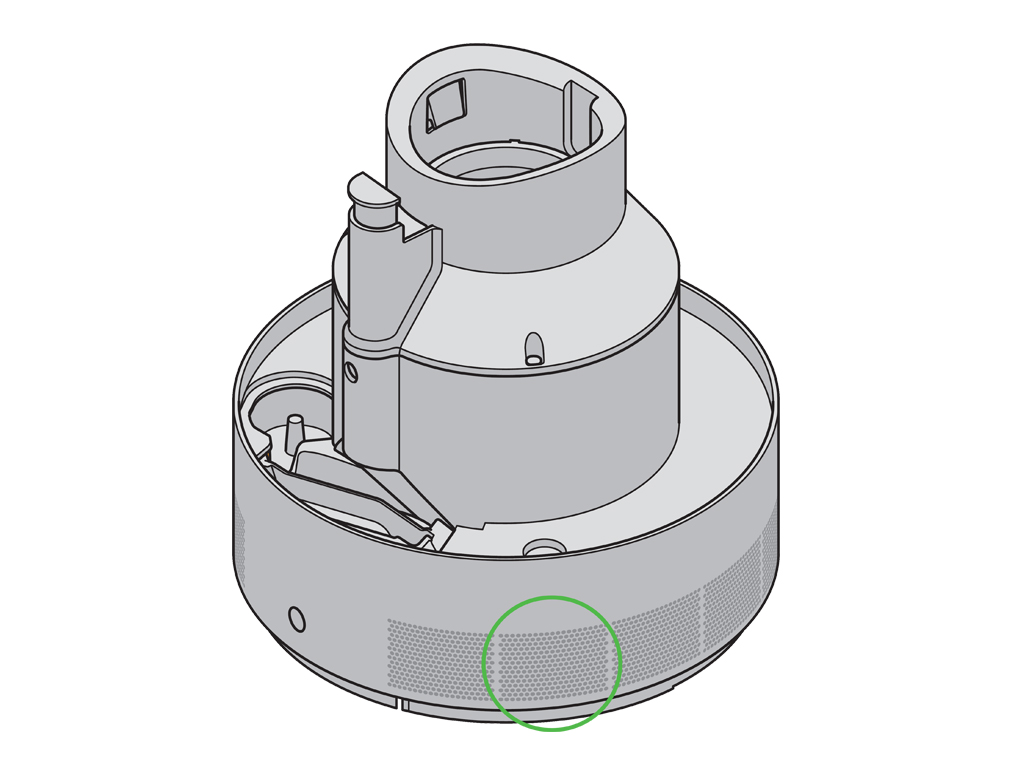
Air inlet.
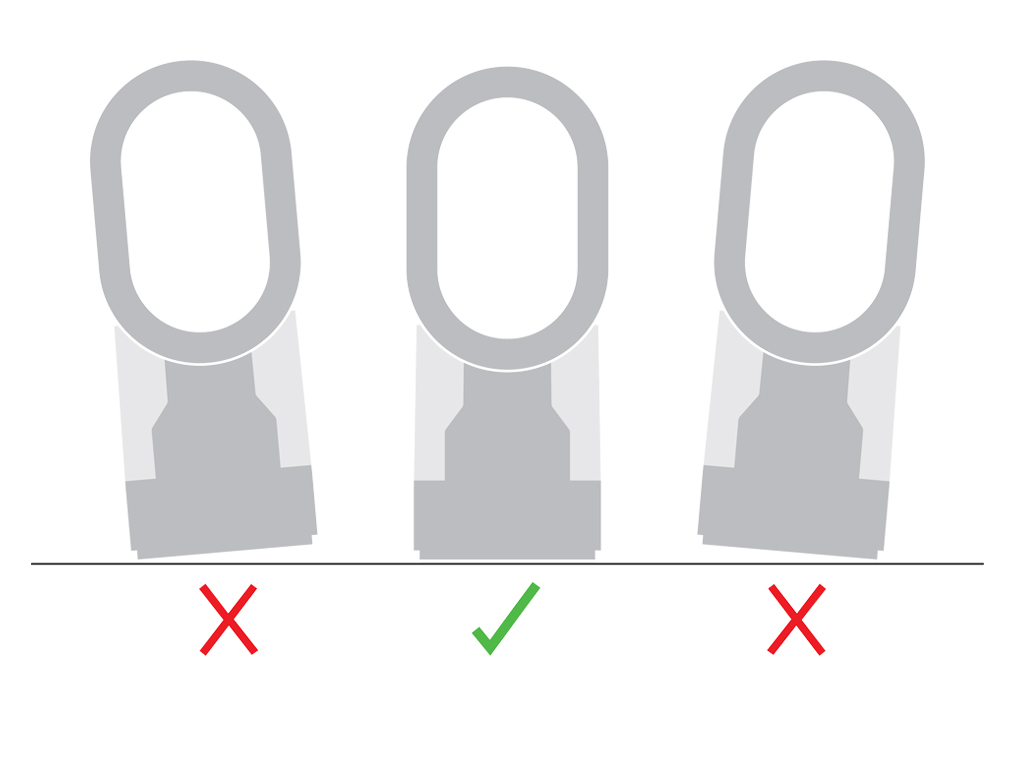
Positioning machine
When carrying, ensure the machine is level and do not lift by the loop amplifier.
Always place the machine on a firm, flat, level surface, otherwise the machine will not operate.
It is recommended that a waterproof mat or pad is placed under the machine.
WARNING: Do not place the machine in an area where it is accessible to children.
If the machine is tilted, the blue LED surrounding the Standby ON/OFF button will flash if the base is not level.
When the machine is tilted by over 5° the display will show a 'tilted' graphic.
If the machine has been tilted ensure it is level and to clear up any spillage. If the machine is not levelled after 15 minute, it will switch 'OFF'.
Is there anything else we can help with?
Where to position your machine
For the best performance, place on the floor, in the corner of the room, at least 1m from any wall and facing into the center of the room.
Always place the machine on a firm, flat, level surface, otherwise the machine will not operate.
Consider placing near to air conditioning or heating devices to circulate air effectively.
Do not place the machine underneath overhanging surfaces.
To avoid a cooling effect while humidifying, the unit should be at least 1m from any people.
WARNING: Do not place the machine on a rug, carpet, wooden flooring, or any other surface that may be damaged by exposure to water or moisture. Do not place the machine in an area where it is accessible to children.
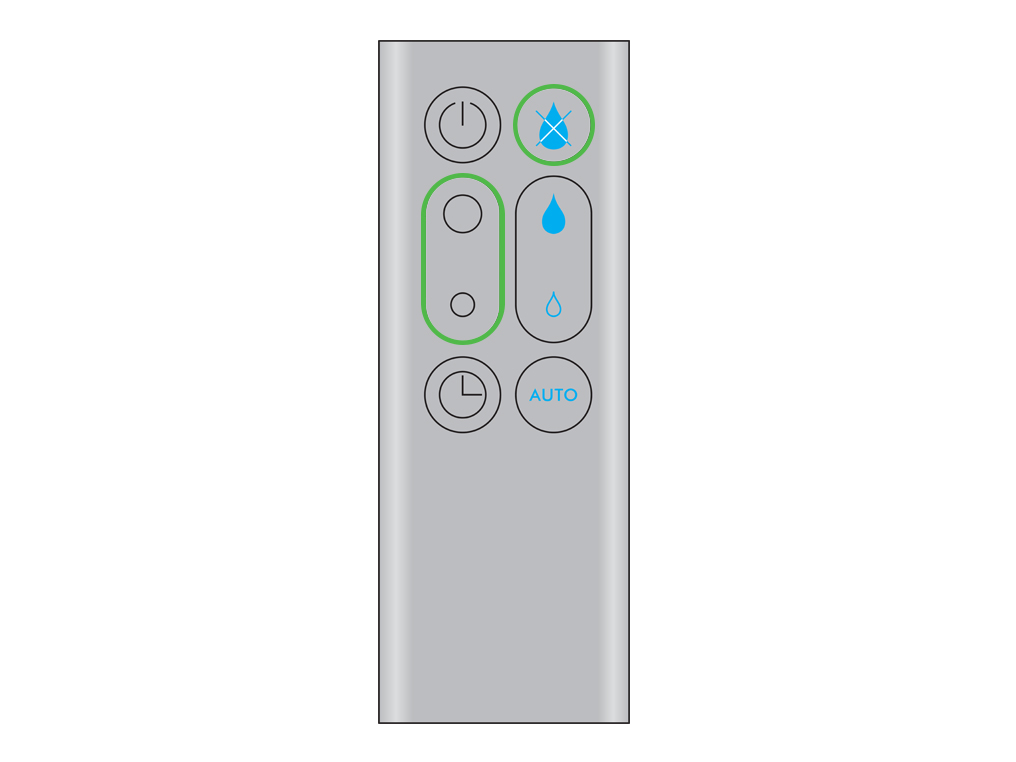
Using the remote control
On/Off
Fan only mode
Airspeed control
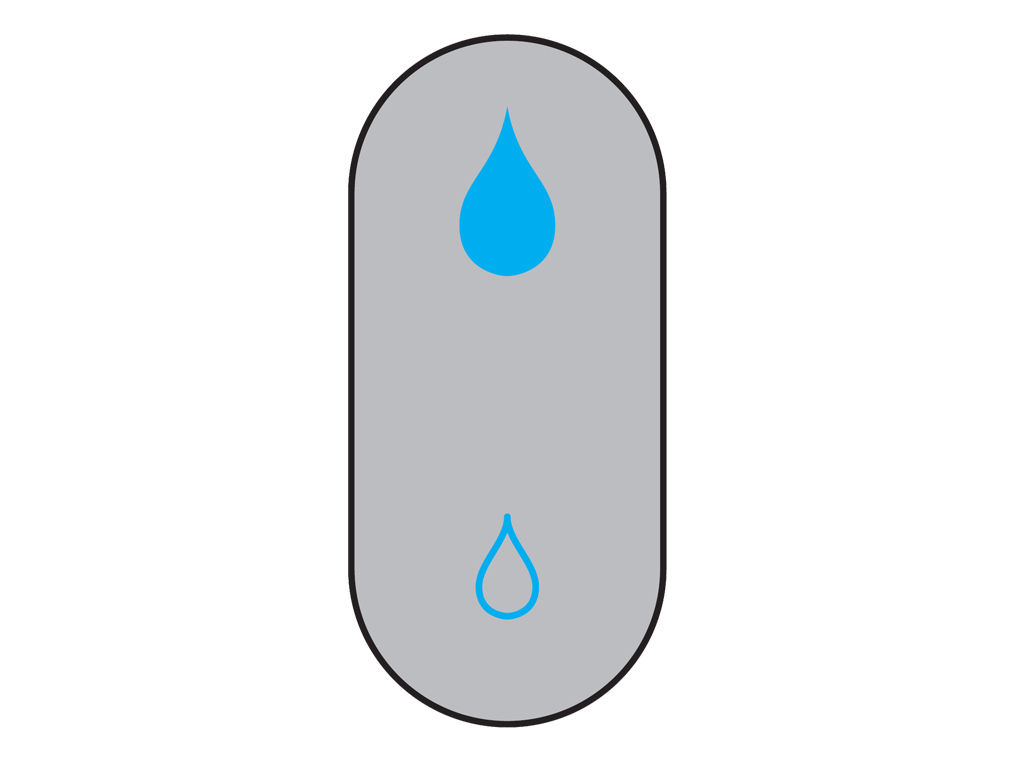
Manual humidity level control
Sleep timer
Automatic humidity mode
Aim the remote at the base of the machine.
Please select the appropriate option
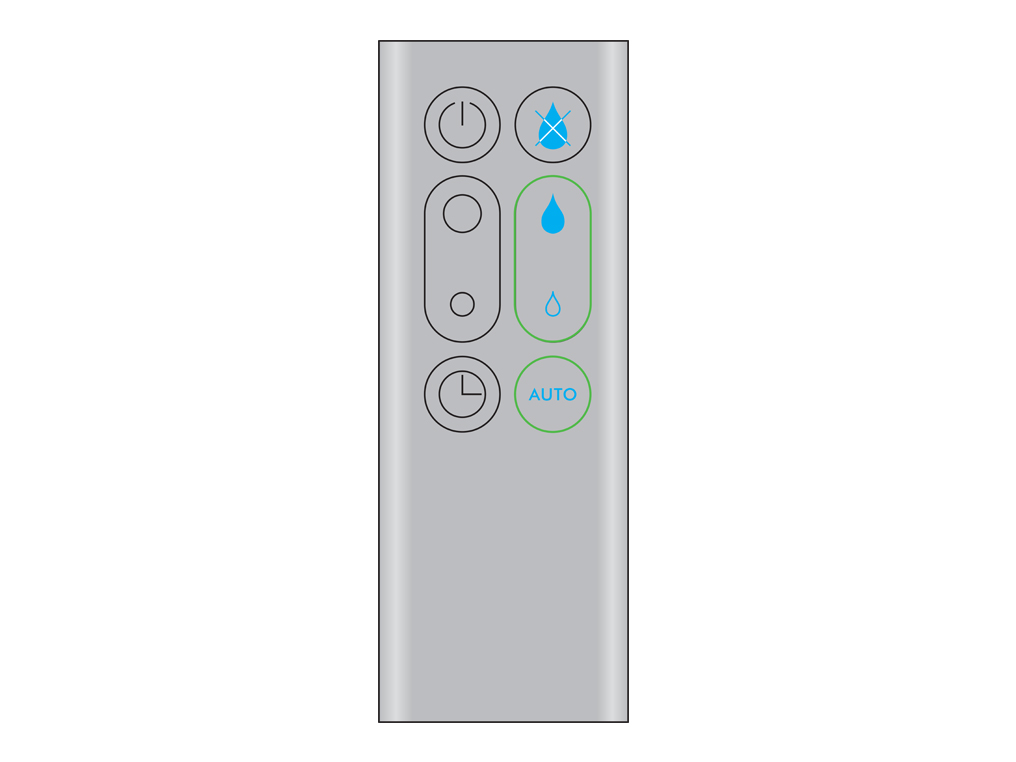
Adjust the humidity
The AM10 can automatically adjust to the optimal humidity based on environmental conditions of the surrounding area.
The machine will switch on and off as necessary to maintain the optimal humidity level.
Press the 'Auto' button on the remote to start this mode.
You can also manually set the target humidity (between 30% and 70%) via the remote. The machine will then turn itself on and off automatically to maintain the target humidity.
Adjust the airflow
Adjust the airflow between 1 and 10 using the remote.
The selected level is displayed on the front of the machine for 3 seconds after it is set.
While using the machine in fan mode, the airflow can still be adjusted without water in the tank. Press the fan only button to turn off the humidification function.
Set the sleep timer
To set the sleep timer, press the clock button on the remote until the desired time is displayed on the machine (15 minutes to 9 hours).

When the time reaches zero, the appliance will go into standby mode. To cancel the timer, press the button again until two dashes appear.
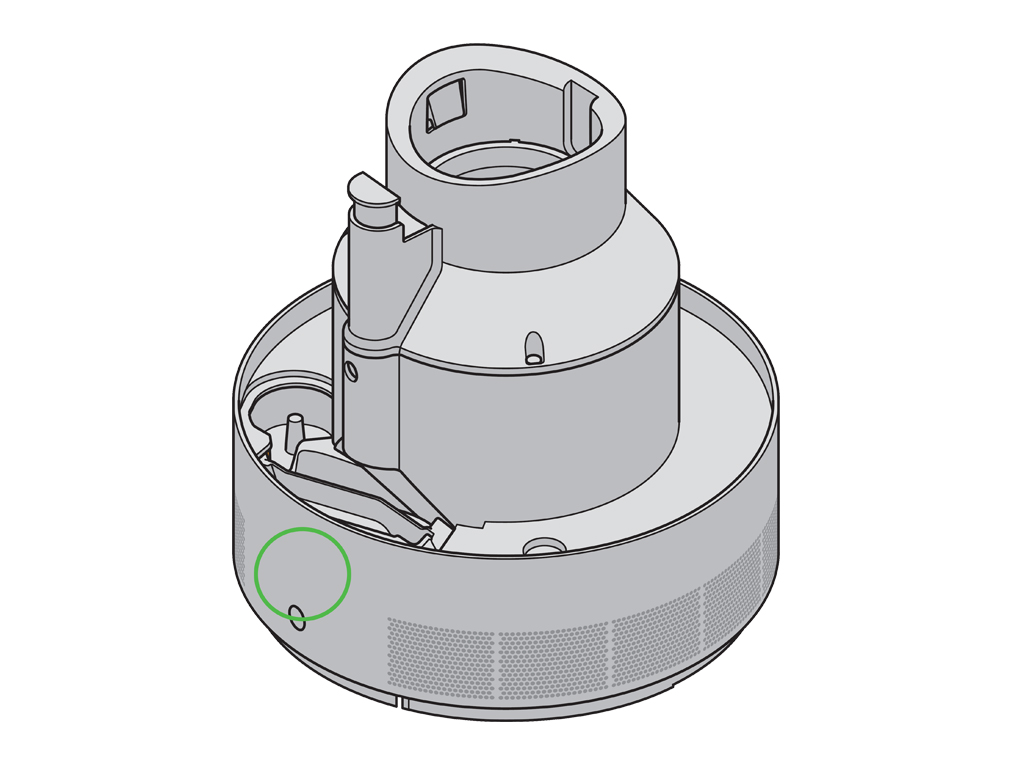
Serial number location
Ensure all the water has been emptied from the machine before checking for the serial number.
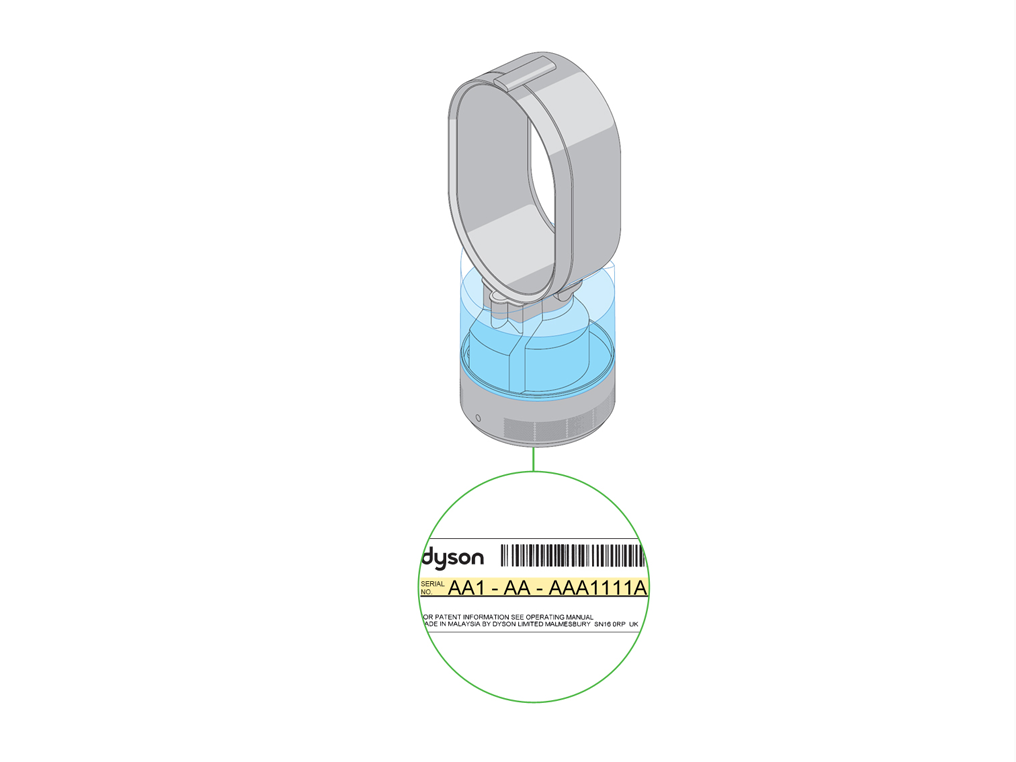
The serial number can be found on the base of the machine.

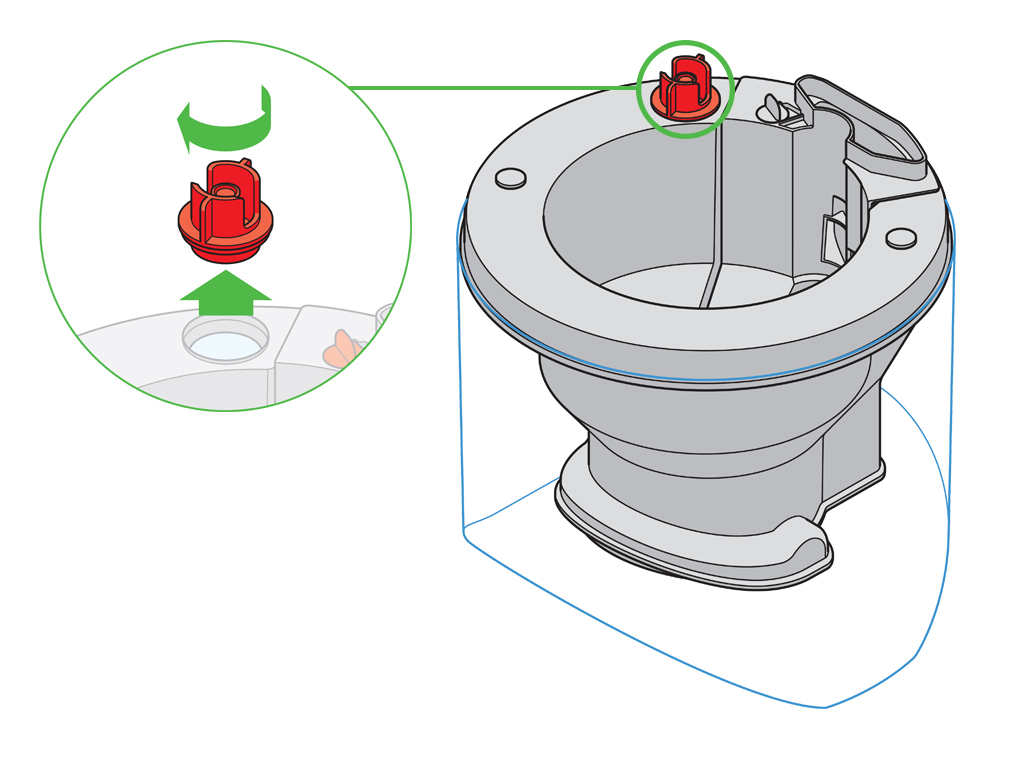
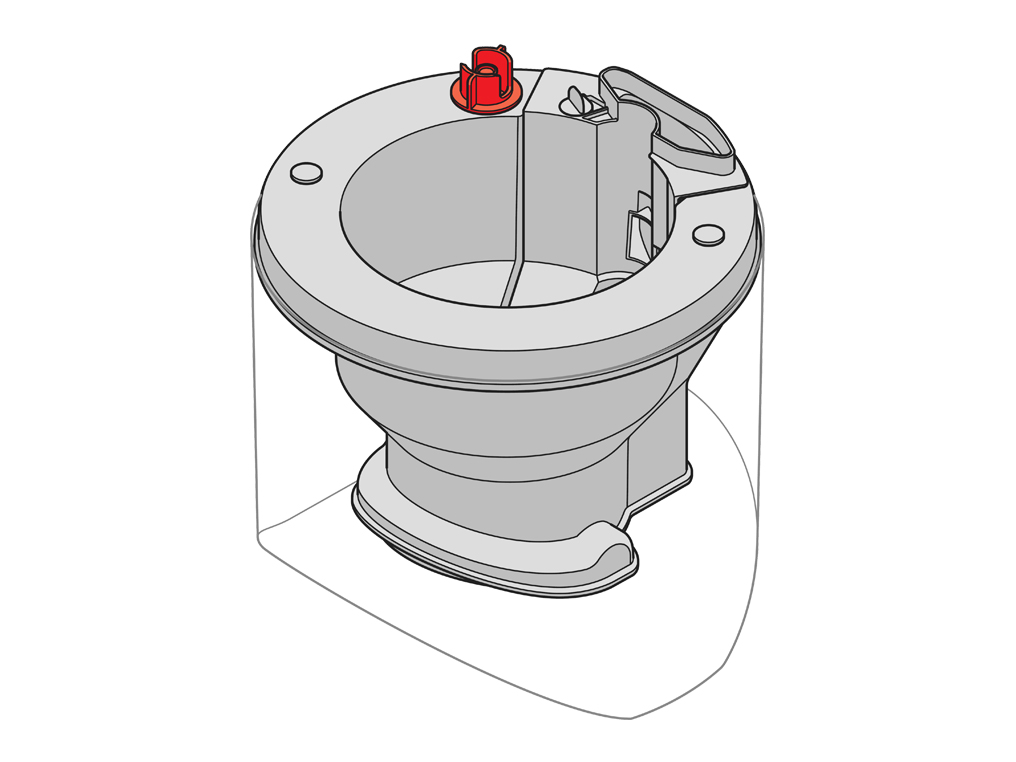
Replacing the Piezo
Parts of the machine may become hot during operation. Switch off and unplug the machine for 10 minutes before replacing the piezo.
Remove the loop amplifier
- Press the button at the base of the loop
- Lift the loop off the tank
- Lift the tank of the base

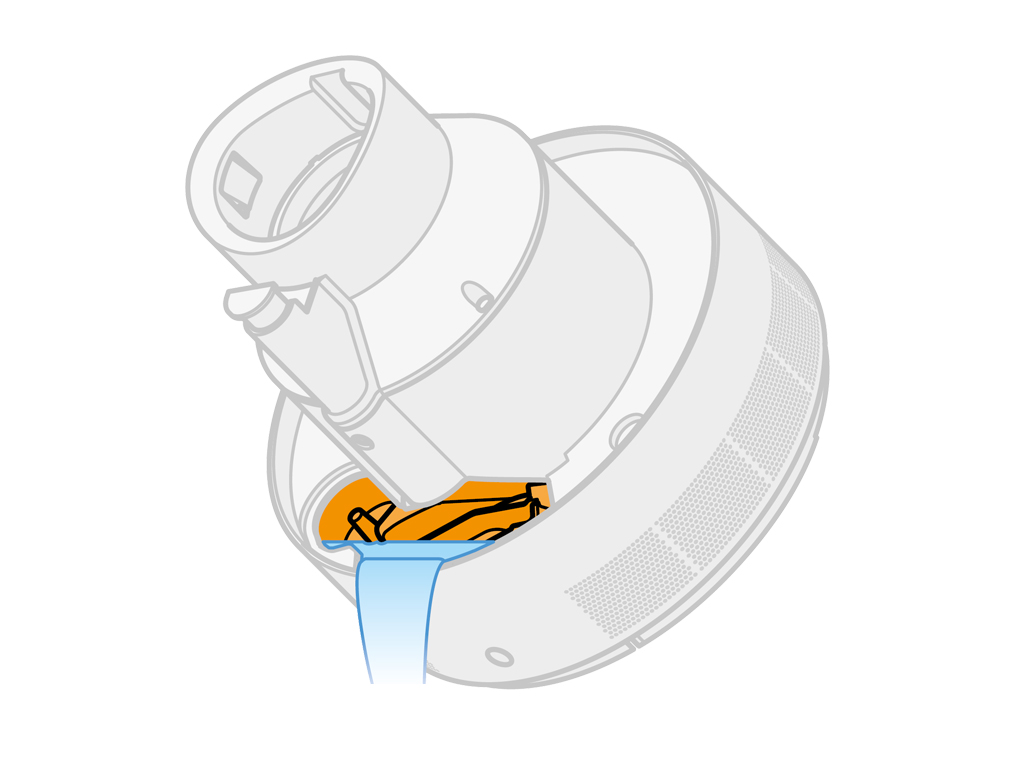
Tip any water out of the base.
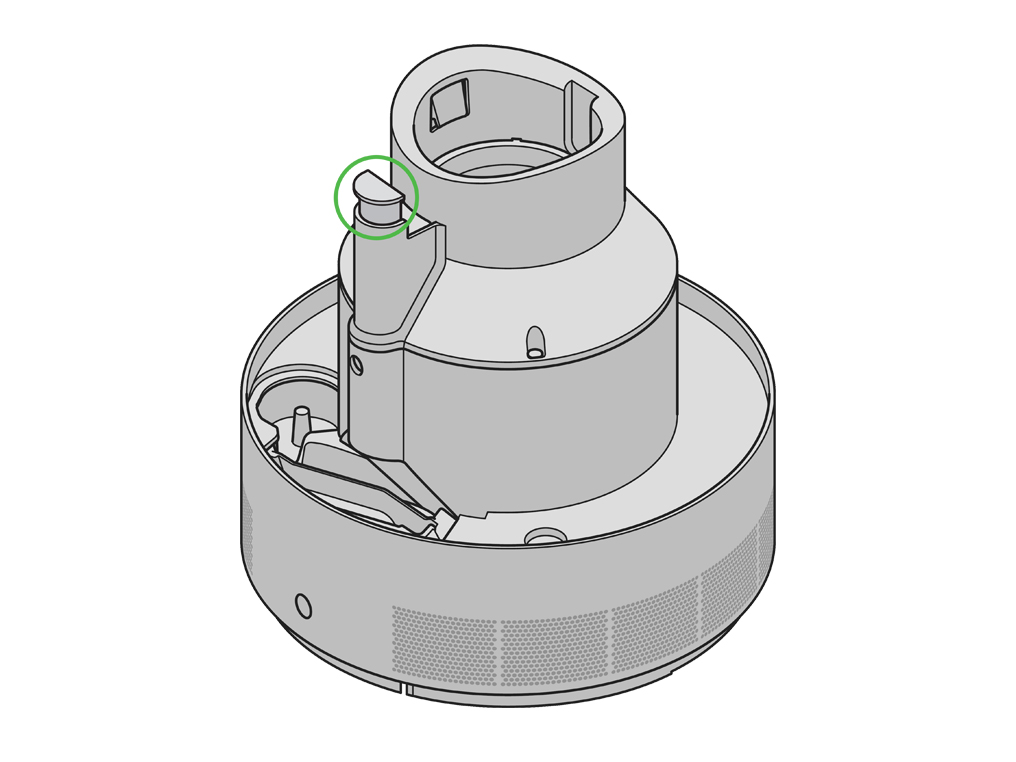
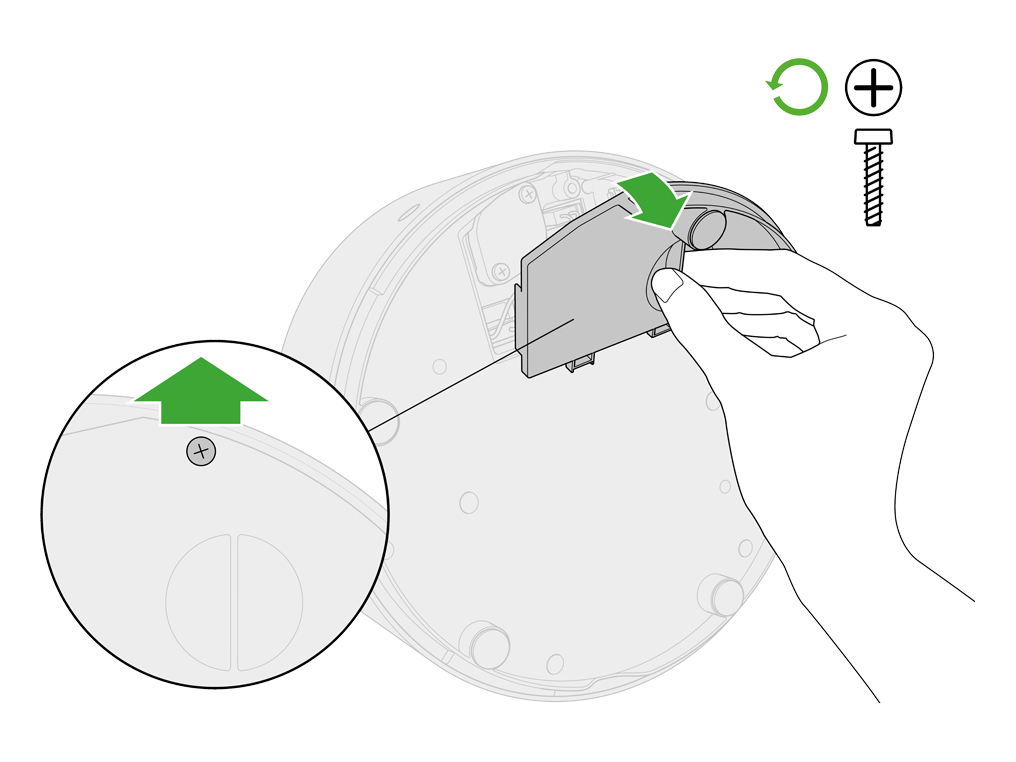
Remove the cover
Undo the screw with a Phillips screwdriver.
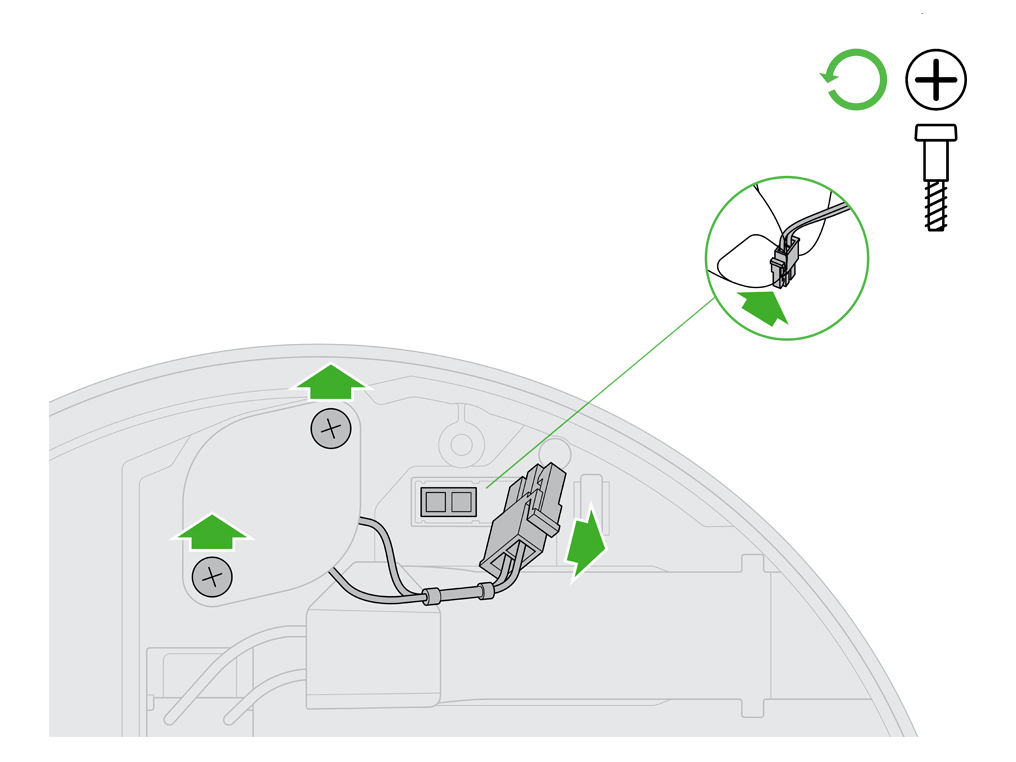
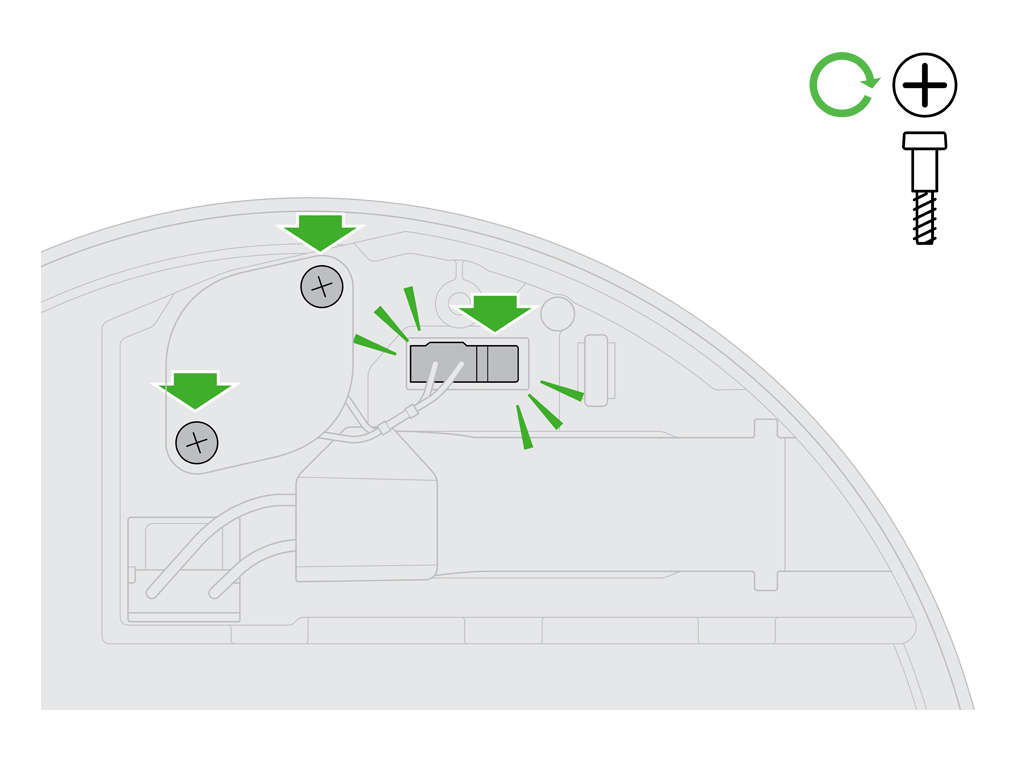
Remove the Piezo
- Press the catch on the wire connector
- Gently remove the connector from its socket
- Undo the two screws with a Phillips screwdriver and remove the piezo
Fit the new Piezo
Reverse step 4 to attach the new piezo.
Reassemble the machine


Further help
Dyson Humidifier (Iron/Blue)